Clifford Concept 10 Owners Guide - Page 3
Standard, Features, Concept
 |
View all Clifford Concept 10 manuals
Add to My Manuals
Save this manual to your list of manuals |
Page 3 highlights
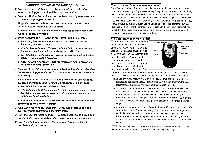
Standard Features of the Concept 10 (cont.) 2 Patented Smart AutoTestingrm - Automatically tests all system sensors and triggers, and identifies any malfunction. • Patented Malfunction AutoBypassw - Automatically bypasses any malfunctioning trigger or sensor. w Magnetic Resonance Sensor - Utilizes magnetic flux to detect intrusion related vibrations and impacts. • TotalRecaltm - Non-volatile memory stores the identity of the last trigger or sensor activated. w Smart AutoArmingTm - Automatically arms itself if you forget. ■ AutoArming Enable/Disable - Allows you to enable or disable the AutoArming features any time. ■ Visual Acknowledgment - Visually confirms initiation of the 30-second AutoArming countdown with two flashes of the parking lights. ■ User-Selectable AutoArm & Lock - Allows you to select whether the doors will lock when the system AutoArms. ■ Instant AutoArming Bypass', - Lets youtemporarily turn off AutoArming with Just a turn of the ignition key. 2 Patented Smart Prior Intrusion Attempt Alert - Specifically identifies the sensor or trigger activated by an attempted intrusion while you were away. 2 High-Output insignia,m Siren - Designed exclusively by Clifford for greater performance and 10 times the reliability of other sirens. ■ User-Selectable 30/60 second siren duration. ■ Patented Automatic Noise Abatement - Limits alarm sounding to no more than 5 siren duration cycles to prevent battery drain and towing of the vehicle due to noise pollution. fa Fault-Proof Starter Interrupt - Prevents an intruder from starting the engine while the system is armed. • High-Luminescence LED Indicator - Adds visual deterrence and provides visual confirmation of system status. Full-Time Remote Panic Feature - Remotely activate the siren and parking lights inside or outside the vehicle, or even while driving. w User-Friendly Programming - You can alter feature settings to precisely suit your needs. 3 Your 4-button/l2-channel remote controls The 4-button/12-channel remote control is an ultra-sophisticated miniature radio transmitter powered by a tiny 12-volt battery. Range is up to 100 feet. Obstructions, electrical interference, weather conditions or a weak battery will reduce the range. Your 4-button/l2-channel remote control is the key to your Concept 10. ft incorporates Clifford's proprietary Anti-CodeGrabbingTM (ACG) technology with Random Code Generation for the ultimate in protection against thieves "code-grabbing" devices (see page 6). You'll use the remote control to ann and disarm the system, lock and unlock the doors, activate the system's panic feature and command options such as a remote trunk release and remote engine starter. How to use your keychain remote control Your remote control can command up to 12 different system functions and options. It's like having a TV with 12 channels. You change channels (functions) with your keychain remote. But LED indicator Button 4 Button 3 Button 1 -LevelShift button Button 2 instead of putting 12 buttons on the remote, we made it easy: First, the button you use the most - button 1 to arm, disarm,lock and unlock - is • larger than the others. Buttons 2,3 and 4 are the smaller buttons to the right, be ow and left of button 1. The LevelShift button on the side permits you to select channels 5-12 with the same four buttons. ■ To transmit either channel 7, 2, 3 or 4: Just press either button 1,2,3 or 4. For instance, to transmit channel 3, press button 3. While you transmit, the LED indicator will blink once every second: this indicates level 1. ■ To transmit either chonnel 5, 6, 7 or & Press the LevelShift button once. This shifts buttons 1-4 to level 2 (channels 5-8). Then press the desired button within the next 7 seconds. For instance, to transmit channel 5, press the LevelShift button once, then press button 1. While you transmit, you'll notice that the LED indicator blinks twice, pauses, blinks twice, etc.: this indicates level 2. ■ To transmit channel 9, 10, 71 or 12: Press the LevelShift button twice. This shifts buttons 1-4 to level 3 (channels 9-12). Then press the corresponding button within the next 7 seconds. For instance, to transmit channel 10, press the LevelShift button twice, then press button 2. While you transmit, you'll notice that the LED blinks three times, pauses, blinks three times, etc.: this indicates level 3. NOTE: One second after you stop transmitting level 2 or level 3 (channels 5-12), the remote control automatically returns to level 1 (channels 1-4). 4
-
 1
1 -
 2
2 -
 3
3 -
 4
4 -
 5
5 -
 6
6 -
 7
7 -
 8
8 -
 9
9
 |
 |
