Cobra CDR 895 D CDR895D_QSG_ENG.pdf - Page 1
Cobra CDR 895 D Manual
 |
View all Cobra CDR 895 D manuals
Add to My Manuals
Save this manual to your list of manuals |
Page 1 highlights
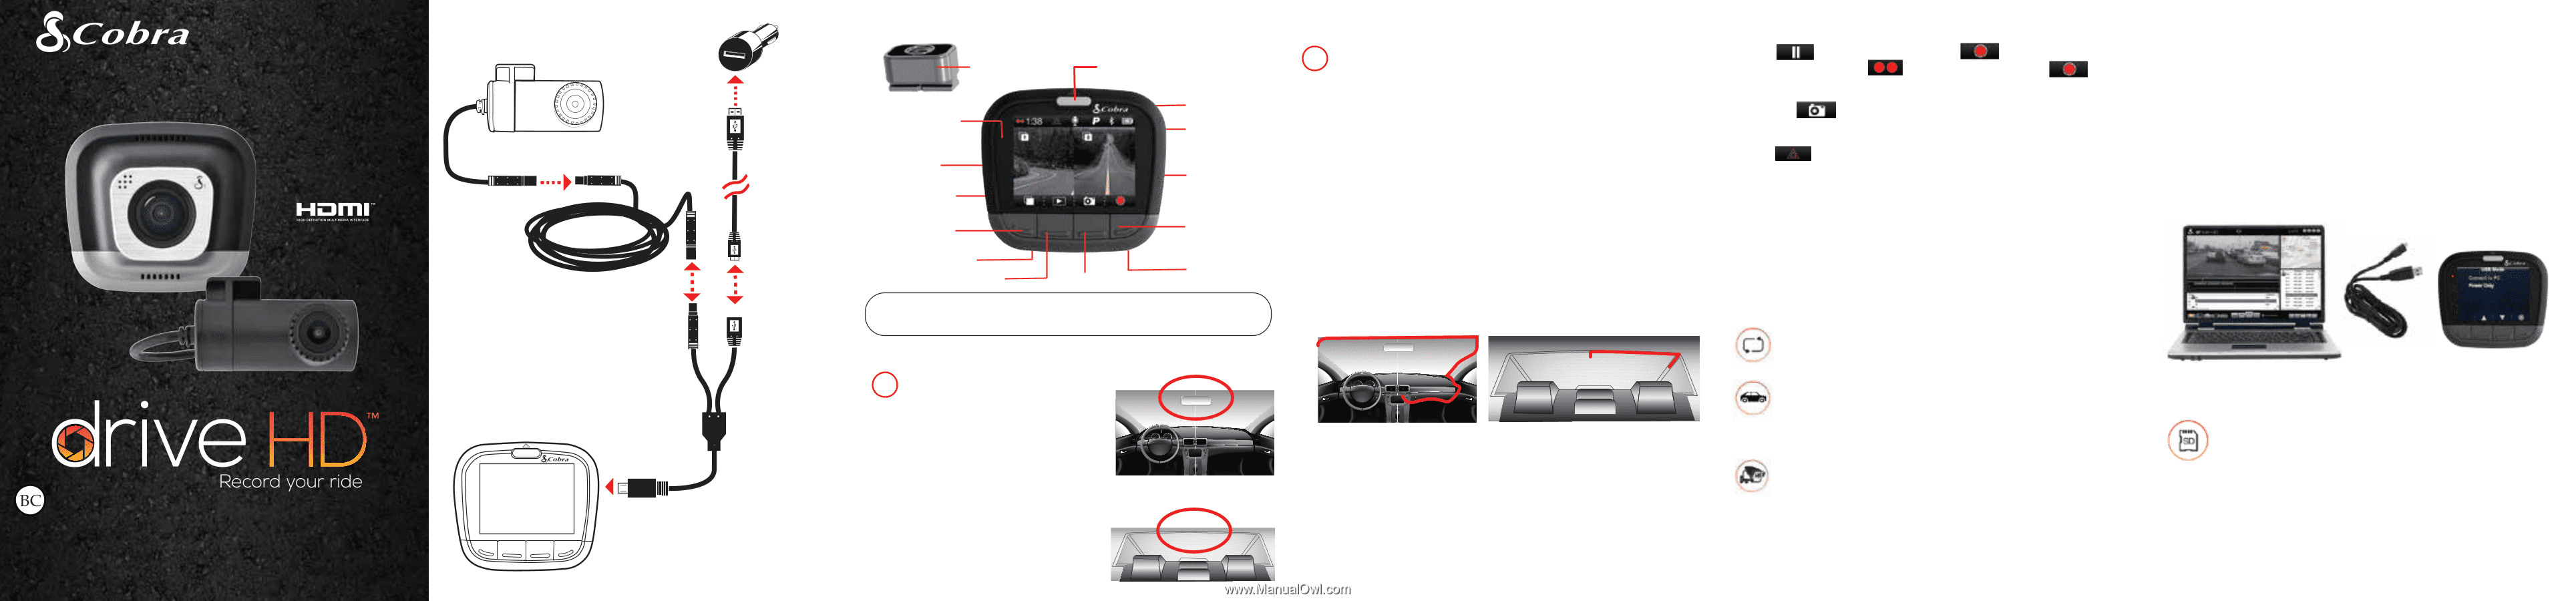
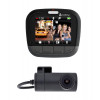
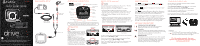
CDR 895 D QUICK START GUIDE DUAL CAMERA SET-UP CAM 2 CAM 2 Extender Cable (Optional) HDMI, the HDMI logo, and High-De nition Multimedia Interface are trademarks or registered trademarks of HDMI Licensing, LLC in the United States and/or other countries. ©2016 Cobra Electronics Corp., Part No.: 480-1069-P, Printed in China, Version B CAM 1 Car Power Adapter Power Cord 10 Ft. (3M) Y-Splitter Cable CONTROLS & CONNECTIONS Quick Release Mount LED Indicator GPS Port Micro SD Card Slot Button 1 Reset Button Button 2 Emergency Recording Button Power/Volume Button Micro USB Port HDMI Output Button 3 Button 4 Microphone The functions of Buttons 1-4 are indicated by the icon directly above each button and change depending on the state of the unit. INSTALLATION 1 MOUNT CAM 1 - Screw the suction cup into the Quick Release Mount. Slide the mount into CAM 1 and press the lever to secure the unit to your vehicle's front windshield. CAM 2 - Attach CAM 2 to the windshield using the adhesive tape. CAM 2 is most commonly installed facing out the rear on the top center of the rear windshield. It can also be mounted on the front windshield to record the interior of the vehicle. Windshield Back Window INSTALLATION continued 2 POWER The CDR 895 D utilizes a Y-Splitter to offer maximum flexibility and clean installation without dangling wires. • Plug the Y-Splitter into the Micro USB Port on CAM 1. • Connect the Micro USB end of the power cord into the Y-Splitter. Connect the USB end of the power cord in the Cigarette Lighter Adapter and then plug into your vehicle. • Plug CAM 2 into the Y-Splitter. Use the Extender Cable if necessary. • Organize and tuck away cables to make sure that the driver's view is not obstructed. In most vehicles it's possible to tuck Y-Splitter and cables into the headliner and cleanly hide the extender cable along the top wall all the way to the rear of the vehicle. Professional installation is recommended. Windshield Back Window If CAM 2 videos appear upside-down enter the Video Settings Menu and turn Flip Cam 2 to ON. If you have mounted CAM 2 facing forward enter the Video Settings Menu and turn Mirror CAM 2 to OFF. Note: The long (10ft) USB->Micro USB cord is for power only. Use the short (18in) USB->Micro USB cord to connect to a computer. BASIC OPERATION Press to stop recording and to start. When CAM 2 is connected is displayed instead of to indicate dual recording. Pressing at any time will capture a still photo on both CAM 1 and CAM 2. Press to create an Emergency Recording. Emergency Recordings apply to both CAM 1 and CAM 2 video files and will not be overwritten by Continuous Loop Recording. While recording, press Button 1 to toggle between viewing modes. With CAM 2 connected, the options are CAM 1, CAM 2, Split Screen, and Screen Off. Note that viewing mode does not affect recording. Separate video files are created for CAM 1 and CAM 2 regardless of your viewing mode. KEY DASH CAM FEATURES CONTINUOUS LOOP RECORDING When the MicroSD Card is full it will overwrite the oldest clips to make room for new footage. G-SENSOR A built-in accelerometer senses sudden accelerations or collisions and automatically protects footage surrounding the incident so that it will not be overwritten by Continuous Loop Recording. PARKING MODE Parking Mode provides security while your vehicle is parked. If the dash cam doesn't sense any motion for a set time the screen will turn off and recording will stop. If motion is detected or the G-Sensor is triggered, the camera will automatically wake up and start recording again. COMPUTER CONNECTION To view videos on a computer connect to CAM 1 using the short Micro USB->USB Cable. Select Connect to Computer on the dash cam. It will mount as a drive on the computer called DriveHD. Movie clips and photos can be found in the DCIM folder. Video clips are saved as .MOV files and can be played by most video players on both PC and Mac. For synchronized playback of CAM 1 and CAM 2 video download Drive HD Player at www.cobra.com/support/software-downloads STORAGE A 16GB MicroSD Card comes installed in this dash cam, but it can support cards up to 64GB. The MicroSD card speed must be rated Class 10 or higher. For full product manuals, firmware updates and additional language support, visit www.cobra.com
-
 1
1
 |
 |