Coby CX-50 User Manual - Page 1
Coby CX-50 - Portable Radio Manual
 |
UPC - 716829110508
View all Coby CX-50 manuals
Add to My Manuals
Save this manual to your list of manuals |
Page 1 highlights
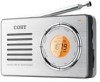
CX50 Operating Instructions DIGITAL DISPLAY MINI AM/FM RADIO 14 13 3 2 1 12 11 10 8 15 7 9 16 4 1. Power OFF 2. Alarm ON/OFF 3. Time Set 4. Alarm Set 5. AM Power ON 6. FM Power ON 7. MIN 8. HOUR 56 9. Volume Dial 10. Tuning Dial 11. LCD 12. Tuning Indicator 13. Telescopic Antenna 14. Earphone Jack 15. Speaker 16. Battery Compartment (On the rear of the radio) POWER SOURCE BATTERY OPERATIONS 1. Remove the battery compartment cover. 2. Load 2 "AAA"( UM-4) size batteries into the Battery Compartment, making sure that the batteries are installed in the designated numerical order and that the proper polarities (+ and -) are maintained. To prevent possible damage to this unit: Load new batteries with their polarities ( + and -) aligned correctly. Do not apply heat to batteries, or internal short-circuit may occur. If this unit is not to be used for a long period of time , remove all batteries and store them in a cool and dry place. Remove spent batteries and dispose of them properly. Do not use old and new batteries together. Also never use an alkaline battery with a manganese battery. Battery life If the sound become low or distorted, replace all the batteries with new ones. RADIO OPERATIONS 1. Press AM/FM button to turn on the AM/FM radio and to enter its screen. FM 102.9 MHz 2. Tune in the desired station by turning the Tuning Dial. The LCD shows the frequency. 3. Adjust the volume to a comfortable listening level by turning the Volume Dial. 4. Adjust the antenna (See ANTENNA section). 5. Press the Power Off button to turn off the radio. CLOCK FUNCTIONS When it's in Radio Mode, press the POWER OFF PM button to enter the Clock Mode. See its diagram 12:21 on the right. Press and hold TIME SET button and press the HOUR & MIN buttons repeatedly to adjust the hour and minute. After finish setting, release the Time Set button. WAKE UP TO RADIO BROADCAST TO SET THE ALARM TIME 1. Select a desired station in Radio Mode for waking up, press the POWER OFF button to enter the Clock Mode. 2. To enter the alarm screen and to adjust the alarm time: Press and hold the ALARM SET button and AL-SET PM press the HOUR & MIN buttons repeatedly. See its 6:21 diagram on the right. 3. After finish setting, release the ALARM SET button. 4. To turn the alarm on, press the ALARM ON/OFF AL-SET button, the alarm on icon' 'appears on the LCD, PM see its diagram on the right. 6:21 5. To cancel the alarm function, press the ALARM ON/OFF button again, the alarm on icon ' ' disappears on LCD.
-
 1
1 -
 2
2
 |
 |