Coby DP854 User Manual - Page 9
Turning Your Photo Frame On/Off - digital frame
 |
UPC - 716829908549
View all Coby DP854 manuals
Add to My Manuals
Save this manual to your list of manuals |
Page 9 highlights
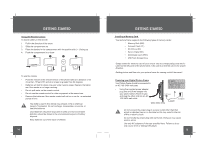
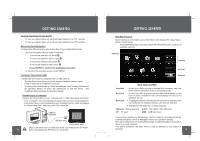
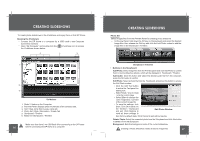
GETTING STARTED Turning Your Photo Frame On/Off • To turn your photo frame on, set the Power Switch to the "On" position. • To turn your photo frame off, set the Power Switch to the "Off" position. Menu Interface Navigation To select the different menu options and files of your digital photo frame: • Use the Navigation keys to make a selection. • To move the selection up, press • To move the selection down, press • To move the selection left, press • To move the selection right, press • Press ENTER to confirm the highlighted selection. • To return to the previous screen, press MENU. Computer Connection (USB) Connect the DP frame to a computer with a USB cable to: • Transfer files to and from your photo frame's installed memory cards. • Perform basic file management functions. • To make photo slideshows in Vividshare software. See Creating Slideshows for operation details. To enjoy the slideshows on this DP frame , see Vividshare Mode sections for operation details. Connecting to a Computer Connect the photo frame to your computer with a USB cable. Upon connection: • Your computer will automatically recognize the memory cards installed in your photo frame. Icons representing your installed memory cards will appear as "Removable Disk " when you open "My Computer". USB Port (computer) USB Port (mini) DP850 / DP852 / DP854 Make sure that there's no USB flash drive connecting to the DP frame 16 before connecting the DP frame to a computer. GETTING STARTED Main Menu Screen Upon turning on the power, your photo frame will display the " Main Menu " screen shown below. • Press the MENU button and then press the UP/DOWN button to select an available card slot. Selected Inserted No Card Selected MAIN MENU SCREEN Inserted: No Card: Selected: A card icon that is in-color indicates that a memory card has been inserted (installed) in the corresponding slot. A card icon that is grayed-out indicates that a memory card has not been installed in the corresponding slot and is not available for use. A highlighted frame indicates that the card slot is selected. Only card slots with an installed memory card may be selected. Highlighted: the Video icon is being selected. Memory: Built-in Memory 4 IN 1: SD / MMC / MS / XD Card CF: CF card USB: USB flash drive You can save pictures on the Memory ( built-in memory ) and enjoy them as a demo slideshow. see File Manager section for operation details. The demo slideshow will automatically start in approximately 8 seconds if there is no card inserted. The demo slideshow will stop when a card is inserted or any button is pressed. 17
-
 1
1 -
2
-
3
-
 4
4 -
 5
5 -
 6
6 -
 7
7 -
 8
8 -
 9
9 -
 10
10 -
 11
11 -
 12
12 -
 13
13 -
 14
14 -
15
-
16
-
17
-
18
-
19
-
20
-
21
-
22
-
23
-
24
-
25
 |
 |
