Compaq 2200 Service Guide - Page 105
Optical Drive
 |
UPC - 743172430892
View all Compaq 2200 manuals
Add to My Manuals
Save this manual to your list of manuals |
Page 105 highlights
Removal and Replacement Procedures 5.11 Optical Drive Spare Part Number Information 4X Max DVD+R/RW 2X Max DVD+R/RW 24X Max DVD/CD-RW Combo Drive 8X Max DVD-ROM Drive 24X Max CD-ROM Drive 371784-001 371783-001 371782-001 371781-001 371780-001 1. Prepare the notebook for disassembly (Section 5.3). 2. Remove the keyboard cover (Section 5.7). 3. Remove the keyboard (Section 5.8). 4. Remove the PM2.0×8.0 screw 1 and PM2.0×4.0 screw 2 that secure the optical drive to the notebook. 5. Push on the back of the optical drive to disconnect it from the system board. 6. Remove the optical drive 3. Removing the Optical Drive Reverse the above procedure to install the optical drive. 5-22 Maintenance and Service Guide
-
 1
1 -
2
-
3
-
4
-
5
-
6
-
7
-
8
-
9
-
10
-
11
-
12
-
13
-
14
-
15
-
16
-
17
-
18
-
19
-
20
-
21
-
22
-
23
-
24
-
25
-
26
-
27
-
28
-
29
-
30
-
31
-
32
-
33
-
34
-
35
-
36
-
37
-
38
-
39
-
40
-
41
-
42
-
43
-
44
-
45
-
46
-
47
-
48
-
49
-
50
-
51
-
52
-
53
-
54
-
55
-
56
-
57
-
58
-
59
-
60
-
61
-
62
-
63
-
64
-
65
-
66
-
67
-
68
-
69
-
70
-
71
-
72
-
73
-
74
-
75
-
76
-
77
-
78
-
79
-
80
-
81
-
82
-
83
-
84
-
85
-
86
-
87
-
88
-
89
-
90
-
91
-
92
-
93
-
94
-
95
-
96
-
97
-
98
-
99
-
 100
100 -
 101
101 -
 102
102 -
 103
103 -
 104
104 -
 105
105 -
 106
106 -
 107
107 -
 108
108 -
 109
109 -
 110
110 -
111
-
112
-
113
-
114
-
115
-
116
-
117
-
118
-
119
-
120
-
121
-
122
-
123
-
124
-
125
-
126
-
127
-
128
-
129
-
130
-
131
-
132
-
133
-
134
-
135
-
136
-
137
-
138
-
139
-
140
-
141
-
142
-
143
-
144
-
145
-
146
-
147
-
148
-
149
-
150
-
151
-
152
-
153
-
154
-
155
-
156
-
157
-
158
-
159
-
160
-
161
-
162
-
163
-
164
-
165
-
166
-
167
-
168
-
169
-
170
-
171
-
172
-
173
-
174
-
175
-
176
-
177
-
178
-
179
-
180
-
181
-
182
 |
 |

5–22
Maintenance and Service Guide
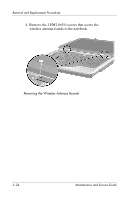
Removal and Replacement Procedures
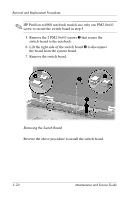
5.11 Optical Drive
1. Prepare the notebook for disassembly (
Section 5.3
).
2. Remove the keyboard cover (
Section 5.7
).
3. Remove the keyboard (
Section 5.8
).
4. Remove the PM2.0×8.0 screw
1
and PM2.0×4.0 screw
2
that secure the optical drive to the notebook.
5. Push on the back of the optical drive to disconnect it from
the system board.
6. Remove the optical drive
3
.
Removing the Optical Drive
Reverse the above procedure to install the optical drive.
Spare Part Number Information
4X Max DVD+R/RW
2X Max DVD+R/RW
24X Max DVD/CD-RW Combo Drive
8X Max DVD-ROM Drive
24X Max CD-ROM Drive
371784-001
371783-001
371782-001
371781-001
371780-001