Compaq CQ50-139WM HP G50 Notebook PC and Compaq Presario CQ50 Notebook PC - Ma - Page 86
Battery, on Hard drive, Optical drive, Keyboard, Keyboard cover, Display assembly, Top cover, Speakers, System board
 |
UPC - 884420367277
View all Compaq CQ50-139WM manuals
Add to My Manuals
Save this manual to your list of manuals |
Page 86 highlights
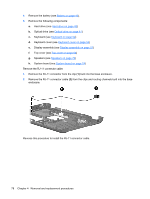
4. Remove the battery (see Battery on page 40). 5. Remove the following components: a. Hard drive (see Hard drive on page 43) b. Optical drive (see Optical drive on page 41) c. Keyboard (see Keyboard on page 52) d. Keyboard cover (see Keyboard cover on page 54) e. Display assembly (see Display assembly on page 57) f. Top cover (see Top cover on page 64) g. Speakers (see Speakers on page 72) h. System board (see System board on page 74) Remove the RJ-11 connector cable: 1. Remove the RJ-11 connector from the clip (1) built into the base enclosure. 2. Remove the RJ-11 connector cable (2) from the clips and routing channels built into the base enclosure. Reverse this procedure to install the RJ-11 connector cable. 78 Chapter 4 Removal and replacement procedures
-
 1
1 -
2
-
3
-
4
-
5
-
6
-
7
-
8
-
9
-
10
-
11
-
12
-
13
-
14
-
15
-
16
-
17
-
18
-
19
-
20
-
21
-
22
-
23
-
24
-
25
-
26
-
27
-
28
-
29
-
30
-
31
-
32
-
33
-
34
-
35
-
36
-
37
-
38
-
39
-
40
-
41
-
42
-
43
-
44
-
45
-
46
-
47
-
48
-
49
-
50
-
51
-
52
-
53
-
54
-
55
-
56
-
57
-
58
-
59
-
60
-
61
-
62
-
63
-
64
-
65
-
66
-
67
-
68
-
69
-
70
-
71
-
72
-
73
-
74
-
75
-
76
-
77
-
78
-
79
-
80
-
 81
81 -
 82
82 -
 83
83 -
 84
84 -
 85
85 -
 86
86 -
 87
87 -
 88
88 -
 89
89 -
 90
90 -
 91
91 -
92
-
93
-
94
-
95
-
96
-
97
-
98
-
99
-
100
-
101
-
102
-
103
-
104
-
105
-
106
-
107
-
108
-
109
-
110
-
111
-
112
-
113
-
114
-
115
-
116
-
117
-
118
-
119
-
120
-
121
-
122
-
123
-
124
-
125
-
126
-
127
-
128
-
129
-
130
-
131
-
132
-
133
-
134
-
135
-
136
-
137
-
138
-
139
-
140
-
141
-
142
-
143
-
144
-
145
-
146
-
147
-
148
-
149
 |
 |
