Compaq ProSignia 300 Microsoft Small Business Server 2000 Installation Instruc - Page 10
Task 3, Finish, Set Up Small Business Server, Cancel, I agree, Organization, Computer Name
 |
View all Compaq ProSignia 300 manuals
Add to My Manuals
Save this manual to your list of manuals |
Page 10 highlights
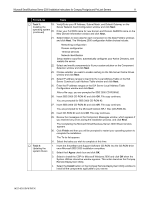
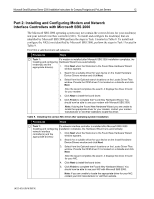
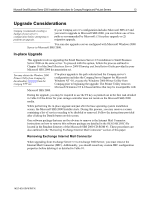
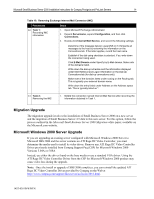
Microsoft Small Business Server 2000 Installation Instructions for Compaq Prosignia and ProLiant Servers 10 √ Procedures Steps … Task 3: 8. Select Typical Settings or Custom Settings when prompted with the Installing the Networking Settings windows and click Next. If you select Custom Settings, operating system refer to the Microsoft SBS 2000 documentation to complete the Custom (continued) Settings interview options. Note: If your network interface controller driver does not reside on the Microsoft SBS 2000 CD-ROM, you will need to select provide the network card driver from your network card manufacturer. If you plan to add the network interface controller after Microsoft SBS 2000 installation, refer to Table 9. The installation of Microsoft SBS 2000 continues until you are prompted with the Completing the Windows 2000 Setup Wizard. 9. Remove the SBS 2000 CD-ROM #1 and click Finish to restart your server. 10. Login to your operating system and re-insert the SBS 2000 CD-ROM #1. The Microsoft Small Business Sever 2000 Setup Window prompt appears. 11. Highlight and click Set Up Small Business Server to begin the Post Operating System portion of the installation after you determine a plan for your installation. Note: Refer to the Microsoft SBS 2000 documentation for help on Planning your installation. 12. Click Next on the Welcome to the Microsoft SBS 2000 Setup Wizard window. The Suite Requirements window appears if your system meets all the requirements to install Microsoft SBS 2000. 13. Follow these procedures based on the listed conditions: • If your system does not meet all the requirements, click Cancel to exit this portion of setup. Take corrective action by adding required hardware and/or reconfigure your base operating system. To take corrective action, connect necessary components or make modifications, select Back, and select Next to re-evaluate system. • If you system meets all the requirements, click Next. The License Agreement appears. 14. Review the License Agreement. If you agree, select the I agree radio button and click Next. 15. Verify the Name, Organization, and Computer Name on the Product Identification window. Then enter the 25-digit key for your Small Business Server CD-ROM and your Microsoft Outlook CD-ROM. Click Next. The Automatic Logon Information window prompts you for your password if you would like Setup to log you on automatically after the system restarts. 16. Select your preference and click Next. 17. Fill out your address information on the Company Information window and click Next. 18. Fill out your telephone information on the Telephony Information window and click Next. Note: You need to enter this information even if you do not have a modem installed. 145Z-0301B-WWEN
-
 1
1 -
2
-
3
-
4
-
 5
5 -
 6
6 -
 7
7 -
 8
8 -
 9
9 -
 10
10 -
 11
11 -
 12
12 -
 13
13 -
 14
14 -
 15
15
 |
 |