Craftsman 21828 Operation Manual
Craftsman 21828 - Professional 10 in. Jobsite Saw Manual
 |
View all Craftsman 21828 manuals
Add to My Manuals
Save this manual to your list of manuals |
Craftsman 21828 manual content summary:
- Craftsman 21828 | Operation Manual - Page 1
in. TABLE SAW Model No. 315.218280 ,& WARNING: To reduce the risk of injury, the user must read and understand the operator's manual before using this product. Customer Help Line: 1-800-932-3188 Sears, Roebuck and Co., 3333 Beverly Rd., Hoffman Estates, IL 60179 USA Visit the Craftsman web page - Craftsman 21828 | Operation Manual - Page 2
14 [] Assembly ...[] Operation ...[] Adjustments ...[] Maintenance ...[] Accessories ... 15-19 19-32 33-35 36 36 [] Troubleshooting ...[] Exploded View ...[] Parts Ordering/Service ... 37-38 39-46 Back Page ONE YEAR FULL WARRANTY ON CRAFTSMAN TOOL If this Craftsman tool fails due to a defect in - Craftsman 21828 | Operation Manual - Page 3
. Consult the operator's manual for recommended accessories. The use of improper accessories may risk injury. [] NEVER STAND ON TOOL. Serious injury could occur if the tool is tipped or if the cutting tool is unintentionally contacted. [] CHECK DAMAGED PARTS. Before further use of the tool - Craftsman 21828 | Operation Manual - Page 4
. [] WHEN SERVICING use only identical replacement parts. Use of any other parts may create a hazard or cause product damage. [] USE ONLY RECOMMENDED ACCESSORIES listed in this manual or addendums. Use of accessories that are not listed may cause the risk of personal injury. Instructions for safe - Craftsman 21828 | Operation Manual - Page 5
operation "freehand" which means using only your hands to support or guide the workpiece. Always use either the rip fence or miter fence to position and guide the work. [] NEVER stand or have any part of your body in line with the path of the saw blade. [] NEVER reach behind, over, or within three - Craftsman 21828 | Operation Manual - Page 6
Eye Protection Safety Alert No Hands Symbol To reduce the risk of injury, user must read and understand operator's manual before using this product. Always wear safety goggles or safety glasses with side shields and a full face shield when operating this product. Precautions that involve - Craftsman 21828 | Operation Manual - Page 7
parts. _lb WARNING: To avoid serious personal injury, do not attempt to use this product until you read thoroughly and understand completely the operator's manual. If you do not understand the warnings and instructions in the operator's manual, do not use this product. Call the Craftsman - Craftsman 21828 | Operation Manual - Page 8
can support one power tool may not be able to support two or three tools. GROUNDING INSTRUCTIONS This product with a qualified electrician or service personnel if the grounding instructions are not completely understood, the motor will overheat. If the saw does not operate when plugged into an outlet, double - Craftsman 21828 | Operation Manual - Page 9
as a guide for drilling large holes accurately. Push Blocks (for jointer planers) Device used to feed the workpiece over the jointer planer cutterhead during any operation. This aid helps keep the operator's hands well away from the cutterhead. Push Blocks and Push Sticks (for table saws) Devices - Craftsman 21828 | Operation Manual - Page 10
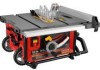
min. (RPM) Cutting Depth at 0 3-1/4 in. Cutting Depth at 45 2-3/8 in. ANTFKICKBACK PAWLS SPREADER/ RiViNG KNIFE BLADE GUARD RiP FENCE OUTFEED SUPPORT MITER GAUGE CORD STORAGE BLADE WRENCH STORAGE FRONT RAiL LOCKING LEVER BEVEL LOCKING LEVER BEVEL SCALE HEiGHT/BEVEL ADJUSTING HANDWHEEL - Craftsman 21828 | Operation Manual - Page 11
of the information on the tool and in this operator's manual as well as a knowledge of the project you are attempting saw table. OUTFEED SUPPORT - This table extension at the back of the tool gives the operator additional support when cutting long workpieces. RIP FENCE - A sturdy metal fence guides - Craftsman 21828 | Operation Manual - Page 12
of the blade is set with a handwheel on the front of the cabinet. To accommodate wide panels, the saw table has rails on each side. Detailed instructions are provided in the Operation section of this manual for the basic cuts: cross cuts, miter cuts, bevel cuts, and compound cuts. The rip fence is - Craftsman 21828 | Operation Manual - Page 13
Thefollowingtools(notincludedordrawnto scalea) reneededfor makingadjustments: _t,l,_,l,_,J,l,l,a,l,l,l,bl,l,l,_ FRAMINGSQUARE COMBINATION SQUARE PHiLLiPS SCREWDRIVER FLATBLADE SCREWDRIVER Fig. 4 13 - Craftsman 21828 | Operation Manual - Page 14
Thefollowingitemsareincludedwithyourtablesaw: A E 0 6 A. Blade Guard 1 B. Anti-Kickback Pawls 1 C. Miter Gauge 1 D. Rip Fence 1 Fig. 5 E. Handle Assembly 1 R Push Stick 1 G. Blade Wrench 2 H. Hex Key, 5 mm 1 14 - Craftsman 21828 | Operation Manual - Page 15
personal injury, always make sure the table saw is securely mounted to a workbench or an approved leg stand. NEVER operate the saw on the floor. MOUNTING HOLES The table saw must be mounted to a firm supporting, waist high surface such as a workbench or leg stand. Four bolt holes have been provided - Craftsman 21828 | Operation Manual - Page 16
TO STORE THE TABLE SAW ACCESSORIES See Figures 7- 8. The table saw has two convenient storage areas (one on either side of the saw cabinet) specifically designed for the saw's accessories. When not in use, store accessories securely. RAISING AND LOWERING THE TELESCOPING HANDLE See Figure 9. [] To - Craftsman 21828 | Operation Manual - Page 17
riving knife down until the internal pins are engaged and the spreader is below the saw blade. [] Lock the release lever by pushing the lever down. [] Reinstall the up until the internal pins are engaged and the spreader is above the saw blade. [] Lock the release lever by pushing the lever down. - Craftsman 21828 | Operation Manual - Page 18
Anti-kickback pawls should only be installed for through cuts. [] Unplug the saw. [] Raise the saw blade. [] Place spreader/riving knife in "up" position. To install . Push the front of the guard down until it is parallel to the table. [] Lock the guard in place by pushing the lever down. NOTE: - Craftsman 21828 | Operation Manual - Page 19
The use of attachments or accessories not recommended can result in serious personal injury. _IL WARNING: Although many of the illustrations in this manual are shown with the blade guard removed for clarity, do not operate the saw without the blade guard unless specifically instructed to do so. 19 - Craftsman 21828 | Operation Manual - Page 20
table saw must be mounted to a firm supporting, waist high surface such as a workbench or leg stand. Many illustrations in this manual are shown with the saw and compound cutting [] Dado or molding cuts with optional accessories [] Cabinet making and woodworking NOTE: This table saw is designed to - Craftsman 21828 | Operation Manual - Page 21
device used to help control the workpiece by guiding it securely against the table or fence. Featherboards are especially useful when ripping the blade. Attach a C-clamp to secure the featherboard to the edge of the saw table. A WARNING: The featherboard must be installed in front of the blade. Do - Craftsman 21828 | Operation Manual - Page 22
miter cuts before trying a compound miter cut. CUTTING TIPS Dado and rabbet cuts are non-through cuts which can be either . Carefully read and understand all sections of this operator's manual before attempting any operation. _, WARNING: Do not use blades support for the wood as it comes out of the - Craftsman 21828 | Operation Manual - Page 23
by pushing the bevel lock lever all the way to the right. [] To unlock, adjust the bevel angle by pushing the wheel in toward the saw then turning it. Turning the wheel counterclockwise increases the angle of the blade, bringing it closer to 45 ° . Turning it clockwise decreases the angle, bringing - Craftsman 21828 | Operation Manual - Page 24
the rear of the saw table and pull slightly toward the front of the unit. [] Lower the front end of the rip fence onto the guide surfaces on top Rip Fence to the Blade in the Adjustment section of this manual. LOCKING LEVER RIP FENCE SAW TABLE BEAR LiP Fig. 25 TO USE THE MITER GAUGE See Figure - Craftsman 21828 | Operation Manual - Page 25
the lever back towards the saw base. TO USE THE OUTFEED SUPPORT See Figure 28. The outfeed support slides to give the operator additional support for cutting long workpieces. [] With the table saw in the off position, stand behind the saw. [] Grasp the outfeed support with both hands and pull - Craftsman 21828 | Operation Manual - Page 26
[] Place spreader/riving knife in "down" position then lower the blade. [] Extend the outfeed support. [] Loosen adjusting bolts (1) and (3). NOTE: The adjusting bolts are located under the saw table in the back of the saw. [] Turn adjusting bolt (2) left or right until the blade is square. NOTE: If - Craftsman 21828 | Operation Manual - Page 27
lifting the locking lever. [] Set the blade to the correct depth for the workpiece. [] Set the miter gauge to 0 ° and tighten the lock knob. [] Place a support (the same height as saw table) behind the saw for the cut work. [] Make sure the wood is clear of the blade before turning on the - Craftsman 21828 | Operation Manual - Page 28
Place a support (the same height as saw table) behind the saw for the cut work. Stand slightly to the side of the wood as it contacts the blade to reduce the chance of injury should kickback occur. [] Once the blade has made contact with the workpiece, use the hand closest to the rip fence to guide - Craftsman 21828 | Operation Manual - Page 29
[] Place a support (the same height as saw table) behind the saw for the cut table with the edge flush against the rip fence. Let the blade build up to full speed before feeding the workpiece into the blade. [] Using a push stick and/or push blocks, slowly feed the workpiece toward the blade. Stand - Craftsman 21828 | Operation Manual - Page 30
lock knob. [] Make sure the wood is clear of the blade before turning on the saw. [] Turn the power switch to the on position. [] Hold the workpiece firmly with be placed on the workpiece. [] When the cut is made, turn the saw off. Wait for the blade to come to a complete stop before removing the - Craftsman 21828 | Operation Manual - Page 31
possible serious injury. [] Place a support the same height as the top of the saw table behind the saw for the cut work. Add supports to the sides as needed. the type of cut in addition to this section on non-through or dado cuts. For example, if your non-through cut is a straight cross cut - Craftsman 21828 | Operation Manual - Page 32
. [] Mount the dado blade, according to manufacturer instructions, using the blade and DADO CUT See Figure 42. An optional dado throat plate is required for this procedure (see the Accessories section of this manual and check with the retailer where the table saw was purchased). All blades and dado - Craftsman 21828 | Operation Manual - Page 33
BLADE NUT Fig. 44 To replace the blade with an accessory blade, follow the instructions provided with the accessory. To install a standard blade: [] Place the new blade on the arbor shaft (the teeth must point down toward the front of the saw to work properly). [] Place the blade washer and the - Craftsman 21828 | Operation Manual - Page 34
TO SETTHE BLADEAT 0° AND 45° See Figures 46 - 47. The angle settings of your saw have been set at the factory and, unless damaged in shipping, should not require setting during assembly. After extensive use, it may need to be - Craftsman 21828 | Operation Manual - Page 35
_ WARNING: To reduce the risk of injury, always make sure the rip fence is parallel to the blade before beginning any operation. [] Unplug the saw. [] Raise the locking lever to permit the rip fence to be moved. BLADE FRAMING SQUARE RIP FENCE GAUGE_ GAUGE ROD ___m__ 45° ADJUSTABLE STOPSCREW - Craftsman 21828 | Operation Manual - Page 36
blade by cleaning out saw dust from underneath the table and in the blade teeth. Use a resin solvent on the blade teeth. [] Clean plastic parts only with a soft accessories are currently available at retail stores: 089110113920 Dado Throat Plate _ WARNING: Current attachments and accessories - Craftsman 21828 | Operation Manual - Page 37
PROBLEM Excess vibration. CAUSE SOLUTION 1 Blade is out of balance. Replace blade. Blade is damaged. Replace blade. Saw is not mounted spreader/riving knife and saw blade" in theAssemblysection. Replace the wood. Always cut with convex side to table surface. Check and adjust the rip fence. - Craftsman 21828 | Operation Manual - Page 38
PROBLEM Saw does not make accurate 90 ° or 45 ° cuts. Height/bevel adjusting handwheel is hard to turn. Saw does not start. Replace circuit fuse. Reset circuit breaker. Have the cord or switch replaced at your Sears Service Center. Blade is dull or dirty. Blade is wrong type for cut being made. - Craftsman 21828 | Operation Manual - Page 39
_- CRAFTSMAN 10 in. TABLE SAW - MODEL NUMBER 315.218280 -, 33 36 18 Figure A 57 60 63 94 91 90 62 39 - Craftsman 21828 | Operation Manual - Page 40
CRAFTSMAN 10 in. TABLE SAW - MODEL NUMBER 315.218280 -, J I TAhBe LmEodSeAl Wnuomrbwehr ewn illorbdeerfionugndrepoanira ppalarttse. attached to the motor housing. Always mention the model number in all correspondence regarding your 1 KEY PART 2 Bevel Trunnion 2 KEY PART NO. NUMBER 28 0121010901 - Craftsman 21828 | Operation Manual - Page 41
CRAFTSMAN 10 in. TABLE SAW - MODEL NUMBER 315.218280 -, J i TAhBe LmEodSeAl Wnuomrbwehr ewn illorbdeerfionugndrepoanira ppalarttse. attached to the motor housing. Always mention the model number in all correspondence regarding your 1 KEY PART Optional Dado Throat Plate 1 Operator's Manual 1 41 - Craftsman 21828 | Operation Manual - Page 42
CRAFTSMAN 10 in. TABLE SAW = MODEL NUMBER 315.218280 2 77 42 - Craftsman 21828 | Operation Manual - Page 43
,,- CRAFTSMAN 10 in. TABLE SAW - MODEL NUMBER 315.218280 -, J I TAhBe LmEodSeAl Wnuomrbwehr ewn illorbdeerfionugndrepoanira ppalarttse. attached to the motor housing. Always mention the model number in all correspondence regarding your 1 PARTS LIST (FIGURE B) KEY NO. 1 2 3 4 5 6 7 8 9 10 11 12 - Craftsman 21828 | Operation Manual - Page 44
r CRAFTSMAN 10 in. TABLE SAW - MODEL NUMBER 315.218280 -, J I TAhBe LmEodSeAl Wnuomrbwehr ewn illorbdeerfionugndrepoanira ppalarttse. attached to the motor housing. Always mention the model number in all correspondence regarding your "1 KEY PART NO. NUMBER 55 089110113005 56 410561004 57 - Craftsman 21828 | Operation Manual - Page 45
_- CRAFTSMAN 10 in. TABLE SAW - MODEL NUMBER 315.218280 -_ 4o_ 41 44 21 48 37 Figure C 45 - Craftsman 21828 | Operation Manual - Page 46
CRAFTSMAN 10 in. TABLE SAW - MODEL NUMBER 315.218280 I TAheBLmEodSeAl Wnuomrbwehr ewn illorbdeerfionugndrepoanira ppalarttse. attached to the motor housing. Always mention the model number in all correspondence regarding your |1 J KEY PART NO. NUMBER 1 089110113705 2 089110113118 3 089110113115 4
-
 1
1 -
 2
2 -
 3
3 -
 4
4 -
 5
5 -
 6
6 -
 7
7 -
8
-
9
-
10
-
11
-
12
-
13
-
14
-
15
-
16
-
17
-
18
-
19
-
20
-
21
-
22
-
23
-
24
-
25
-
26
-
27
-
28
-
29
-
30
-
31
-
32
-
33
-
34
-
35
-
36
-
37
-
38
-
39
-
40
-
41
-
42
-
43
-
44
-
45
-
46
 |
 |

PERATOR'S
AL
10
in. TABLE SAW
Model No.
315.218280
,&
WARNING:
To reduce the risk of injury, the
user must read and understand
the operator's
manual before using this product.
Customer
Help
Line: 1-800-932-3188
Sears,
Roebuck
and
Co.,
3333
Beverly
Rd.,
Hoffman
Estates,
IL 60179
USA
Visit the Craftsman
web
page:
www.sears.com/craftsman
987000-344
9-1-08
(REV:00)
Save
this
manual
for
future
reference