Craftsman 21828 Operation Manual - Page 19
Blade, Guard, Lever, Align, Spreader/riving, To Check, Knife, Rivingknife, Framing, Warning,
 |
View all Craftsman 21828 manuals
Add to My Manuals
Save this manual to your list of manuals |
Page 19 highlights
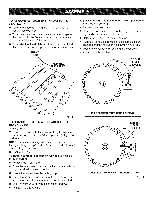
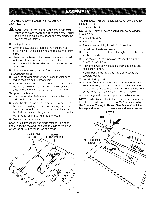
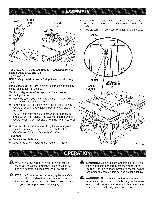
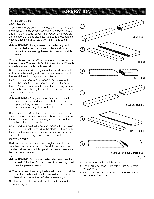
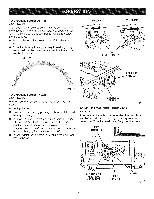
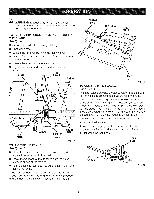
BLADE GUARD I I GUARD LEVER [] Reposition the blade guard assembly left or right as needed to align the spreader/riving knife with the saw blade. [] Once properly aligned, securely retighten the screws. SCREW Fig. 15 TO CHECK AND ALIGN THE SPREADER/RIVING KNIFE AND SAW BLADE See Figure 16. NOTE: Only install spreader/riving knife for all through cuts. If the spreader/riving knife is out of alignment with the saw blade, adjustment is needed. To check alignment of the spreader/riving knife: [] Unplug the saw. [] Raise the saw blade by turning the height/bevel adjust- ing handwheel counterclockwise. [] Remove the anti-kickback pawls and place a framing square or straight edge against both the saw blade and the spreader. NOTE: Place framing square between carbide teeth and measure from blade. This step will insure framing square is square against blade from the front to back of blade. [] The saw blade and spreader/riving knife are aligned when the framing square contacts both the blade and spreader/riving knife evenly with no gaps. To adjust: [] Remove the blade guard. [] Loosen the screws holding the mounting bracket. SCREW FRAMING SQUARE SPREADER/ RIVINGKNIFE Fig. 16 _, WARNING: Do not allow familiarity with tools to make you careless. Remember that a careless fraction of a second is sufficient to inflict severe injury. A WARNING: Always wear safety goggles or safety glasses with side shields when operating tools. Failure to do so could result in objects being thrown into your eyes in possible serious injury. A WARNING: Do not use any attachments or accessories not recommended by the manufacturer of this tool. The use of attachments or accessories not recommended can result in serious personal injury. _IL WARNING: Although many of the illustrations in this manual are shown with the blade guard removed for clarity, do not operate the saw without the blade guard unless specifically instructed to do so. 19
-
 1
1 -
2
-
3
-
4
-
5
-
6
-
7
-
8
-
9
-
10
-
11
-
12
-
13
-
 14
14 -
 15
15 -
 16
16 -
 17
17 -
 18
18 -
 19
19 -
 20
20 -
 21
21 -
 22
22 -
 23
23 -
 24
24 -
25
-
26
-
27
-
28
-
29
-
30
-
31
-
32
-
33
-
34
-
35
-
36
-
37
-
38
-
39
-
40
-
41
-
42
-
43
-
44
-
45
-
46
 |
 |
