Craftsman 24531 Owners Manual - Page 6
Plug To Come In Contact
 |
View all Craftsman 24531 manuals
Add to My Manuals
Save this manual to your list of manuals |
Page 6 highlights
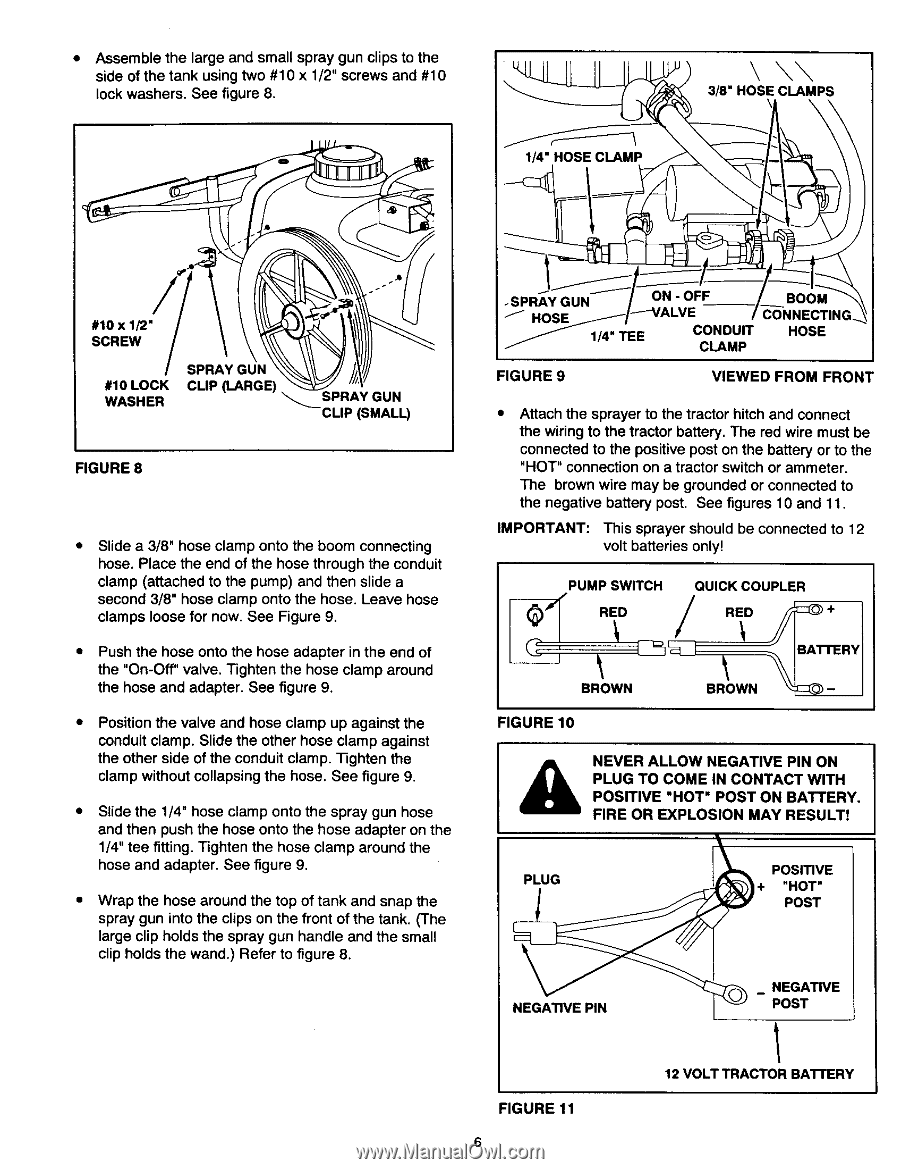
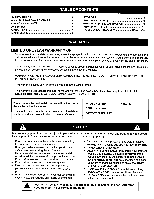
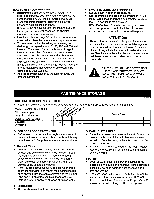
• Assemble the large and small spray gun clips to the side of the tank using two #10 x 1/2" screws and #10 lock washers. See figure 8. \ \\ 3/8" HOSE CLAMPS #10 x 1F2" SCREW #10 LOCK WASHER SPRAY GUN CLIP (LARGE) _SPRAY GUN CLIP (SMALL) FIGURE 8 Slide a 3/8" hose clamp onto the boom connecting hose. Place the end of the hose through the conduit clamp (attached to the pump) and then slide a second 3/8" hose clamp onto the hose. Leave hose clamps loose for now. See Figure 9. Push the hose onto the hose adapter in the end of the "On-Off" valve. Tighten the hose clamp around the hose and adapter. See figure 9. Position the valve and hose clamp up against the conduit clamp. Slide the other hose clamp against the other side of the conduit clamp. Tighten the clamp without collapsing the hose, See figure 9. Slide the 1/4" hose clamp onto the spray gun hose and then push the hose onto the hose adapter on the 1/4" tee fitting. Tighten the hose clamp around the hose and adapter. See figure 9. Wrap the hose around the top of tank and snap the spray gun into the clips on the front of the tank. (The large clip holds the spray gun handle and the small clip holds the wand.) Refer to figure 8. 114" TEE FIGURE 9 CONDUIT CLAMP HOSE VIEWED FROM FRONT Attach the sprayer to the tractor hitch and connect the wiring to the tractor battery. The red wire must be connected to the positive post on the battery or to the "HOT" connection on a tractor switch or ammeter. The brown wire may be grounded or connected to the negative battery post. See figures 10 and 11. IMPORTANT: This sprayer should be connected to 12 volt batteries only! PUMP SWITCH RED QUICK COUPLER RED \ BROWN BROWN BA'I-FER¥ FIGURE 10 & NEVER ALLOW NEGATIVE PIN ON PLUG TO COME IN CONTACT WITH POSITIVE "HOT" POST ON BATTERY. FIRE OR EXPLOSION MAY RESULT! PLUG J POSITIVE "HOT" POST NEGATIVE PIN _ NEGATIVE POST FIGURE 11 6 12 VOLT TRACTOR BATFERY
-
 1
1 -
 2
2 -
 3
3 -
 4
4 -
 5
5 -
 6
6 -
 7
7 -
 8
8 -
 9
9 -
 10
10 -
 11
11 -
 12
12
 |
 |