Creative CT4810 User Guide - Page 5
To Install the Card and Related Hardware - model
 |
UPC - 000000051002
View all Creative CT4810 manuals
Add to My Manuals
Save this manual to your list of manuals |
Page 5 highlights
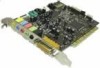
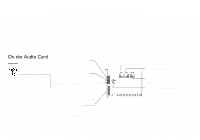
To Install the Card and Related Hardware 1. Switch off your system and all peripheral devices, and then touch a metal plate on your computer to discharge any static electricity. 2. Unplug the power cord from the wall outlet. 3. Remove the cover of your computer to expose the motherboard and PCI slots. 4. Find an available PCI slot. Remove the cover plate at the back of the computer to create an opening for the audio card's jacks. Place the screw aside for later use. 5. (Only for certain models) Adjust the Line Out/Speaker Out jumper (JP1) as follows: ❑ If you are using powered speakers for the Line Out/Speaker Out jack, set the jumper as shown in Figure 2. ❑ If you are using non-powered speakers for the Line Out/Speaker Out jack, set the jumper as shown in Figure 3. Figure 2: Line Out mode (default) Figure 3: Speaker Out mode 6. Align your card's 32-bit slot connector with the expansion slot and press the card into the slot gently and evenly, with the external jacks facing the outside of the computer. Ensure that the bus connector has been pressed in as far as it will go and is sitting firmly inside the expansion slot. 7. Plug the CD-ROM audio cable into the CD Audio connector and plug the speakers into the Line Out/Speaker Out jack (see Figure 1). Make any other internal connections applicable for your computer, including modem or video card connections. 8. Replace the computer cover. Plug all components back into their respective outlets. You may now start the computer. About Your VIBRA™ 128 Card 5
-
 1
1 -
 2
2 -
 3
3 -
 4
4 -
 5
5 -
 6
6 -
 7
7 -
 8
8 -
 9
9 -
 10
10 -
 11
11 -
12
 |
 |
