Creative SB0400 User Guide
Creative SB0400 Manual
 |
View all Creative SB0400 manuals
Add to My Manuals
Save this manual to your list of manuals |
Creative SB0400 manual content summary:
- Creative SB0400 | User Guide - Page 1
- Creative SB0400 | User Guide - Page 2
User's Guide Creative Sound Blaster Audigy 2 Information in this document is subject to change without notice and does not represent a commitment on the part of Creative Technology Ltd. No part of this manual may be reproduced or transmitted in any form or by any means, electronic or mechanical, - Creative SB0400 | User Guide - Page 3
been designed to provide you with complete product knowledge. The following are instructions on how to make use of this manual effectively by launching applications and help files, as well as accessing relevant again. To access linked web sites, your computer must be connected to the Internet. - Creative SB0400 | User Guide - Page 4
Contents - Creative SB0400 | User Guide - Page 5
Blaster Audigy 2 card 1-9 Step 5: Connect to power outlet 1-10 Connecting Related Peripherals ...1-11 Connecting Speaker Systems ...1-13 Connecting External Consumer Devices 1-14 Positioning Your Speakers...1-16 2 Installing Software Installing Drivers and Applications...2-1 Sound Blaster Audigy - Creative SB0400 | User Guide - Page 6
selected Audio Drivers or Applications 2-3 Using Creative Software AutoUpdate...2-5 Updating Windows 2000 (Service Pack 3 2-6 Installing Digital Video Update...2-6 3 Using Audigy 2 Software Creative Sound Blaster Audigy 2 Applications 3-1 Demos...3-2 Sound Blaster Audigy 2 Getting Started - Creative SB0400 | User Guide - Page 7
B-9 Problems with Sound Blaster Live! Series or Sound Blaster PCI512 card B-10 Resolving I/O Conflicts ...B-11 Problems with Encore DVD Player ...B-11 Problems with Software DVD Player B-12 Problems with DV driver for Windows 98 SE/2000/Me/XP B-12 Problems in Windows XP...B-13 Problems with - Creative SB0400 | User Guide - Page 8
Introduction - Creative SB0400 | User Guide - Page 9
Blaster™ Audigy 2™, the next generation Creative audio product with exciting new features and enhanced audio processing architecture. This User Manual (on CD) guides you through the installation and usage of Sound Blaster Audigy 2. Sound Blaster Audigy 2 consists of the Sound Blaster Audigy 2 card - Creative SB0400 | User Guide - Page 10
HD brings a new level of performance, power, and flexibility to PC audio. Taking advantage of the enhanced processing capabilities of the Sound Blaster Audigy 2 processor, EAX ADVANCED HD delivers a host of new features that achieve high definition audio for gaming and music enhancement. The all - Creative SB0400 | User Guide - Page 11
(SE), Windows Millennium Edition (Me), Windows 2000 Service Pack 2 (SP2) or Windows XP ❑ 64 MB RAM for Windows 98 SE and Windows Me 128 MB RAM for Windows 2000 SP2 and Windows XP ❑ 600 MB of free hard disk space ❑ Available PCI 2.1 compliant slot for the Sound Blaster Audigy 2 card ❑ Available - Creative SB0400 | User Guide - Page 12
.com site for the latest Sound Blaster news and products. The site also includes information on making purchases, technical help, and using the Creative Software AutoUpdate for automated driver download and installation. Technical Support Visit www.soundblaster.com/support/faq for general help - Creative SB0400 | User Guide - Page 13
Document Conventions The following typographical conventions are used throughout this manual: The notepad icon indicates information that is of particular importance and should be considered before continuing. The alarm clock designates a caution or warning that can - Creative SB0400 | User Guide - Page 14
1Installing Hardware This chapter tells you how to install the Sound Blaster Audigy 2 hardware. - Creative SB0400 | User Guide - Page 15
you will also need an available PCI slot and another adjacent available slot on your computer. Sound Blaster Audigy 2 card Joystick/MIDI bracket* Digital CD audio cable* Phillips-head screwdriver (not included) *Available on some models of the Sound Blaster Audigy 2 card. Installing Hardware 1-1 - Creative SB0400 | User Guide - Page 16
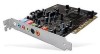
Out and Rear Center Out jacks are used simultaneously for 6.1 channel speaker systems. Click any circled number in the diagram for a description of the item. 7 6 5 4 3 2 1 9 8 10 12 11 13 14 Figure 1-1: Jacks, connectors and ports on the Sound Blaster Audigy 2 card. Installing Hardware 1-2 - Creative SB0400 | User Guide - Page 17
supports headphones. 5 Microphone In jack (MIC_IN) Connects to an external microphone for voice input. 6 Line In jack (LIN_IN) Connects to an external device (such as a cassette, DAT or MiniDisc player). 7 Digital Out jack 6-channel or compressed AC-3 SPDIF output for connection - Creative SB0400 | User Guide - Page 18
return to the main diagram. *Available with some models of the Sound Blaster Audigy 2 card. Table 1: Description of Jacks, Connectors and Ports. Number Description 8 Telephone Answering Device connector (TAD) Provides a monaural connection from a standard voice modem, and transmits microphone - Creative SB0400 | User Guide - Page 19
MIDI Bracket The Joystick/MIDI bracket* is used to attach a joystick or MIDI device: *Available with some models of the Sound Blaster Audigy 2 card. Joystick/MIDI connector Connects to a joystick or a MIDI device. Rear view of connector bracket Figure 1-2: Connector on the Joystick/MIDI bracket - Creative SB0400 | User Guide - Page 20
mounted with screws, put the screws aside for later use in Steps 2 and 3 below. A Remove any existing audio card or disable the onboard audio chipset. For more information, see "Problems with Multiple Audio Devices" on page B-9. A: metal bracket B: PCI slot C: ISA slot (may not be present on your - Creative SB0400 | User Guide - Page 21
the Sound Blaster Audigy 2 card 1. Align the Sound Blaster Audigy 2 card with the PCI slot and press the card gently but firmly into the slot as shown in Figure 1-4. 2 Do not force the audio card into the slot. Make sure that the gold finger PCI connector on the Sound Blaster Audigy 2 card is - Creative SB0400 | User Guide - Page 22
slot next to the Sound Blaster Audigy 2 card with a screw if necessary. You may also connect all the cables to the Sound Blaster Audigy 2 card first before securing the card and Joystick/ MIDI bracket in place. *Available with some models of the Sound Blaster Audigy 2 card. Joystick/MIDI bracket - Creative SB0400 | User Guide - Page 23
as shown in Figure 1-6. A • If the Sound Blaster Audigy 2 card is connected to both the CD_SPDIF and CD Audio connectors on a CDROM or DVD-ROM drive, do not enable the CD Audio and CD Digital options at the same time in Creative Surround Mixer. • Analog and Digital CD audio cables are not needed - Creative SB0400 | User Guide - Page 24
Plug the power cord back into the wall outlet, and turn on the computer. To connect your Sound Blaster Audigy 2 card to other devices, see "Connecting Related Peripherals" on page 1-11. To install drivers and software, refer to "Installing Drivers and Applications" on page 2-1. Installing Hardware - Creative SB0400 | User Guide - Page 25
to the Audigy 2 card and Audigy 2 Drive, which will void the warranty for this product. Your computer may potentially be damaged too. Click any circled number in the diagram for a description of the item. Line-out 2 8 1 3 4 7 5 Sound Blaster Audigy 2 card 6 Figure 1-7: Connecting other - Creative SB0400 | User Guide - Page 26
some models of the Sound Blaster Audigy 2 card. Click here or on any description in the table to return to the main diagram. **Available separately. Table 2: Description of Connectors and Devices. Number Description 1 Digital Out jack Connects to digital speakers, for example, Creative Inspire - Creative SB0400 | User Guide - Page 27
Creative or Cambridge SoundWorks C A F G B *For example, Creative Inspire 6.1 Analog Speakers. Analog 6.1 channel speaker system* Sound Blaster Audigy 2 card bottom) G: AD_EXT Connects to Audigy 2 Drive (upgrade option) Figure 1-8: Connecting Sound Blaster Audigy 2 card to speaker systems. - Creative SB0400 | User Guide - Page 28
use a 4-pole Digital Video A/V cable (not included) to connect Line Out 3 to available center, subwoofer and rear center channels. 5 4 6 7 8 Sound Blaster Audigy 2 card 9 10 OR Additional information for advanced users: For connection to Center and Subwoofer channels using a 3.5mm (stereo - Creative SB0400 | User Guide - Page 29
Description of Connectors and Consumer Devices. Number Description 1 Dolby Digital (AC-3) SPDIF In 2 3.5 mm (mono)-to-RCA cable 3 3.5 mm (stereo)-to 1(top) Line Out 2 (middle) Line Out 3 (bottom) 8 AD_EXT Connects to Audigy 2 Drive (upgrade option) 9 3.5 mm (stereo)-to-RCA plug: for - Creative SB0400 | User Guide - Page 30
movie enjoyment, while careless placement can make good audio systems sound bad. For detailed loudspeaker placement tips, visit the Dolby using six speakers, place them to form a circle around you (as in Figure 1-10) and angled toward you. Make sure that the computer monitor is not blocking the path - Creative SB0400 | User Guide - Page 31
2Installing Software This chapter tells you how to install the Sound Blaster Audigy 2 software. - Creative SB0400 | User Guide - Page 32
installed on). You need to install device drivers and applications prior to using your Sound Blaster Audigy 2. The instructions are applicable to all supported Windows operating systems. 1. After you have installed the Sound Blaster Audigy 2 card and Joystick/MIDI bracket*, turn on your computer - Creative SB0400 | User Guide - Page 33
the Sound Blaster Audigy 2 Feature Showcase Demo CD into your CD-ROM drive. If the drive supports Windows AutoPlay mode, the CD starts running automatically. If not, you need to enable your CD-ROM drive's auto-insert notification feature. For more details, see "Problems Installing Software" on - Creative SB0400 | User Guide - Page 34
Sound Blaster Audigy 2 device drivers or applications. For more information, see "Installing Drivers and Applications" on page 2-1. Installing/ Uninstalling selected Audio Drivers or Applications The above instructions insert the Sound Blaster Audigy 2 Installation and Applications CD into your CD-ROM - Creative SB0400 | User Guide - Page 35
icon. 3. Click the Install/Uninstall tab (or Change or Remove Programs button). 4. Select the Creative MediaSource entry, and then click the Add/Remove (or Change/Remove) button. 5. In the InstallShield . 6. Click the Next button. 7. Restart your computer when prompted. Installing Software 2-4 - Creative SB0400 | User Guide - Page 36
time users of Creative Software AutoUpdate may be prompted to authorize the download of a browser component required for system inspection. Ensure that the content is signed by Creative Labs, Inc., and then click the Yes button. ❑ Ensure that all your Creative products are connected and installed on - Creative SB0400 | User Guide - Page 37
Updating Windows 2000 (Service Pack 3) Windows 2000 now provides better support for AC-3 SPDIF output (non-PCM through waveOut) for software DVD viewing. Click the web site link below to download the Windows 2000 Service Pack 3 to enjoy this support and to fix other issues in the Windows 2000 OS. - Creative SB0400 | User Guide - Page 38
3 Using Audigy 2 Software Find out how the software accompanying your audio card can be used to control and customize the card's features for best performance. - Creative SB0400 | User Guide - Page 39
of Sound Blaster Audigy 2's rich features. Demos: Providing an overview of Sound Blaster Audigy 2's features ❑ Creative Sound Blaster Audigy 2 Getting Started Demo ❑ Creative Sound Blaster Audigy 2 Feature Showcase Demo Introduction to the Sound Blaster Audigy 2 software suite ❑ Creative MediaSource - Creative SB0400 | User Guide - Page 40
channels. Note: The Sound Blaster Audigy 2 Feature Showcase Demo can be installed using the Sound Blaster Audigy 2 Feature Showcase Demo CD in your package. This demo will run only if a Sound Blaster Audigy 2 card is installed because the software utilizes the card's hardware capabilities for the - Creative SB0400 | User Guide - Page 41
Start button in Windows, Creative MediaSource Go! Launcher provides a single point of access to most of the software programs you need, to control and customize Sound Blaster Audigy 2. Creative MediaSource Go! Launcher consists of four tabs: Programs, Product Settings, Product Support and Companion - Creative SB0400 | User Guide - Page 42
! Launcher, refer to its online Help. Creative MediaSource Player is the only software you will need for music and multimedia entertainment. Unlike other media players, Creative MediaSource Player is specially designed to access the power of your Sound Blaster Audigy 2 card. With it, you can: ❑ play - Creative SB0400 | User Guide - Page 43
files. Creative MediaSource manually type the track information of an audio CD's ripped tracks, a feature called CDDB can connect your computer to the Internet (Gracenote's CDDB service) and automatically retrieve the track names and other useful track information for you. Using Audigy 2 Software - Creative SB0400 | User Guide - Page 44
SP3 or Windows XP SP1. Also requires a second-generation 6x or faster DVD-ROM drive. Visit www.soundblaster.com for updates on OSspecific support issues. Creative EAX Console allows you to configure the Audigy 2 processor's effects engine. Creative EAX Console promises to deliver sounds that are - Creative SB0400 | User Guide - Page 45
It supports up to 6 speakers and one subwoofer. ❑ Karaoke Effects let singers add high-quality echo to add richness to their voices. Users can also vary the music's pitch to suit their vocal range. Creative MultiSpeaker Surround (CMSS) 3D makes ordinary two-channel (Left and Right Stereo) sound seem - Creative SB0400 | User Guide - Page 46
of the song. With the Time Scaling feature, Sound Blaster Audigy 2 users can maintain the pitch of a song while varying the playback speed. For more information and usage details on EAX ADVANCED HD, refer to the Creative EAX online Help. Use Creative Surround Mixer to select the device you wish to - Creative SB0400 | User Guide - Page 47
SoundFont Studio, which you can download from http://www.SoundFont.com. You can use external MIDI input devices to audition your MIDI banks and instruments. First, connect a MIDI input device to your audio card and then select that device in the Creative SoundFont Bank Manager. Once you discover - Creative SB0400 | User Guide - Page 48
Studio, you can convert between file formats and edit out any section of sound. Apply effects like fade-in/fade-out. You can also use it to blend two or more songs into a single file. For more information and usage details on Creative Recorder, refer to its online Help. Using Audigy 2 Software 3-10 - Creative SB0400 | User Guide - Page 49
and usage details on Creative Diagnostics, refer to its online Help. Creative Speaker Settings This is the main application to use for managing your speakers and troubleshooting problems related to speaker configurations. See "Creative Speaker Settings" on page 3-8. Using Audigy 2 Software 3-11 - Creative SB0400 | User Guide - Page 50
A General Specifications This section displays the specifications of your Sound Blaster Audigy 2 card and Joystick/MIDI bracket. - Creative SB0400 | User Guide - Page 51
Specifications Features This section displays the specifications of your Sound Blaster Audigy 2 card and Joystick/MIDI bracket*. *Available with some models of the Sound Blaster Audigy 2 card. PCI Bus Mastering Audigy Processor High Quality Audio Path ❑ PCI Specification Version 2.1 compliant - Creative SB0400 | User Guide - Page 52
(Digital Rights Management) technology ❑ Selectable 6-channel SPDIF output to matching digital speaker systems ❑ Software switching of SPDIF Input-to-Output (bypass) to minimize cable connection hassle ❑ Low latency multitrack recording with ASIO support ❑ Software playback control of CD Audio, Line - Creative SB0400 | User Guide - Page 53
data rates of 100, 200, and 400 Mbps ❑ Supports up to 63 IEEE 1394 compatible devices in a daisy-chain configuration ❑ Supplies up to 3 watts to IEEE 1394 compatible devices Connectivity Sound Blaster Audigy 2 card Audio Inputs Audio Outputs ❑ One line-level analog Line input via stereo jack - Creative SB0400 | User Guide - Page 54
headphone (32-ohm load) support on Front Line-Out SB1394/FireWire Inter- ❑ One 2 x 5 pin Internal SB1394/FireWire connector on card faces ❑ One 6-pin SB1394/FireWire port on rear bracket The 6-pin SB1394/FireWire connector/port has a 3 watt maximum power output. Connect only one high power usage - Creative SB0400 | User Guide - Page 55
B Troubleshooting and FAQs This section provides solutions to problems you may encounter during installation or normal use. - Creative SB0400 | User Guide - Page 56
Troubleshooting and FAQs Problems Installing Software This appendix provides solutions to problems you may encounter during installation or normal use. The installation does not start automatically after the Sound Blaster Audigy 2 Installation and Applications CD is inserted. The AutoPlay feature - Creative SB0400 | User Guide - Page 57
Problems with Sound There is unexpected excessive environmental sound sound from the headphones. Check the following: ❑ The headphones are connected to the Headphones jack. ❑ In the Speaker Selection tab of Creative in Creative Surround cannot be selected in Creative Surround Mixer. Five analog - Creative SB0400 | User Guide - Page 58
the problem is with the speakers or connection; if not, the problem may lie in the card or software configuration. No sound from the speakers. Check the following: ❑ You have connected your speakers to your card's output. ❑ You have selected the correct source in the Source panel Creative Surround - Creative SB0400 | User Guide - Page 59
problem: ❑ Make sure the Analog Audio connector on the CD-ROM drive and the CD In connector on the audio card are connected. ❑ Enable digital CD playback: For Windows v. Click the OK button. For Windows Me i. Click Start -> Settings -> the OK button. For Windows 2000 and Windows XP i. Click Start -> - Creative SB0400 | User Guide - Page 60
sources. This ensures that your analog sources will not turn silent when you pan them in Creative Surround Mixer. Problems with File Transfers on Some VIA Chipset Motherboards After you install the Audigy 2 card on a VIA chipset motherboard, you may have the slight chance of seeing one of the - Creative SB0400 | User Guide - Page 61
chipset: ❑ Creative recommends that you first contact your computer vendor or motherboard manufacturer for the latest solution. ❑ Some users have solved the above problems by doing one or both of the following: Figure B-1: Device Manager tab. • downloading the latest VIA 4in1 drivers from http - Creative SB0400 | User Guide - Page 62
the audio card's Joystick/MIDI connector and use the system port instead. Do the following: 1. Click Start -> Settings -> Control Panel. 2. In the Control Panel window, double-click the System icon. 3. In the System Properties dialog box, click the Device Manager tab. Troubleshooting and FAQs - Creative SB0400 | User Guide - Page 63
Sound, Video And Game Controllers, and then select Creative Audigy 2 Gameport (Creative Game Port for Windows it. 7. Click OK to restart Windows and for the change to take effect you have experience with system software. The joystick is not range. To solve this problem: Increase your system's 8 - Creative SB0400 | User Guide - Page 64
Blaster Audigy 2 card, do the following: ❑ If your computer detects an installed Sound Blaster Live! Series or Sound Blaster PCI512 audio card, a message box recommending that you completely uninstall and remove the older audio device will appear. Click the Yes button and follow the instructions - Creative SB0400 | User Guide - Page 65
well when Sound Blaster Audigy 2 is installed. To solve this problem: Uninstall and remove the older card from the computer. Otherwise, you can choose to disable the Sound Blaster Live! or Sound Blaster PCI512 card: 1. Click Start -> Settings -> Control Panel. 2. In the Control Panel window, double - Creative SB0400 | User Guide - Page 66
Resolving I/O Conflicts You can also refer to the Troubleshooting section in the online Help of Windows 98 SE/ Me. Problems with Encore DVD Player Conflicts between your audio card and another peripheral device may occur if your card and the other device are set to use the same I/O address. To - Creative SB0400 | User Guide - Page 67
SPDIF Output mode or vice versa) while watching a DVD movie does not seem to work, even though all settings in the software DVD player and in Creative Surround Mixer are correct. To solve this problem: Close and restart the software DVD player. Problems with DV driver for Windows 98 SE/ 2000/Me/XP - Creative SB0400 | User Guide - Page 68
button. Device drivers not signed by Microsoft may be used in Windows XP, and need not impair or destabilize your computer. Should you need more XP-related information or help, you can contact the company that developed the driver, at the company's web site or helpline. Troubleshooting and FAQs - Creative SB0400 | User Guide - Page 69
sampling rate of the PCM SPDIF output of your Digital Out connector to match the requirements of the receiving device. You may need to select a lower digital output sampling rate. The choices available are 48 kHz and 96 kHz. To solve this problem: 1. In Creative MediaSource Go! Launcher, click the - Creative SB0400 | User Guide - Page 70
CD-RW, and DVD-ROM drives. In step 4, double-click the respective drive icon. For Windows 2000 and Windows XP: 1. Click Start -> Settings -> Control Panel. 2. In the Control Panel dialog box, Click the DMA if available check box to select it. 10. Click the OK button. Troubleshooting and FAQs B-15
-
 1
1 -
 2
2 -
 3
3 -
 4
4 -
 5
5 -
 6
6 -
 7
7 -
8
-
9
-
10
-
11
-
12
-
13
-
14
-
15
-
16
-
17
-
18
-
19
-
20
-
21
-
22
-
23
-
24
-
25
-
26
-
27
-
28
-
29
-
30
-
31
-
32
-
33
-
34
-
35
-
36
-
37
-
38
-
39
-
40
-
41
-
42
-
43
-
44
-
45
-
46
-
47
-
48
-
49
-
50
-
51
-
52
-
53
-
54
-
55
-
56
-
57
-
58
-
59
-
60
-
61
-
62
-
63
-
64
-
65
-
66
-
67
-
68
-
69
-
70
 |
 |
