Creative Sound Blaster Tactic3D Rage Wireless V2.0 User Guide - Page 7
Step 4 : Set the default audio device (Mac OS ONLY), Step 5 : Wear - software
 |
View all Creative Sound Blaster Tactic3D Rage Wireless V2.0 manuals
Add to My Manuals
Save this manual to your list of manuals |
Page 7 highlights
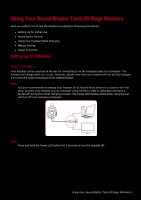
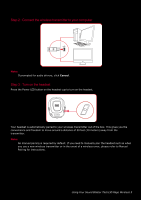
Step 4 : Set the default audio device (Mac OS ONLY) 1. Go to System Preferences and click Sound. 2. Select "Sound Blaster Tactic(3D) Rage Wireless" in both the Output and Input tabs. Step 5 : Wear it Adjust the headband so that the headset rests lightly on your head. Do not tighten excessively. Step 6 : Downloading and Installing the Software Your headset is now ready for use. However, you can enhance your audio and voice experience via an optional software package that can be downloaded and installed into your PC. We recommend that you download and install this software to make full use of all the features that your headset is equipped with. For Windows 1. Using a standard web browser, visit www.creative.com/soundblaster/products/gaming and locate the software package for the Windows operating system for your product. 2. Download this package into your local hard disk. 3. Locate and launch the software package. 4. Follow the on-screen instructions to complete the installation. 5. When prompted, restart your computer. 6. Launch the application by clicking Start > Programs or All Programs > Creative > Sound Blaster Tactic(3D) > Sound Blaster Tactic(3D) Control Panel". For Mac 1. Using your web browser, visit www.creative.com/soundblaster/products/gaming and locate the software package for the Mac OS for your product. 2. Download this package into your local hard disk. 3. Double-click the downloaded file to decompress it. 4. Double-click the uncompressed DMG file. 5. Double-click the Install icon and follow the subsequent on-screen instructions to complete the installation. 6. Launch the Sound Blaster Tactic(3D) Control Panel from the Applications > Creative > Sound Blaster Tactic(3D) folder. For more details on the software and the various features it has to offer, please refer to Using the Software. Using Your Sound Blaster Tactic3D Rage Wireless 6
-
 1
1 -
 2
2 -
 3
3 -
 4
4 -
 5
5 -
 6
6 -
 7
7 -
 8
8 -
 9
9 -
 10
10 -
 11
11 -
 12
12 -
13
-
14
-
15
-
16
-
17
-
18
-
19
-
20
-
21
-
22
-
23
-
24
-
25
-
26
-
27
-
28
-
29
-
30
-
31
 |
 |
