Crucial CT12864Z40B Installation Guide - Page 2
a module. Fill the memory slots on your computer - used
 |
UPC - 649528720726
View all Crucial CT12864Z40B manuals
Add to My Manuals
Save this manual to your list of manuals |
Page 2 highlights
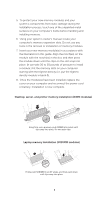
5. To protect your new memory modules and your system's components from static damage during the installation process, touch any of the unpainted metal surfaces on your computer's frame before handling and installing memory. 6. Using your system's owner's manual, locate your computer's memory expansion slots. Do not use any tools in the removal or installation of memory modules. 7. Insert your new memory module(s) in accordance with the illustrations in this guide. Align the notch(es) on the module with the notch(es) in the slot, and then press the module down until the clips on the slot snap into place. (It can take 20 to 30 pounds of pressure to install a module.) Fill the memory slots on your computer starting with the highest density (i.e. put the highest density module in bank 0). 8. Once the module(s) have been installed, replace the cover on your computer and reconnect the power cord or battery. Installation is now complete. Desktop, server, and printer memory installation (DIMM modules) Using firm, even pressure, push DIMM into socket until clips snap into place. Do not assist clips. Laptop memory installation (SODIMM modules) Firmly push SODIMM in at 45° angle, and then push down until clips snap into place. 2
-
 1
1 -
 2
2 -
 3
3 -
 4
4
 |
 |
