Cub Cadet Challenger 400LX Installation Manual
Cub Cadet Challenger 400LX Manual
 |
View all Cub Cadet Challenger 400LX manuals
Add to My Manuals
Save this manual to your list of manuals |
Cub Cadet Challenger 400LX manual content summary:
- Cub Cadet Challenger 400LX | Installation Manual - Page 1
3 NOTE: Install the windshield on top of the clamp and not inside it accessories; you can seek help from the experts. Have your full model number and serial number ready. Choose from the options below: Web: www.cubcadet.com/equipment/cubcadet/service-and-parts Phone: (800) 965-4CUB Mail: Cub Cadet - Cub Cadet Challenger 400LX | Installation Manual - Page 2
MANUFACTURER'S LIMITED WARRANTY FOR UTILITY VEHICLES The limited warranty set forth below is given by Cub Cadet LLC with respect to new installation or use of any part, accessory or attachment not approved by Cub Cadet for use with the product(s) covered by this manual will void your warranty as to
-
 1
1 -
 2
2
 |
 |

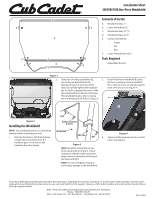
Installation Sheet
39A70051100 One-Piece Windshield
If you have difficulty assembling this product, have questions regarding the controls, operation, or maintenance of this product, want to order
replacement parts/attachments/accessories; you can seek help from the experts. Have your full model number and serial number ready. Choose
from the options below:
Web:
www.cubcadet.com/equipment/cubcadet/service-and-parts
Phone:
(800) 965-4CUB
Mail:
Cub Cadet LLC • P.O. Box 361131 • Cleveland, OH • 44136-0019
769-11590
A
E
E
F
B
C
D
E
E
E
E
Figure 1
Figure 2
Installing the Windshield
NOTE:
The windshield and/or roof should be
removed when trailering your unit.
1.
Remove the clamps with the hardware
installed (nuts and bolts) from the
hardware pack. Then remove the
hardware from the clamps.
Contents of Carton
A.
Windshield (Qty. 1)
B.
Lower Windshield (1)
C.
Windshield Seal, 37” (1)
D.
Windshield Seal, 47-°”
E.
Clamp Assembly (6)
•
Clamp
•
Nut
•
Bolt
F.
Lower Windshield Seal (1)
Tools Required
•
Adjustable Wrench
2.
Using four (4) clamp assemblies (E),
mount the windshield (A) to the
Operator Protective Structure (OPS)
tube. Do not fully tighten the hardware
yet. If a roof is equipped, be sure to slide
the windshield (A) under the roof panel.
The windshield seals to the roof using
the windshield seal (D). Refer to Figure 3.
Windshield
Rubber Grommet
& Spacer
Bolt
Nut
OPS Tube
Figure 3
NOTE:
Install the windshield on top
of the clamp and not inside it. This in
conjuction with the rubber grommet
helps reduce cracking due to flexing of
the frame and OPS.
NOTE:
Do not overtighten. Doing so
could cause damage to the windshield.
3.
Install the lower windshield (B) using
the two remaining clamp assemblies
(E) so that the lower windshield seal (F)
rests on the hood. See Figure 4.
E
B
F
Figure 4
4.
Tighten all the hardware but be careful
not to overtighten.