Cub Cadet XT2 SLX50 Operation Manual - Page 9
Hood Topper Not Shown for Clarity
 |
View all Cub Cadet XT2 SLX50 manuals
Add to My Manuals
Save this manual to your list of manuals |
Page 9 highlights
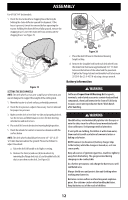
ASSEMBLY INSTALLING THE HOOD COLLAR (IF NECESSARY) There are three (3) alignment posts (a) on the hood collar (b) that line up with corresponding alignment holes (c) in the hood (d). See Figure 5. (c) (a) (b) (d) 3. Once the hood topper is in place, the two locking tabs near the rear of the hood need to be pushed upward to lock the hood topper in place. See Figure 8. (c) (c) (a) (a) (a) Figure 5 Use these alignment points to properly position the hood collar (a), then secure it in place with the six hex bolts (b) provided in the hardware bag. Tighten the hex bolts to 102-124 in-lbs (11.514 N-m). See Figure 6. a bb b b Hood Topper Not Shown for Clarity Figure 8 INSTALLING THE SCREW-ON HOOD TOPPER (IF NECESSARY) NOTE: Be careful not to damage the headlight harness when installing the screw-on hood topper. 1. Set the hood topper up against the top of the hood with the hood open, and align the holes on the hood. 2. Secure the screw-on hood topper (a) from below, handtighten the screws (b) on the rear half of the hood and then snug them. See Figure 9. 3. With the rear screws in place, align the holes in the hood topper (a) with the holes in the hood (c) and secure in place with remaining two screws (d). See Figure 9. (a) (c) Figure 6 INSTALLING THE SNAP-ON HOOD TOPPER (IF NECESSARY) 1. To install the snap-on hood topper (a), line up the holes on the hood topper (a) with the tabs (b) in the hood frame as shown in Figure 7. (a) (b) (b) (b) (b) (b) (b) (d) (d) Figure 9 4. Tighten all four screws to 16-24 in-lbs (1.8-2.7 N-m). INSTALLING THE PLENUM (IF NECESSARY) NOTE: Be careful not to damage the headlight harness when installing the plenum. To install the plenum (a) onto the hood (b): 1. Insert the rear tabs (c) as shown in Figure 10. Figure 7 (c) (b) 2. Insert the tabs (b) into the hood topper and pull back to lock (a) into place. Figure 10 9
-
 1
1 -
2
-
3
-
 4
4 -
 5
5 -
 6
6 -
 7
7 -
 8
8 -
 9
9 -
 10
10 -
 11
11 -
 12
12 -
 13
13 -
 14
14 -
15
-
16
-
17
-
18
-
19
-
20
-
21
-
22
-
23
-
24
-
25
-
26
-
27
-
28
-
29
-
30
-
31
-
32
-
33
-
34
-
35
-
36
-
37
-
38
-
39
-
40
-
41
-
42
-
43
-
44
-
45
-
46
-
47
-
48
-
49
-
50
-
51
-
52
-
53
-
54
-
55
-
56
-
57
-
58
-
59
-
60
-
61
-
62
-
63
-
64
-
65
-
66
-
67
-
68
-
69
-
70
-
71
-
72
-
73
-
74
-
75
-
76
-
77
-
78
-
79
-
80
-
81
-
82
-
83
-
84
-
85
-
86
-
87
-
88
-
89
-
90
-
91
-
92
-
93
-
94
-
95
-
96
-
97
-
98
-
99
-
100
-
101
-
102
-
103
-
104
-
105
-
106
-
107
-
108
-
109
-
110
-
111
-
112
 |
 |
