D-Link AC1750 Quick Install Guide - Page 6
Connect Your Wireless Devices - extender
 |
View all D-Link AC1750 manuals
Add to My Manuals
Save this manual to your list of manuals |
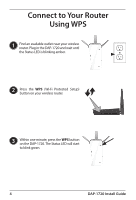
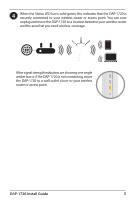
Page 6 highlights
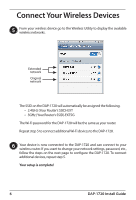
Connect Your Wireless Devices 5 From your wireless device go to the Wireless Utility to display the available wireless networks. Extended network Original network The SSID on the DAP-1720 will automatically be assigned the following: • 2.4GHz (Your Router's SSID)-EXT • 5GHz (Your Router's SSID)-EXT5G The Wi-Fi password for the DAP-1720 will be the same as your router. Repeat step 5 to connect additional Wi-Fi devices to the DAP-1720. 6 Your device is now connected to the DAP-1720 and can connect to your wireless router. If you want to change your network settings, password, etc., follow the steps on the next page to configure the DAP-1720. To connect additional devices, repeat step 5. Your setup is complete! 6 DAP-1720 Install Guide
-
 1
1 -
 2
2 -
 3
3 -
 4
4 -
 5
5 -
 6
6 -
 7
7 -
 8
8 -
 9
9 -
 10
10 -
 11
11 -
 12
12 -
13
-
14
-
15
-
16
-
17
-
18
-
19
-
20
-
21
-
22
-
23
-
24
-
25
-
26
-
27
-
28
-
29
-
30
-
31
-
32
-
33
-
34
-
35
-
36
-
37
-
38
-
39
-
40
 |
 |

6
DAP-1720 Install Guide
Connect Your Wireless Devices
5
6
Your device is now connected to the DAP-1720 and can connect to your
wireless router. If you want to change your network settings, password, etc.,
follow the steps on the next page to configure the DAP-1720. To connect
additional devices, repeat step 5.
Your setup is complete!
Extended
network
Original
network
From your wireless device go to the Wireless Utility to display the available
wireless networks.
The SSID on the DAP-1720 will automatically be assigned the following:
• 2.4GHz (Your Router’s SSID)-EXT
• 5GHz (Your Router’s SSID)-EXT5G
The Wi-Fi password for the DAP-1720 will be the same as your router.
Repeat step 5 to connect additional Wi-Fi devices to the DAP-1720.