D-Link DCS-G900 Product Manual
D-Link DCS-G900 - SECURICAM Wireless G Internet Camera Network Manual
 |
UPC - 790069286599
View all D-Link DCS-G900 manuals
Add to My Manuals
Save this manual to your list of manuals |
D-Link DCS-G900 manual content summary:
- D-Link DCS-G900 | Product Manual - Page 1
- D-Link DCS-G900 | Product Manual - Page 2
10 Security 11 The DCS-G900 Setup Wizard 12 DCS-G900 Configuration 17 Home ...17 ActiveX ...17 Java...18 Setup...18 Advanced...19 System ...19 Video ...20 Wireless ...21 Site Survey...23 Network ...24 User...26 Date Time...27 Upload...28 E-mail ...30 Tools ...32 Test...32 Reset...33 Upgrade ...33 - D-Link DCS-G900 | Product Manual - Page 3
Asked Questions 64 Internet Camera Features 64 Internet Camera Installation 66 How to Ping Your IP Address 68 Technical Specifications 69 Appendix 71 Wireless Installation Considerations 71 Glossary 72 Networking...72 Technical Support 74 Warranty 75 Registration 78 D-Link Systems, Inc - D-Link DCS-G900 | Product Manual - Page 4
DCS-G900 User's Manual Introduction Introduction Congratulations on your purchase of the DCS-G900 Wireless G Internet Camera! The DCS-G900 is a versatile and unique solution for your small office or home. Unlike a PC Camera, the DCS-G900 is a stand-alone system with a built-in CPU and Web server - D-Link DCS-G900 | Product Manual - Page 5
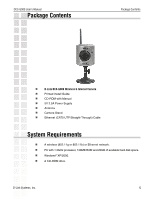
Contents Package Contents D-Link DCS-G900 Wireless G Internet Camera Printed Install Guide CD-ROM with Manual 5V 2.5A Power Supply Antenna Camera Stand Ethernet (CAT5-UTP/Straight-Through) Cable System Requirements A wireless (802.11g or 802.11b) or Ethernet network. PC with - D-Link DCS-G900 | Product Manual - Page 6
or software such as PC frame grabber cards. The DCS-G900 supports both ActiveX mode for Internet Explorer and Java mode for Internet Explorer and Netscape Navigator™. Supports a Variety of Platforms: Supporting TCP/IP networking, HTTP, and other Internet related protocols. The DCS-G900 can - D-Link DCS-G900 | Product Manual - Page 7
DCS-G900 User's Manual Hardware Overview Front Wireless Antenna Camera Lens Hardware Overview Power LED LAN LED Camera Stand D-Link Systems, Inc. 7 - D-Link DCS-G900 | Product Manual - Page 8
DCS-G900 User's Manual Rear Wireless Antenna Ethernet Cable Connector Reset Hardware Overview Power Connector Camera Stand D-Link Systems, Inc. 8 - D-Link DCS-G900 | Product Manual - Page 9
DCS-G900 User's Manual Getting Started Getting Started To begin using the DCS-G900 Wireless G Internet Camera, you will need: An existing network (including a wireless 802.11b or 802.11g router or a router/hub with an available Ethernet port). The DCS-G900 Wireless G Internet Camera connected - D-Link DCS-G900 | Product Manual - Page 10
DCS-G900 User's Manual Hardware Installation Attach the Antenna Locate the antenna included with your DCS-G900 and attach it to the antenna connector located on the back of the DCS-G900. Note: It is required that an Ethernet cable is used during initial setup. Once your wireless configuration is set, - D-Link DCS-G900 | Product Manual - Page 11
DCS-G900 User's Manual Security Security To ensure the highest security and prevent unauthorized usage of the DCS-G900, the Administrator has the exclusive privilege to create all users. The DCS-G900 supports multi-level password protection/access that can be restricted by the Administrator for - D-Link DCS-G900 | Product Manual - Page 12
DCS-G900 User's Manual The DCS-G900 Setup Wizard The DCS-G900 Setup Wizard You are now ready to run the Setup Wizard, which will guide you quickly through the installation process. Insert the D-Link DCS-G900 Driver CD into your CD-ROM drive. Click Install Software Click Install Wizard Click - D-Link DCS-G900 | Product Manual - Page 13
DCS-G900 User's Manual Click Yes Click Next Click Finish D-Link Systems, Inc. The DCS-G900 Setup Wizard 13 - D-Link DCS-G900 | Product Manual - Page 14
DCS-G900 User's Manual The DCS-G900 Setup Wizard To run the Setup Wizard, click on: Start > Programs > D-Link Setup Wizard. Your camera's IP Address will be displayed here along with its corresponding MAC Address. Click Wizard You must change the Admin ID and Password immediately to protect your - D-Link DCS-G900 | Product Manual - Page 15
Manual For Connection Mode, select either Infrastructure for use with a router, or Adhoc for a peer-to-peer connection. The Network Name (SSID), Wireless Channel, Security Mode, and Authentication must correspond with your wireless network settings for the camera to work. The DCS-G900 Setup Wizard - D-Link DCS-G900 | Product Manual - Page 16
be prompted to download ActiveX. If you want to use ActiveX to view your video images instead of Java, then you must download ActiveX. • Please refer to the Manual located on the CD-ROM for additional information regarding all features and instructions related to the DCS-G900. D-Link Systems, Inc - D-Link DCS-G900 | Product Manual - Page 17
page. Java: For Windows® users that have Java installed can also use this for viewing video. Mac users should also choose this mode to view video. Setup: This will allow you to configure the DCS-G900. Home > ActiveX For Windows® Users that do not have Java installed, please choose this option to - D-Link DCS-G900 | Product Manual - Page 18
DCS-G900 User's Manual Home > Java For Windows® users that have Java installed can also use this for viewing video. MAC users should also choose this mode to view video. DCS-G900 Configuration Home > Setup After clicking the Setup button, you will be directed to Advanced > System, please see page - D-Link DCS-G900 | Product Manual - Page 19
DCS-G900 User's Manual Advanced > System DCS-G900 Configuration System Setting Camera Name: Provide the name of your camera. Location: Enter information of where your camera is located. Admin: The following fields are required for setting up the Administrator name and password: Admin ID: Admin - D-Link DCS-G900 | Product Manual - Page 20
DCS-G900 User's Manual Advanced > Video DCS-G900 Configuration Video adjust the contrast level. The default setting is 64. Saturation Control: Allows you to adjust the saturation level. The default setting is 64. Light this option if the camera is installed upside down. D-Link Systems, Inc. 20 - D-Link DCS-G900 | Product Manual - Page 21
the DCS-G900 connected to a wireless adapter on the PC. Service Set Identifier is an identifier for the wireless network name that other devices can recognize. This page will allow you to select a wireless network that the DCS-G900 was able to detect upon booting up (see page 14). The default wireless - D-Link DCS-G900 | Product Manual - Page 22
's Manual DCS-G900 Configuration Advanced > Wireless (continued) Transmission Rate: This can be selected to restrict bandwidth usage of the DCS-G900 in a high traffic network so that the camera does not consume all the bandwidth. If too much bandwidth is being used in a network that cannot support - D-Link DCS-G900 | Product Manual - Page 23
DCS-G900 User's Manual DCS-G900 Configuration Advanced > Wireless (continued) Preamble: A preamble is a signal used in network Wireless > Site Survey This screen displays all available wireless networks, along with their SSID, MAC, Channel, Encryption, and Signal Strength information. D-Link - D-Link DCS-G900 | Product Manual - Page 24
DCS-G900 User's Manual Advanced > Network DCS-G900 Configuration TCP/IP IP Address Mode: Fixed IP: Manually provide a fixed IP Address for your connection. IP Address: Enter your IP Address, this is necessary for network identification. Subnet Mask: Provide a Subnet Mask, this will be used to - D-Link DCS-G900 | Product Manual - Page 25
Manual DCS-G900 Configuration Advanced > Network (continued) IP Address Mode (continued): PPPoE: If you use the DCS-G900 to connect directly to the Internet you will need to put in the user name and password that was given to you when you initially set up your account with the Internet Service - D-Link DCS-G900 | Product Manual - Page 26
DCS-G900 User's Manual Advanced > User DCS-G900 Configuration User Access Control Access Control: Enable the User List. User Name: Add the User Name of the user. User Add the User Password of the user. Password: Delete User: Select a user from the pull-down list and click the Delete button. User - D-Link DCS-G900 | Product Manual - Page 27
DCS-G900 User's Manual Advanced > Time DCS-G900 Configuration Date & Time Setting Synchronized with Time Server: The time will be based on the GMT setting, and will be synchronized every 10 minutes.This is also the default setting for the Internet Camera. Remember that the time set does not take - D-Link DCS-G900 | Product Manual - Page 28
DCS-G900 User's Manual Advanced > Upload DCS-G900 Configuration FTP Server Host Address: Port Number: User Name: Password: Directory Path: Passive Mode: This is the IP address of the FTP server that you will be connecting to. Default is port 21. If changed, external FTP client program must change - D-Link DCS-G900 | Product Manual - Page 29
DCS-G900 User's Manual DCS-G900 Configuration Advanced > Upload ( will be the name that precedes the time, for example G9002005072116425101.jpg. This means that the camera took a snapshot in the year 2005, July 21 at 16th hour (4 o'clock), 42 minutes 1025 will be 1 again. D-Link Systems, Inc. 29 - D-Link DCS-G900 | Product Manual - Page 30
DCS-G900 User's Manual Advanced > E-mail DCS-G900 Configuration E-mail Account SMTP Server This is the domain name or IP address of your external e-mail server. Address: Sender e-mail This is the e-mail address of the person sending the camera Address: snapshots. Receiver e-mail This is the e- - D-Link DCS-G900 | Product Manual - Page 31
DCS-G900 User's Manual DCS-G900 Configuration Advanced > E-mail (continued) Time Schedule Enable e-mail image to e-mail account: Choosing always will start sending stop. Interval: The frequency of the snapshot interval can also be configured from 1 to 65535 seconds. D-Link Systems, Inc. 31 - D-Link DCS-G900 | Product Manual - Page 32
DCS-G900 User's Manual Tools > Test DCS-G900 Configuration Test FTP Server: This will send a snapshot to the FTP server that you have configured in the Upload configured the SMTP account correctly you will be able to send a test file to the e-mail account of the recipient. D-Link Systems, Inc. 32 - D-Link DCS-G900 | Product Manual - Page 33
's Manual Tools > Reset DCS-G900 Configuration Restart: Factory Reset: This will reboot the camera once you select Apply. Select Apply will reset the camera to all its default settings. The Installation Wizard may need to be used in order to find the camera again. Tools > Firmware Firmware Update - D-Link DCS-G900 | Product Manual - Page 34
to your hard drive. Restore Device Configuration from File: This is particularly useful if you will be installing more than one camera; remember to make the IP Address unique to each camera, so there will not be two cameras with the same IP Address on the same network. D-Link Systems, Inc. 34 - D-Link DCS-G900 | Product Manual - Page 35
DCS-G900 User's Manual Status > System DCS-G900 Configuration Displays information about the Device Status, such as Camera Name, Location, Model, Firmware Version, MAC Address, and IP Address. Also displays information about the Ethernet Status, such as Link, Speed, and Duplex. Status > Video - D-Link DCS-G900 | Product Manual - Page 36
DCS-G900 User's Manual Status > Wireless DCS-G900 Configuration Displays information about the Wireless Status, such as Connection Mode, Link, SSID, Channel, transmission Rate, and Encryption. Status > Network Displays information about the Network Status, such as IP Address, Subnet Mask, Default - D-Link DCS-G900 | Product Manual - Page 37
DCS-G900 User's Manual Status > User DCS-G900 Configuration Displays information about Active Users, such as their IP Address, Name, DateTime, and Miniseconds/Packet. D-Link Systems, Inc. 37 - D-Link DCS-G900 | Product Manual - Page 38
DCS-G900 User's Manual Help DCS-G900 Configuration Click Help for easy access to information on specific fields. D-Link Systems, Inc. 38 - D-Link DCS-G900 | Product Manual - Page 39
DCS-G900 User's Manual Installing the DCS-G900 Behind a Router Installing the DCS-G900 Behind a Router Assigning and Opening the HTTP Port on the DCS-G900 (For Installing Multiple Cameras) Opening ports will allow users to view the camera via the Internet. The ports that are opened must be unique - D-Link DCS-G900 | Product Manual - Page 40
DCS-G900 User's Manual Installing the DCS-G900 Behind a Router Router Setup and Installation The following steps generally apply to any router that you have on your network. The D-Link DI-624 is used as an example to clarify the configuration process. Your WAN IP Address information will be listed - D-Link DCS-G900 | Product Manual - Page 41
proceed as follows: • Select Enabled to enable virtual server settings. • Select a camera name. • Enter your camera's Local IP Address in the Private IP field. • Select TCP under Protocol Type. • If you are using the default camera port settings, enter 80 in to the Public and Private Port section - D-Link DCS-G900 | Product Manual - Page 42
DCS-G900 User's Manual Installing the DCS-G900 Behind a Router Viewing Your Camera After all settings have been entered correctly, a user inside or outside your network will have access to the camera through a standard Web browser. To access from the Internet, simply type in the IP Address of the - D-Link DCS-G900 | Product Manual - Page 43
the DCS-G900. IPView SE is a complete software management tool for the DCS-G900 and includes all configurable settings available in the web configuration utility. Insert the CD-ROM into the CD-ROM drive. A menu screen will appear as shown below. Click Install Software Click Install IPView SE D-Link - D-Link DCS-G900 | Product Manual - Page 44
DCS-G900 User's Manual Click Next Click Yes Click Next D-Link Systems, Inc. IPView SE Application Installation 44 - D-Link DCS-G900 | Product Manual - Page 45
DCS-G900 User's Manual IPView SE Application Installation Click Finish After successfully installing the IPView SE, the application program for the DCS-G900 is automatically installed to \Programs\IPView SE Directory. To start running the IPView SE click on Windows® Start > Programs > IPView SE > - D-Link DCS-G900 | Product Manual - Page 46
DCS-G900 User's Manual IPView SE IPView SE This section describes the operation of the IPView SE application User Interface with detailed procedures for using the application. IPView SE allows you to manage your cameras by enabling you to search, configure and preview all the DCS-G900s from one - D-Link DCS-G900 | Product Manual - Page 47
DCS-G900 User's Manual IPView SE Icon Description System Configure Connect/Disconnect Assign IP to a Camera Liberate Camera Camera's Extra Information Configure Camera from Web Motion Setting Manual Recording Schedule Recording Motion Recording Scan Combine Play Help/About Minimize - D-Link DCS-G900 | Product Manual - Page 48
, a dialog box will appear to notify you of the error. To add cameras in IPView SE, check that you have your network configured correctly. To add a remote camera, you need to have Internet access. If you are unsure of the IP Address of the camera, you can click on Search to search for all available - D-Link DCS-G900 | Product Manual - Page 49
DCS-G900 User's Manual IPView SE Highlight the camera you wish to add and click on Add. The camera will automatically be added into the IPView SE list view. If you add the same camera more than once you will receive the following message (see below). If the Login Camera dialog box appears, make - D-Link DCS-G900 | Product Manual - Page 50
Change IP Address button and the Change IP Address dialog box will appear. Select Manually Assign IP if you want to connect manually to the camera by providing the IP Address, Subnet Mask, and Default Gateway. Select DHCP if you would like to connect to only cameras on your network. D-Link Systems - D-Link DCS-G900 | Product Manual - Page 51
DCS-G900 User's Manual IPView SE How to Format the Camera View Select the Combine button on the IPView SE and you should see all four cameras combined (see image below). A maximum of 4 cameras can be viewed simultaneously with IPView SE. Select any of the four cameras for the View Mode format - D-Link DCS-G900 | Product Manual - Page 52
DCS-G900 User's Manual IPView SE How to Rotate the Video View In View Mode format, click on the Rotate button the left (see image below). and the image should rotate 90o to View/List Click the View/List button . All the cameras and their properties, such as the camera name, IP Address, user - D-Link DCS-G900 | Product Manual - Page 53
DCS-G900 User's Manual IPView SE Zoom Click the Zoom button to zoom in on the camera image. The options under zoom are Fit Window x1, x1.5, x2, x2.5, x3, x3.5, and x4. Color always appear on top. Close Click the Close button to close the display screen of the camera. D-Link Systems, Inc. 53 - D-Link DCS-G900 | Product Manual - Page 54
DCS-G900 User's Manual IPView SE How to take a Snap-Shot with the Camera In View Mode format select the Snapshot button picture. How to Start Recording To start recording with a camera, click the Manual Recording button appear in your IPView SE folder. Note: You must stop recording before changing - D-Link DCS-G900 | Product Manual - Page 55
DCS-G900 User's Manual IPView SE Camera Settings Once you have completed the initial configuration of the DCS-G900 using the Web-based interface, you can review or change your configuration using either the Web-based configuration utility or the Settings in the DCS-G900 IPView SE. Configure Camera - D-Link DCS-G900 | Product Manual - Page 56
DCS-G900 User's Manual IPView SE Manual Recording Click the Manual Recording button , to begin recording images from your camera. Schedule Recording Click the Schedule Recording button to record based on a specific time and date. Click Add to set the time and date for recording. D-Link Systems, - D-Link DCS-G900 | Product Manual - Page 57
DCS-G900 User's Manual IPView SE Schedule Recording (continued) Select Date Mode and enter in the Start date/time, and Stop date/time. The camera option is selected and the camera detects motion within the range of camera one by one. When this option is selected the camera(s) will briefly display their - D-Link DCS-G900 | Product Manual - Page 58
DCS-G900 User's Manual IPView SE Camera's Extra Information Click the Camera's Extra Information button to view information about your camera. Play Click the Play button to playback video recorded from your camera. D-Link Systems, Inc. 58 - D-Link DCS-G900 | Product Manual - Page 59
DCS-G900 User's Manual System Configure Click the System Configure button on the IPView SE. IPView SE Profile: The DCS-G900 will not have a profile to load initially, you will have to select all of your cameras and then click the Save or Save As buttons to save your profile. Up to - D-Link DCS-G900 | Product Manual - Page 60
DCS-G900 User's Manual IPView SE Log Storage: The Single HDD Reserved Space option permits reserved HDD space from 500 MB to 1000 MB. The Split Recording File option is used to adjust the file size for recording the video images (the default to keep one storage at least. D-Link Systems, Inc. 60 - D-Link DCS-G900 | Product Manual - Page 61
DCS-G900 User's Manual IPView SE Recycle: The Reserved HDD space per camera option allows old video files to the Recording File Path Settings in the Recording menu. Player Setup: In this section you may choose between Windows system default or User define for the video player desired for - D-Link DCS-G900 | Product Manual - Page 62
DCS-G900 User's Manual IPView SE About Click the Help/About version. icon, and then select About for camera details such as software D-Link Systems, Inc. 62 - D-Link DCS-G900 | Product Manual - Page 63
DCS-G900 User's Manual Uninstall IPView SE IPView SE Click on Windows® Start Menu > Programs > IPView SE > Uninstall IPView SE. A new prompt OK to continue the process. The InstallShield Wizard prompt will appear. Click Finish to complete the uninstallation procedure. D-Link Systems, Inc. 63 - D-Link DCS-G900 | Product Manual - Page 64
DCS-G900 User's Manual Frequently Asked Questions Frequently Asked Questions Internet Camera Features 1 What is an Internet Camera? The Internet Camera is a standalone system connecting directly to an Ethernet or Fast Ethernet network and supported by the wireless transmission based on the IEEE - D-Link DCS-G900 | Product Manual - Page 65
only on Ethernet and Fast Ethernet network or supported by wireless transmission. The D-Link DSB-C110, DSB-C310 can be used as a PC Camera (Webcam). 8 Can the Internet Camera be connected on the network if it consists of only private IP Addresses? Yes, the Internet Camera can be connected to a LAN - D-Link DCS-G900 | Product Manual - Page 66
is DC 5V, for the Internet Camera. Also verify that the power supply is well connected, and/or the option to turn off the LED is enabled. 12 Why does the LAN LED not light up properly? There might be a problem with the network cable. To confirm that the cables are working, PING the address - D-Link DCS-G900 | Product Manual - Page 67
DCS-G900 User's Manual Frequently Asked Questions 16 Noisy images occur. How can I solve the problem? The video images might be noisy if the Internet Camera is used in a very low light environment. 17 The images are poor quality, how can I improve the image quality? Make sure that your computers - D-Link DCS-G900 | Product Manual - Page 68
DCS-G900 User's Manual How to Ping Your IP Address How to Ping Your IP Address The PING (Packet Internet Groper) command can determine whether a specific IP Address is accessible by sending a packet to the specific address and waiting for a reply. It is a very useful tool to confirm if the IP Address - D-Link DCS-G900 | Product Manual - Page 69
DCS-G900 User's Manual Technical Specifications Technical Specifications Network* • TCP/IP (DHCP or Static IP Address) • 802.11g Wireless (Supports up to 54Mbps transfer rate) • 802.11b Wireless (Supports up to 11Mbps transfer rate) • Wired LAN: 10/100Mbps Web Access Requirements • Any Java-Enabled - D-Link DCS-G900 | Product Manual - Page 70
DCS-G900 User's Manual Power Consumption: • 5W Environmental specification • Operating temperature: 5°C to 50°C • Storage temperature: -25°C to 50°C • Operating relative humidity: 5% to 95% non-condensing Warranty: • 1 Year Technical Specifications D-Link Systems, Inc. 70 - D-Link DCS-G900 | Product Manual - Page 71
DCS-G900 User's Manual Appendix Appendix Wireless Installation Considerations The D-Link® DCS-G900 can be integrated into a wireless network from virtually anywhere within its operating range. However, the range can be limited by the number of walls, thickness of walls, and location of the - D-Link DCS-G900 | Product Manual - Page 72
with access to the Internet. Key: Encryption keys allow you to easily change wireless encryption settings to maintain a secure network. The DCS-G900 supports 64-bit and 128-bit keys. Netmask: Commonly referred to as subnet mask, this is used to determine what subnet an IP address belongs to. RJ-45 - D-Link DCS-G900 | Product Manual - Page 73
DCS-G900 User's Manual Glossary SSID (Service Set Identifier): The name designated for a specific wireless local area network (WLAN). The SSID can be easily changed to connect to an existing wireless network. Static IP: A static IP address is configured manually on the device that will be using it. A - D-Link DCS-G900 | Product Manual - Page 74
DCS-G900 User's Manual Technical Support Technical Support Technical Support You can find software updates and user documentation on the D-Link website. D-Link provides free technical support for customers within the United States and within Canada for the duration of the warranty period on this - D-Link DCS-G900 | Product Manual - Page 75
DCS-G900 User's Manual Warranty Warranty Subject to the terms and conditions set forth herein, D-Link Systems, Inc. ("D-Link") provides this Limited Warranty: · Only to the person or entity that originally purchased the product from D-Link by D-Link for the Software. Replacement Software will be - D-Link DCS-G900 | Product Manual - Page 76
DCS-G900 User's Manual Warranty · The customer must submit with the product as part of the claim a written description of the Hardware defect or Software nonconformance in sufficient detail to allow D-Link ID Number at https://rma.dlink.com/. · After an RMA only an Authorized D-Link Service Office. - D-Link DCS-G900 | Product Manual - Page 77
DCS-G900 User's Manual Warranty Limitation of Liability: TO THE MAXIMUM EXTENT PERMITTED BY LAW, D-LINK LINK FOR WARRANTY SERVICE) RESULTING FROM THE USE OF THE PRODUCT, RELATING TO WARRANTY SERVICE, OR ARISING OUT OF ANY BREACH OF THIS LIMITED WARRANTY, EVEN IF D-LINK with the instructions, may - D-Link DCS-G900 | Product Manual - Page 78
DCS-G900 User's Manual Registration Registration Product registration is entirely voluntary and failure to complete or return this form will not diminish your warranty rights. 11/03/05 D-Link Systems, Inc. 78
-
 1
1 -
 2
2 -
 3
3 -
 4
4 -
 5
5 -
 6
6 -
 7
7 -
8
-
9
-
10
-
11
-
12
-
13
-
14
-
15
-
16
-
17
-
18
-
19
-
20
-
21
-
22
-
23
-
24
-
25
-
26
-
27
-
28
-
29
-
30
-
31
-
32
-
33
-
34
-
35
-
36
-
37
-
38
-
39
-
40
-
41
-
42
-
43
-
44
-
45
-
46
-
47
-
48
-
49
-
50
-
51
-
52
-
53
-
54
-
55
-
56
-
57
-
58
-
59
-
60
-
61
-
62
-
63
-
64
-
65
-
66
-
67
-
68
-
69
-
70
-
71
-
72
-
73
-
74
-
75
-
76
-
77
-
78
 |
 |