D-Link DGS-1100-16 Product Manual - Page 5
Product Introduction, DGS-1100-16, Front Panel, Rear Panel, Power LED, Link/Act/Speed LED Ports 1-16 - configuration
 |
UPC - 790069349577
View all D-Link DGS-1100-16 manuals
Add to My Manuals
Save this manual to your list of manuals |
Page 5 highlights
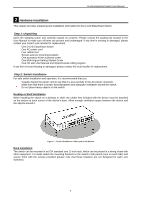
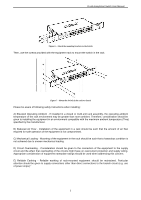
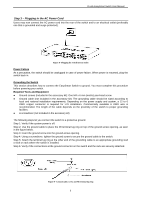
D-Link EasySmart Switch User Manual 1 Product Introduction Thank you and congratulations on your purchase of D-Link EasySmart Switch Products. D-Link's next generation EasySmart Ethernet switch series blends plug-and-play simplicity with exceptional value and reliability for small and medium-sized business (SMB) networking. All models are housed in a new style rack-mount metal case with easy-to-view front panel diagnostic LEDs. The brand-new DGS-1100 series are born to be green by design of IEEE 802.3az Energy Efficient Ethernet compliant (abbreviated as EEE) and D-Link Green Technologies. It allows significant power saving during periods of low data activity. In most of use cases and environments, switches are idle in 90% or more of time. While no traffic in a short period of time, ports on DGS-1100 switch get into power saving mode automatically. Once if a packet is received, the switch wakes and works immediately. Connecting to EEE compliant devices, such as PCs and servers, the network can save energy without compromising any performance. While connecting to legacy devices which do not support IEEE 802.3az, D-Link Green Technologies can reduce power consumption by detecting short cable and link-down devices. DGS-1100-16 16-Port 10/100/1000Mpbs EasySmart Switch Front Panel Figure 1 - DGS-1100-16 Front Panel Power LED: The Power LED lights up when the Switch is connected to a power source. Link/Act/Speed LED (Ports 1-16): Flashing: Indicates a network link through the corresponding port. Blinking: Indicates that the Switch is either sending or receiving data to the port. Green: Indicates that the port is running at 1000M. Amber: Indicates that the port is running at 10/100M. Light off: No link. Reset: By pressing the Reset button for 5 seconds the Switch will change back to the default configuration and all changes will be lost. Rear Panel Figure 2 - DGS-1100-16 Rear Panel Power: The power port is where to connect the AC power cord. 2
-
 1
1 -
 2
2 -
 3
3 -
 4
4 -
 5
5 -
 6
6 -
 7
7 -
 8
8 -
 9
9 -
 10
10 -
 11
11 -
12
-
13
-
14
-
15
-
16
-
17
-
18
-
19
-
20
-
21
-
22
-
23
-
24
-
25
-
26
-
27
-
28
-
29
-
30
-
31
-
32
-
33
-
34
-
35
-
36
-
37
-
38
-
39
-
40
-
41
 |
 |