D-Link DI-614 Product Manual
D-Link DI-614 - AirPlus Wireless Router Manual
 |
View all D-Link DI-614 manuals
Add to My Manuals
Save this manual to your list of manuals |
D-Link DI-614 manual content summary:
- D-Link DI-614 | Product Manual - Page 1
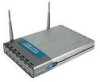
D-Link AirPlus DI-614+ Enhanced 2.4GHz Wireless Broadband Router Manual Building Networks for People - D-Link DI-614 | Product Manual - Page 2
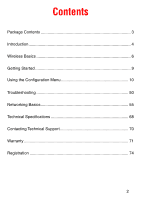
Contents Package Contents 3 Introduction 4 Wireless Basics 6 Getting Started 9 Using the Configuration Menu 10 Troubleshooting 50 Networking Basics 55 Technical Specifications 68 Contacting Technical Support 70 Warranty 71 Registration 74 2 - D-Link DI-614 | Product Manual - Page 3
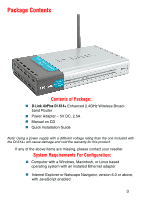
Contents Contents of Package: D-Link AirPlus DI-614+ Enhanced 2.4GHz Wireless Broadband Router Power Adapter - 5V DC, 2.5A Manual on CD Quick Installation Guide Note: Using a power supply with a different voltage rating than the one included with the DI-614+ will cause damage and void the - D-Link DI-614 | Product Manual - Page 4
to help you connect the Router and the D-Link AirPlus 2.4GHz Wireless Adapters into a network in Infrastructure mode. Please take a look at the Getting Started section in this manual to see an example of an Infrastructure network using the DI-614+. This manual provides a quick introduction to - D-Link DI-614 | Product Manual - Page 5
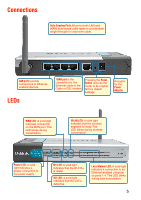
DSL modem Pressing the Reset Button restores the router to its original factory default settings. Receptor for the Power Adapter WAN LED: A solid light indicates connection on the WAN port. This LED blinks during transmission. WLAN LED: A solid light indicates that the wireless segment is ready - D-Link DI-614 | Product Manual - Page 6
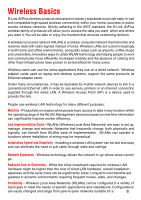
. Wireless users can use the same applications they use on a wired network. Wireless adapter cards used on laptop and desktop systems, support the same protocols as Ethernet adapter cards. Under many circumstances, it may be desirable for mobile network devices to link to a conventional Ethernet - D-Link DI-614 | Product Manual - Page 7
Adapters used with laptop computers (DWL-650+) Enhanced 2.4GHz Wireless PCI cards used with desktop computers (DWL-520+) Enhanced 2.4GHz Wireless Router and Access Point (DI-614+, DWL- 900AP+) The DI-614+ is also compatible with the D-Link Air 802.11b family of products, which include: 2.4GHz - D-Link DI-614 | Product Manual - Page 8
is positioned for best reception by using the software signal strength tools included with your product. Link network devices: A wireless Broadband Router - D-Link AirPlus DI-614+ A laptop computer with a Wireless Adapter - D-Link AirPlus DWL-650+ A desktop computer with a Wireless Adapter - D-Link - D-Link DI-614 | Product Manual - Page 9
of the modem. Connect the Cable or DSL modem to the DI-614+ wireless broadband router (see the Quick Installation Guide included with the DI-614+). If you are connecting a desktop computer to your network, you can install the D-Link DFE-530TX+ ethernet adapter into an available PCI slot. (See the - D-Link DI-614 | Product Manual - Page 10
browser Type in the IP Address of the DI-614+ http://192.168.0.1 Note: if you have changed the default IP Address assigned to the DI-614+, make sure to enter the correct IP Address. The factory default User name is admin and the default Password is blank (empty). It is recommended that you - D-Link DI-614 | Product Manual - Page 11
Point) Portion of the Wireless Router. It allows you to change the wireless settings to fit an existing wireless network or to customize your wireless network. Enabled or Disabled By default, Wireless is Enabled. If you do not want to use the Wireless feature on the DI-614+, you can disable it - D-Link DI-614 | Product Manual - Page 12
customize your wireless network. In this mode, in order to access the DI-614+ on the network, the device must be listed in the MAC Address Control List. The DI-614+ will be visible to all devices on the network. This is the default setting. The Key Types that are supported by the DI-614+ are HEX - D-Link DI-614 | Product Manual - Page 13
users onto the wireless network. WPA uses stronger security than WEP and is based on a key that changes automatically at a regular interval. This mode requires a RADIUS server in the network. Radius Server 1 Radius Server 2 IP - Enter the IP Address of the RADIUS server. Port - Enter the port - D-Link DI-614 | Product Manual - Page 14
Access - Pre-Shared Key mode means that the wireless client and the router must have the same passphrase in order to establish the wireless connection. A RADIUS server is not required with PSK. Passphrase Enter a passphrase for the router. The RADIUS server should use the same passphrase (secret - D-Link DI-614 | Product Manual - Page 15
which of the following represents your connection mode to the Internet: Dynamic IP Address Obtain an IP address from your ISP automatically (mainly for Cable users). Static IP Address Your ISP assigns you a Static IP Address. PPP over Ethernet Others PPTP Some ISPs require the use of PPPoE to - D-Link DI-614 | Product Manual - Page 16
an IP Address automatically from their ISP (Internet Service Provider). Host Name MAC Address Clone MAC Address Primary DNS Address Secondary DNS Address This is optional, but may be required by some ISPs. The host name is the device name of the Router. The default MAC Address is set to the WAN - D-Link DI-614 | Product Manual - Page 17
Subnet Mask provided by your ISP. ISP Gateway Input the Gateway address provided by your ISP. MAC Address The default MAC Address is set to the WAN's physical interface MAC address on the Router. Clone MAC Address This feature will copy the MAC address of the Ethernet card, and replace the WAN - D-Link DI-614 | Product Manual - Page 18
this option to obtain an IP address automatically from their ISP through the use of PPPoE. User Name Your PPPoE username provided by your ISP. Password Your PPPoE password is provided by your ISP. Service Name (Optional) Check with your ISP for more information if they require the use of - D-Link DI-614 | Product Manual - Page 19
is maintained during inactivity. To disable this feature, enable Auto-reconnect. Maximum Transmission Unit; default is 1492; you may need to change the MTU to conform to your ISP. If enabled, the Broadband Router will automatically connect to your ISP after your system is restarted or if the - D-Link DI-614 | Product Manual - Page 20
Address. PPTP Account PPTP Password Maximum Idle Time MTU Auto-reconnect Enter the PPTP account name. Enter the PPTP password. Enter a maximum idle Transmission Unit; default is 1400; you may need to change the MTU to conform to your ISP. If enabled, the Broadband Router will automatically connect - D-Link DI-614 | Product Manual - Page 21
Server IP Address. L2TP Account L2TP Password Enter the PPTP account name. Enter the PPTP password. Maximum Idle Time MTU Auto-reconnect Enter Transmission Unit; default is 1400; you may need to change the MTU to conform to your ISP. If enabled, the Broadband Router will automatically connect - D-Link DI-614 | Product Manual - Page 22
. Enter the password for the BigPond account. Auth Server Login Server IP MAC Address Clone MAC Address Select the auth server for the BigPond account. (Optional) Enter the Login Server name if required. The default MAC Address is set to the WAN's physical interface MAC address on the Router. This - D-Link DI-614 | Product Manual - Page 23
the IP settings of the LAN interface for the DI-614+. These settings may be referred to as Private settings default subnet mask is 255.255.255.0. (Optional) The name of your local domain. DNS Relay You may choose to enable or disable DNS Relay. If disabled, the DNS address received on the WAN port - D-Link DI-614 | Product Manual - Page 24
of the IP address pool. DHCP Server Enable or disable the DHCP service. Starting IP Address Ending IP Address Lease Time The starting IP address DHCP Clients List Lists the DHCP clients connected to the DI-614+. Click Refresh to update the list. The table will show the Host Name, IP Address - D-Link DI-614 | Product Manual - Page 25
Menu Advanced > Virtual Server The DI-614+ can be configured as a virtual server so that remote users accessing Web or FTP services via the public IP address can be automatically redirected to local servers in the LAN (Local Area Network). The DI-614+ firewall feature filters out unrecognized - D-Link DI-614 | Product Manual - Page 26
work with the DI-614+. If you need to run applications that require multiple connections, specify the port normally associated with "Copy to" button and the router will fill in the appropriate information to the list. You will then need to enable the service. If the mechanism of Special - D-Link DI-614 | Product Manual - Page 27
Disabled Click Enabled to apply the filter policy or click Disabled to enter an inactive filter policy. (You can reactivate the policy later.) IP Address Port Range Protocol Type Schedule Enter the IP address range of the computers that you want the policy to apply to. If it is only a single - D-Link DI-614 | Product Manual - Page 28
is a list of MAC addresses from the DHCP client computers connected to the DI-614+. To use them, select one from the drop down list and select an number you want to use. Then click the "Copy to" button and the DI-614+ will fill in the appropriate information in the list. Disabled MAC Filter Select - D-Link DI-614 | Product Manual - Page 29
Using the Configuration Menu Advanced > Parental Control >URL Blocking Use URL Blocking to deny LAN computers from accessing specific web sites by its URL. A URL is a specially formatted text string that defines a location on the Internet. If any part of the URL contains the blocked word, the site will - D-Link DI-614 | Product Manual - Page 30
to both wired computers connected to one of the four Ethernet LAN ports and to wireless clients connected wirelessly to the DI-614+. Disabled Domain Filter Select this option if you do not want to use Domain filters. Allow users to access the following domains and block all other domains Select this - D-Link DI-614 | Product Manual - Page 31
the policy later). Name Enter the name of the Firewall Rule. Action Select Allow or Deny to allow or deny traffic to pass through the DI-614+. Interface Source Choose between a LAN or WAN source. An asterisk signifies the selection of both sources. Interface Destination Choose between a LAN or WAN - D-Link DI-614 | Product Manual - Page 32
the policy applied to, then enter the port number in the Start Port field and leave the End Port field blank. If you want to use all the ports, you can leave the port range empty. Schedule Select Always, or choose From and enter the time period during which the virtual service will be available 32 - D-Link DI-614 | Product Manual - Page 33
Using the Configuration Menu Advanced > DMZ If you have a computer that cannot run Internet applications properly from behind the DI-614+, then you can allow that computer to have unrestricted Internet access. Enter the IP address of that computer as a DMZ (Demilitarized Zone) host with unrestricted - D-Link DI-614 | Product Manual - Page 34
Interval Beacons are packets sent by an Access Point to synchronize a wireless network. Specify a value. 100 is the default setting and is recommended. DTIM interval (Delivery Traffic Indication Message) 3 is the default setting. A DTIM is a countdown informing clients of the next window for - D-Link DI-614 | Product Manual - Page 35
devices on a network must share the same SSID (Service Set Identifier) to establish communication. Choose Disabled if you do not wish to broadcast the SSID over the network. Antenna transmit The DI-614+ has the option to adjust its wireless transmit power. power Limiting transmit power can help in - D-Link DI-614 | Product Manual - Page 36
be configured through the WAN (Wide Area Network) port from the Internet using a web browser. A username and password is still required to access the browser-based management interface. IP Address Port Internet IP Address of the computer that has access to the DI-614+. If the IP Address is set to - D-Link DI-614 | Product Manual - Page 37
NTP Server (Optional.) If you are enabling NTP to synchronize the time settings on your network using an NTP server, please enter the link to the default server. Set Device Date and If you are entering the time manually, select the correct Year, Time Month, Day, Hour, Minute, and Second. 37 - D-Link DI-614 | Product Manual - Page 38
setting file created by the DI-614+ can be uploaded to the unit. To reload a system settings file, click on Browse to search the local hard drive for the file to be used. The device can also be reset back to factory default settings by clicking on the Reset to Default button. Use the restore feature - D-Link DI-614 | Product Manual - Page 39
Tools > Firmware You can upgrade the firmware by using this tool. First, check the D-Link support site for firmware updates at http://support.dlink.com. Make upgrade. Browse After you have downloaded the new firmware, click Browse in this window to locate the firmware update on your hard drive. Click - D-Link DI-614 | Product Manual - Page 40
assigned by a DHCP capable router or server) linked to a domain name. Users who have a Dynamic DNS account may use this feature on the DI-614+. DDNS Server Address Host Name When an IP address is automatically assigned by a DHCP server, DDNS automatically updates the DNS server. Select Disabled - D-Link DI-614 | Product Manual - Page 41
Using the Configuration Menu Tools > Misc 41 - D-Link DI-614 | Product Manual - Page 42
functional using the router without making any configurations. By default UPnP setting is set to enable. It is recommended to keep UPnP Setting on enable. Click Enable to enable Gaming Mode. This feature allows many online games to work with the DI-614+. VPN Pass Through For users who telecommute - D-Link DI-614 | Product Manual - Page 43
mismatch. The Cable Tester feature significantly reduces service calls and returns by allowing users to easily troubleshoot their cable connections. Ports The Ethernet port names associated to the physical ports. Link Status More Info The current link status of the Ethernet cable connected to the - D-Link DI-614 | Product Manual - Page 44
Using the Configuration Menu Status > Device Info This screen displays information about the DI-614+. DHCP Release Click to release IP addresses sent from the DHCP server. DHCP Renew Click to renew IP addreses sent from the DHCP server. 44 - D-Link DI-614 | Product Manual - Page 45
Using the Configuration Menu Status > Log This screen displays activities occurring on the DI-614+. First Page- Click First Page to go to the first page of the log. Last Page- Click Last Page to go to the last page - D-Link DI-614 | Product Manual - Page 46
Menu Status > Log > Log Settings E-Mail Alert SMTP Server IP Email Address Send Mail Now Save Log File to Local Hard Drive Log Type The DI-614+ can be set up to send the log files to a specific email address. Enter in the IP address of the mail server. Enter in the - D-Link DI-614 | Product Manual - Page 47
are displayed. Refresh This will update the page. Reset This will reset the packet counter to zero. WAN Displays Received / Transmitted packets from the WAN port. LAN Displays Received / Transmitted packets from the LAN port. WIRELESS Displays received and transmitted packets from - D-Link DI-614 | Product Manual - Page 48
Using the Configuration Menu Status > Wireless The wireless client table displays a list of current connected wireless clients. This table also displays the time and MAC address of the wireless client connected. 48 - D-Link DI-614 | Product Manual - Page 49
Using the Configuration Menu Help This screen displays the complete Help menu. For help at anytime, click the Help tab in the Configuration menu. 49 - D-Link DI-614 | Product Manual - Page 50
Troubleshooting This chapter provides solutions to problems that can occur during the installation and operation of the DI-614+ Wireless Access Point. We cover various aspects of the network setup, including the network adapters. Please read the following if you are having problems. (Note: It is - D-Link DI-614 | Product Manual - Page 51
correct available network, as shown in the illustrations below. Default Check that the IP Address assigned to the wireless adapter is within the same IP Address range as the gateway. (Since the DI-614+ has an IP Address of 192.168.0.1, wireless adapters must have an IP Address in the same range - D-Link DI-614 | Product Manual - Page 52
Troubleshooting 3. Check that the drivers for the network adapters are installed properly. You may be using different network adapters than those illustrated here, but this procedure will remain the same, - D-Link DI-614 | Product Manual - Page 53
Troubleshooting Double-click on Network Adapters. Right-click on D-Link AirPlus DWL-650+ Wireless Cardbus Adapter. Select Properties to check that the drivers are installed properly. D-Link AirPlus DWL-650+ Wireless Cardbus Look under Device Status to check that the device is working - D-Link DI-614 | Product Manual - Page 54
other methods for troubleshooting your network, you may choose to Reset the DI-614+ to the factory default settings. Remember that D-Link AirPlus products network together, out of the box, at the factory default settings. To hard-reset the D-Link AirPlus DI-614+ to Factory Default Settings, please - D-Link DI-614 | Product Manual - Page 55
Networking Basics Using the Network Setup Wizard in Windows XP In this section you will learn how to establish a network at home or work, using Microsoft Windows XP. Note: Please refer - D-Link DI-614 | Product Manual - Page 56
Networking Basics Please follow all the instructions in this window: Click Next. In the following window, select the description that best fits your computer. If your computer connects to the internet through a gateway/router, select the second option as shown. Click Next. 56 - D-Link DI-614 | Product Manual - Page 57
Networking Basics Enter a Computer description and a Computer name (optional). Click Next. Enter a Workgroup name. All computers on your network should have the same Workgroup name. Click Next. 57 - D-Link DI-614 | Product Manual - Page 58
Networking Basics Please wait while the Network Setup Wizard applies the changes. When the changes are complete, click Next. Please wait while the Network Setup Wizard configures the computer. This may take a few minutes. 58 - D-Link DI-614 | Product Manual - Page 59
Networking Basics In the window below, select the option that fits your needs. In this example, Create a Network Setup Disk has been selected. You will run this disk on each of the computers on your network. Click Next. Insert a disk into the Floppy Disk Drive, in this case drive A. 59 - D-Link DI-614 | Product Manual - Page 60
Networking Basics Please read the information under Here's how in the screen below. After you complete the Network Setup Wizard you will use the Network Setup Disk to run the Network Setup Wizard once on each of the computers on your network. To continue click Next. 60 - D-Link DI-614 | Product Manual - Page 61
the computer. Click Yes to restart the computer. You have completed configuring this computer. Next, you will need to run the Network Setup Disk on all the other computers on your network. After running the Network Setup Disk on all your computers, your new wireless network will be ready to use. 61 - D-Link DI-614 | Product Manual - Page 62
Networking Basics Naming your Computer To name your computer, please follow these directions. In Windows XP: Click Start (in the lower left corner of the screen). Right-click on My Computer. Select Properties and click. Select the Computer Name Tab in the System Properties window. You may - D-Link DI-614 | Product Manual - Page 63
Protocol) technology. If you are using a DHCP-capable Gateway/Router you will not need to assign Static IP Addresses. If you are not using a DHCP capable Gateway/Router, or you need to assign a Static IP Address, please follow these instructions: Go to Start. Double-click on Control Panel. 63 - D-Link DI-614 | Product Manual - Page 64
Networking Basics Assigning a Static IP Address in Windows XP/2000 Double-click on Network Connections. Right-click on Local Area Connections. Double-click on Properties. 64 - D-Link DI-614 | Product Manual - Page 65
/2000 Click on Internet Protocol (TCP/IP). Click Properties. Enter the LAN IP address of the Wireless Router. (D-Link wireless routers have a LAN IP address of 192.168.0.1.) The DNS server information will be supplied by your ISP (Internet Service Provider). Click OK 192 168 0 1 192 168 0 1 65 - D-Link DI-614 | Product Manual - Page 66
Go to the Apple Menu and select System Preferences. cClick on Network. Select Built-in Ethernet in the Show pull-down menu. Select Manually in the Configure pull-down menu. Input the Static IP Address, the Subnet Mask, and the Router IP Address in the appropriate fields. Click Apply Now. 66 - D-Link DI-614 | Product Manual - Page 67
the Show pull-down menu. Select Using DHCP in the Con- figure pull-down menu. Click Apply Now. The IP Address, Subnet mask, and the Router's IP Address will appear in a few seconds. 67 - D-Link DI-614 | Product Manual - Page 68
Advanced Firewall Features Device Management Web-Based - Internet Explorer 6.0 or later; Netscape Navigator 6 or later; or other Java- enabled browsers. Wireless Data Rates* With Automatic Fallback 22Mbps 11Mbps 5.5Mbps 2Mbps 1Mbps Encryption 64/128/256-bit RC4 Media Access Control - D-Link DI-614 | Product Manual - Page 69
(1Mbps/0db) Barker (2Mbps/3db) CCK (5.5Mbps/5.5db) PBCC (5.5Mbps/1.4db) CCK (11Mbps/8.6db) PBCC (11Mbps/4.5db) PBCC (22Mbps/8.5db) Wireless Transmit Power 15dBm ± 2dB External Antenna Type Single detachable reverse SMA LEDs Power M1 M2 WAN Local Network - 10/100 WLAN - D-Link DI-614 | Product Manual - Page 70
can find software updates and user documentation on the D-Link website. D-Link provides free technical support for customers within the United States and within Canada for the duration of the warranty period on this product. U.S. and Canadian customers can contact D-Link technical support through our - D-Link DI-614 | Product Manual - Page 71
(and all copies thereof) is first returned to D-Link. The license granted respecting any Software for which a refund is given automatically terminates. Non-Applicability of Warranty: The Limited Warranty provided hereunder for hardware and software of DLink's products will not be applied to and does - D-Link DI-614 | Product Manual - Page 72
covered in the operating manual for the product, and normal maintenance; Damage that occurs in shipment, due to act of God, failures due to power surge, and cosmetic damage; Any hardware, software, firmware or other products or services provided by anyone other than D-Link; Products that have been - D-Link DI-614 | Product Manual - Page 73
Link Systems, Inc. All rights reserved. CE Mark Warning: This is a Class B product. In a domestic environment, this product may cause radio interference, in which case the user if not installed and used in accordance with the instructions, may cause harmful interference to radio communication. - D-Link DI-614 | Product Manual - Page 74
Registration Product registration is entirely voluntary and failure to complete or return this form will not diminish your warranty rights. 10/11/04 74
-
 1
1 -
 2
2 -
 3
3 -
 4
4 -
 5
5 -
 6
6 -
 7
7 -
8
-
9
-
10
-
11
-
12
-
13
-
14
-
15
-
16
-
17
-
18
-
19
-
20
-
21
-
22
-
23
-
24
-
25
-
26
-
27
-
28
-
29
-
30
-
31
-
32
-
33
-
34
-
35
-
36
-
37
-
38
-
39
-
40
-
41
-
42
-
43
-
44
-
45
-
46
-
47
-
48
-
49
-
50
-
51
-
52
-
53
-
54
-
55
-
56
-
57
-
58
-
59
-
60
-
61
-
62
-
63
-
64
-
65
-
66
-
67
-
68
-
69
-
70
-
71
-
72
-
73
-
74
 |
 |

Manual
Building Networks for People
D-Link
Air
Plus
DI-614+
Enhanced 2.4GHz Wireless
Broadband Router