D-Link DSN-4000 Software User's Guide for DSN-4000 - Page 69
Using the Detail Tabs, Changing Volume Names and Viewing Volume Information Properties Tab
 |
View all D-Link DSN-4000 manuals
Add to My Manuals
Save this manual to your list of manuals |
Page 69 highlights
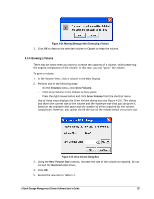
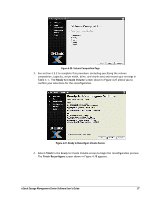
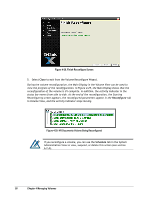
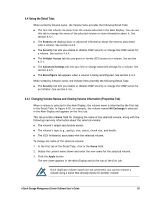
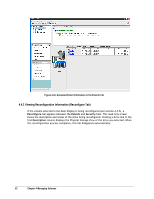
4.4 Using the Detail Tabs When sorted by Volume name, the Volume View provides the following Detail Tabs: The first tab inherits its name from the volume selected in the Main Display. You can use this tab to change the name of the selected volume or view information about it. See section 4.4.1. The Extents tab displays basic or advanced information about the extents associated with a volume. See section 4.4.2. The Security tab lets you enable or disable CHAP security or change the CHAP secret for a volume. See section 4.4.4. The Initiator Access tab lets you grant or revoke iSCSI access to a volume. See section 4.3.1. The Advanced Settings tab lets you view or change advanced settings for a volume. See section 4.4.5. The Reconfigure tab appears when a volume is being reconfigured. See section 4.4.3. When sorted by Initiator name, the Volume View provides the following Detail Tabs: The Security tab lets you enable or disable CHAP security or change the CHAP secret for an initiator. See section 4.4.6. 4.4.1 Changing Volume Names and Viewing Volume Information (Properties Tab) When a volume is selected in the Main Display, the volume name is inherited by the first tab in the Detail Tabs. In Figure 4-30, for example, the volume named MS Exchange is selected in the Main Display and appears on the first tab. This tab provides a Name field for changing the name of the selected volume, along with the following read-only information about the selected volume: The volume's target and durable names. The volume's type (e.g., parity), size, status, chunk size, and health. The iSCSI initiator(s) associated with the selected volume. To change the name of the selected volume: 1. In the first tab of the Detail Tabs, click in the Name field. 2. Delete the current name shown and enter the new name for the selected volume. 3. Click the Apply button. The new name appears in the Main Display and at the top of the first tab. Since duplicate volume names are not permitted, you cannot rename a volume using a name that already exists for another volume. xStack Storage Management Center Software User's Guide 59
-
 1
1 -
2
-
3
-
4
-
5
-
6
-
7
-
8
-
9
-
10
-
11
-
12
-
13
-
14
-
15
-
16
-
17
-
18
-
19
-
20
-
21
-
22
-
23
-
24
-
25
-
26
-
27
-
28
-
29
-
30
-
31
-
32
-
33
-
34
-
35
-
36
-
37
-
38
-
39
-
40
-
41
-
42
-
43
-
44
-
45
-
46
-
47
-
48
-
49
-
50
-
51
-
52
-
53
-
54
-
55
-
56
-
57
-
58
-
59
-
60
-
61
-
62
-
63
-
 64
64 -
 65
65 -
 66
66 -
 67
67 -
 68
68 -
 69
69 -
 70
70 -
 71
71 -
 72
72 -
 73
73 -
 74
74 -
75
-
76
-
77
-
78
-
79
-
80
-
81
-
82
-
83
-
84
-
85
-
86
-
87
-
88
-
89
-
90
-
91
-
92
-
93
-
94
-
95
-
96
-
97
-
98
-
99
-
100
-
101
-
102
-
103
-
104
-
105
-
106
-
107
-
108
-
109
-
110
-
111
-
112
-
113
-
114
-
115
-
116
-
117
-
118
-
119
-
120
-
121
-
122
-
123
-
124
-
125
-
126
-
127
-
128
-
129
-
130
-
131
-
132
-
133
-
134
-
135
-
136
-
137
-
138
-
139
-
140
-
141
-
142
-
143
-
144
-
145
-
146
-
147
-
148
-
149
-
150
-
151
-
152
-
153
-
154
-
155
-
156
-
157
-
158
 |
 |
