D-Link DSS 24 User Guide - Page 21
Ports
 |
UPC - 790069237812
View all D-Link DSS 24 manuals
Add to My Manuals
Save this manual to your list of manuals |
Page 21 highlights
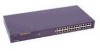
DSS-24 10/100 Auto Negotiation Switch User's Guide Ports There are three types of ports on the DSS-24: RS-232, MDI-II Uplink, and MDIX. RS-232 Port The RS-232 port, located at the rear, is used to configure the DSS-24. Follow these steps to connect the DSS-24 and a workstation or laptop: 1. Plug one end of the cable provided into the port. 2. Plug the other end into the workstation or laptop. 3. Run HyperTerminal or a terminal emulation program using the settings given for Local Console Management at the beginning of Chapter 5, Managing the DSS-24. MDI-II Uplink Port The MDI-II Uplink port allows you to use a straight through cable when connecting another switch to the DSS-24. If the MDI-II Uplink port is in use, you must use a crossover cable when connecting another switch or other device that requires a crossover connection, to the DSS-24. Follow these steps to connect a device to the MDI-II Uplink port: 1. Plug one end of a cable into the uplink port. 2. Plug the other end into any port except an uplink port on the other device. MDI-X Ports The remaining ports are crossover ports. The pin arrangement is the same as the arrangement in a crossover cable. The advantage of MDI-X ports is that you can connect a device with an MDI-II port without using a crossover cable. The steps for connecting the DSS-24 to 10 Mbps devices or 100 Mbps devices are the same. All the ports will auto negotiate the proper speed and duplex mode. Follow these steps to connect cables to the DSS-24: 1. Plug one end of the cable into any of the MDI-X ports. 2. Plug the other end into the appropriate port on the other device. 3. Verify that the LED indicates connection at the proper speed and duplex mode. Network Connections 15
-
 1
1 -
2
-
3
-
4
-
5
-
6
-
7
-
8
-
9
-
10
-
11
-
12
-
13
-
14
-
15
-
 16
16 -
 17
17 -
 18
18 -
 19
19 -
 20
20 -
 21
21 -
 22
22 -
 23
23 -
 24
24 -
 25
25 -
 26
26 -
27
-
28
-
29
-
30
-
31
-
32
-
33
-
34
-
35
 |
 |
