DIRECTV H20 User Guide
DIRECTV H20 Manual
 |
View all DIRECTV H20 manuals
Add to My Manuals
Save this manual to your list of manuals |
DIRECTV H20 manual content summary:
- DIRECTV H20 | User Guide - Page 1
"Cool! A highly defined guide for my high-definition satellite receiver. DIRECTV® HD Receiver user's guide rethink tv - DIRECTV H20 | User Guide - Page 2
that no objects filled with liquids, such as vases, shall be placed on the apparatus. TIP We highly recommend plugging the DIRECTV Receiver into a surge protector to prevent damage from fluctuations in your power supply. IMPORTANT: Be sure not to place your DIRECTV Receiver near anything WET or HOT! - DIRECTV H20 | User Guide - Page 3
or other objects on top of the DIRECTV Receiver. Also, do not stack the receiver on top of a "hot component" such as an audio power amplifier. • Protect your components from power surges by connecting all the components before plugging any power cords into the wall outlet. Use of a surge protector - DIRECTV H20 | User Guide - Page 4
Changes the "source" - the piece of equipment whose signal is displayed on your TV AV1 AV2 TV FORMAT TV INPUT Cycles through HD resolution and screen format options PWR TV POWER ON FORMAT STOP OFF POWER Turns your DIRECTV HD Receiver and other equipment on and off, as selected with MODE - DIRECTV H20 | User Guide - Page 5
"Welcome to the DIRECTV Family! - DIRECTV H20 | User Guide - Page 6
Definition ...4 Resolution & Interlacing...6 Wide-Screen vs. Standard Formats 8 Hardware Reference...13 Cables & Connections ...14 DIRECTV HD Receiver Front Panel 17 DIRECTV HD Receiver Rear Panel 18 Choose Your Setup...20 Guided Setup & Activation ...28 Programming Your Remote Control 33 Options - DIRECTV H20 | User Guide - Page 7
Troubleshooting...66 Limited 90-Day Warranty ...77 Product Information ...82 DIRECTV PROTECTION PLAN 83 FCC Customer Information home use only. Reverse engineering or disas- sembly is prohibited. Unauthorized changes or modifications to this equipment may void the user's authority to operate - DIRECTV H20 | User Guide - Page 8
"Are you ready to watch totally cool, high-definition TV? We thought so. - DIRECTV H20 | User Guide - Page 9
4 About High Definition 6 Resolution & Interlacing 8 Wide-Screen vs. Standard Formats 13 Hardware Reference 14 Cables & Connections 17 DIRECTV HD Receiver Front Panel 18 DIRECTV HD Receiver Rear Panel 20 Choose Your Setup 28 Guided Setup & Activation 33 Programming Your Remote Control 34 Options for - DIRECTV H20 | User Guide - Page 10
sports and events, DIRECTV® HD service offers everything you'd want in your television experience. With the DIRECTV® HD Receiver you can expect and the latest updates at DIRECTV.com. To deliver this unique programming and enhance your entertainment experience, the DIRECTV HD Receiver has been - DIRECTV H20 | User Guide - Page 11
instruction manual that came with your satellite dish antenna. Package Contents The following items are included with your DIRECTV HD Receiver: 4 A/V cables (RCA type) 4 User Guide 4 S-Video cable 4 RF/IR Remote Control & batteries 4 Phone cord 4 Component Video cables (YPbPr) 4 Power - DIRECTV H20 | User Guide - Page 12
TV broadcasts. Although your DIRECTV HD Receiver is a "true" HD receiver, the type of TV or monitor you plug it into (SD, ED, or HD) can affect the resolution of the TV picture you see. See "Resolutions and Interlacing" on page 6, for an explanation of display resolutions. 4 SD (standard definition - DIRECTV H20 | User Guide - Page 13
With an optional off-air antenna, you can also watch locally broadcast HD channels. Equipment You'll Need To view HD programming, you'll need, in addition to your DIRECTV HD Receiver: 4 A high-definition TV set (or HDTV monitor) 4 A 5 LNB Multi-Satellite dish antenna-MPEG4 and Ka/Ku compatible To - DIRECTV H20 | User Guide - Page 14
is defined by the number of horizontal lines displayed to make up each frame of a video image. The more lines of resolution used to compose each frame, the more detailed and sharp the picture. Standard TV resolution uses 480 horizontal lines to make up each video frame; HDTV uses either 720 or 1080 - DIRECTV H20 | User Guide - Page 15
they are tall. SDTV and EDTV can be either 4:3 or 16:9. For HDTV broadcasts, the aspect ratio is 16:9-nearly twice as wide as it is The DIRECTV HD Receiver lets you choose from a variety of screen formats to deal with those scenarios. You can set up your preferences for format during Guided Setup and - DIRECTV H20 | User Guide - Page 16
vs then select Settings. Select Setup, then select the Display menu. Highlight the Preferences tab and press SELECT, then set Bar Color option to the desired color. See your TV owner manual HD programs on a standard TV, but you won't really be watching - DIRECTV H20 | User Guide - Page 17
If your display is a 4:3 format TV or monitor, your format options include these: For 4:3 program signals: Fills TV Screen Only Letterbox For 16:9 program signals: shows the entire original 16:9 Letterbox Stretch Crop image without distortion. 9 - DIRECTV H20 | User Guide - Page 18
at the left and right edges. To change the bar color, access the HDTV screen in System Setup as described above, then select the desired bar color option under the TV Ratio . Fortunately, you can still watch regular TV on your HD TV. Isn't it nice to be one step ahead of the rest of the world? 10 - DIRECTV H20 | User Guide - Page 19
If your display is a 16:9 format TV or monitor, your format options include these: For 4:3 program signals: Pillar Box Stretch Crop For 16:9 program signals: Only Pillar Box shows the entire original 4:3 image without distortion. Fills TV Screen 11 - DIRECTV H20 | User Guide - Page 20
"If you think the hardware is awesome, just wait until you see what comes out of it! - DIRECTV H20 | User Guide - Page 21
the broadcast signals from our satellites. DIRECTV HD Receiver (or Satellite Receiver) Your DIRECTV Receiver picks up the signal from your satellite dish antenna and translates it into viewable TV programming. Access Card Contains information about your DIRECTV service. It must be properly inserted - DIRECTV H20 | User Guide - Page 22
system. For the best access to HD programming at the highest available resolution, connect this to an HDTV that supports HDCP technology. DVI (Digital Visual Interface) is an older digital connection standard that has been replaced by HDMI and is compatible with HDMI. DVI carries video only. You can - DIRECTV H20 | User Guide - Page 23
and stereo sound, and should be used if you don't have HDMI, component or S-Video cables, or your TV does not have HDMI, component or S-Video jacks. The DIRECTV Receiver's A/V jacks are color coded (yellow for video, red for right audio and white for left audio). If your TV has only one input for - DIRECTV H20 | User Guide - Page 24
"This is the part where you might want to invite your favorite gearhead over for pizza. If you are your favorite gearhead, pat yourself on the back. - DIRECTV H20 | User Guide - Page 25
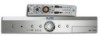
HD Receiver Front Panel 1) POWER - Turns your DIRECTV HD Receiver on or off. Your Receiver still tunes and receives messages when powered off. 2) REMOTE SENSOR - The infrared sensor picks up commands from the remote control. 3) GUIDE - Displays the onscreen program guide. 4) RESOLUTION/RESOLUTION - DIRECTV H20 | User Guide - Page 26
6 COMPONENT OUT OFF AIR IN SATELLITE IN USB S-VIDEO OUT VIDEO OUT AUDIO OUT DIGITAL AUDIO OUT (OPTICAL) RF REMOTE ANTENNA PHONE JACK HDMI 1 72 3 4 5 7 Your equipment may not look exactly like the model illustrated. 8 9 10 11 DIRECTV HD Receiver Rear Panel AC IN 12 1) OFF-AIR IN - - DIRECTV H20 | User Guide - Page 27
than YPbPr/component video). The HDMI also provides audio, for a high-quality, "one-cable" solution. (Cable sold separately.) 10) RF REMOTE ANTENNA - Used to receive the signal from your remote when it's being used as an RF remote. 11) PHONE JACK - Connects the DIRECTV HD Receiver to a telephone - DIRECTV H20 | User Guide - Page 28
the satellite dish cable to your receiver. • Connect the receiver audio and video to your TV or VCR. • If you connected the receiver to a VCR, connect the VCR to your TV. • Connect the receiver to a telephone line. • Plug in all power cords. This section gives detailed instructions on the types - DIRECTV H20 | User Guide - Page 29
inputs on the back of your TV or VCR, you have the following options for connecting your DIRECTV HD Receiver: • HDMI • YPbPr Video • S-Video • Digital Audio (optical) • Analog Audio These connections are described on the following pages. Important Due to restrictions imposed by copyright holders - DIRECTV H20 | User Guide - Page 30
of image, use one of the above methods. However, if your TV does not support S-Video, component or HDMI connections, connect one end of the RCA cable (usually with a yellow plug) to the VIDEO OUT jack on the DIRECTV HD Receiver. Connect the other end to the video input on your TV. TIP To switch - DIRECTV H20 | User Guide - Page 31
AUDIO IN (COAXIAL) DIGITAL AUDIO IN (OPTICAL) HDMI S-VIDEO HDMI (includes video & audio) GOOD BETTER* BEST S-VIDEO HDMI DIRECTV® HD Receiver SATELLITE IN *Note: Do not confuse the component YPbPr cable with a standard Audio/Video (RCA-type) cable. Observe the Red, Green, Blue color-coding - DIRECTV H20 | User Guide - Page 32
your DIRECTV HD Receiver to a stereo or home theater system. Note: HDMI cable is not included with the DIRECTV HD Receiver. • Best 2: You may also receive digtal audio by connecting an Optical Audio cable from the DIGITAL AUDIO OUT (OPTICAL) jack on your DIRECTV HD Receiver to a DIGITAL AUDIO IN - DIRECTV H20 | User Guide - Page 33
may not look exactly like those illustrated. Television COMPONENT IN S-VIDEO IN HDMI DIGITAL AUDIO IN (OPTICAL) RCA-type DIGITAL OPTICAL GOOD BEST 2* DIRECTV® HD Receiver SATELLITE IN * NOTE: For best audio quality, use the HDMI cable for audio and video. (See "Making the Video Connections - DIRECTV H20 | User Guide - Page 34
-AIR IN on your receiver. When you go through the Guided Setup process, be sure to select the Satellite & Antenna button when you reach the Satellite Dish & Off-Air Antenna screen. 3) Connect RF remote antenna to DIRECTV HD Receiver (optional). If you want to use your remote without having to point - DIRECTV H20 | User Guide - Page 35
While you're looking at the back of your DIRECTV HD Receiver, write down the serial number, receiver ID and model number. You'll need them later. DIRECTV® HD Receiver OFF AIR IN 2 1 SATELLITE IN 3 5 4 Serial # Receiver ID Model # (Copy these numbers to page 82 along with your other purchase - DIRECTV H20 | User Guide - Page 36
up and plugged in, you're ready to complete setup to begin enjoying your DIRECTV service. 1) Make sure the MODE switch at the top of the remote control is set to DIRECTV, which is the farleft position. 2) Press TV POWER ON. The DIRECTV Receiver will turn on. 3) The first screen will allow you to - DIRECTV H20 | User Guide - Page 37
automatically adjust resolution to match the resolution of individual TV programs as they are tuned. 4 Primary Local Network: If you've chosen to set up both your Satellite Dish and Off-Air Antenna, you will see this screen near the end of Guided Setup. The receiver will use the ZIP code you enter - DIRECTV H20 | User Guide - Page 38
time! Guided Setup is as simple as following the onscreen instructions. When in doubt, we've usually highlighted the most likely choice for you. Important In order to protect your TV screen from burn-in (a side-effect caused when a stationary image is displayed for too long), the DIRECTV Receiver - DIRECTV H20 | User Guide - Page 39
Your DIRECTV Service Once all the setup processes are complete, all that's left to do is activate your DIRECTV service. Before you make the call, be sure to: 4Have on hand your service address, social security number and a valid major credit card. 4Note your access card and receiver ID numbers. (You - DIRECTV H20 | User Guide - Page 40
"Hang in there... Just a little more techie stuff to go. - DIRECTV H20 | User Guide - Page 41
Guided Setup, but if you didn't, or you want to make changes, or you've acquired some new equipment, follow these instructions. You can program the DIRECTV Remote Control to operate your TV power, volume and mute, additional equipment such as a DVD, VCR, stereo, or second TV or DIRECTV Receiver - DIRECTV H20 | User Guide - Page 42
the FORMAT key on the remote control and the RESOLUTION key on the front panel of the receiver. FORMAT key on Your Remote Pressing this key will cycle the resolutions that you've indicated in System Setup as being supported by your TV. In addition, it will cycle the three available screen formats - DIRECTV H20 | User Guide - Page 43
, then Setup, then HDTV in the left side menu. Press SELECT on the Resolution tab and mark or unmark the TV Resolutions to display the resolutions supported by your television. RESOLUTION Key on Receiver Front Panel This key is used to cycle all available resolutions on your DIRECTV HD Receiver. It - DIRECTV H20 | User Guide - Page 44
Your IR/RF Remote to Control Your DIRECTV HD Receiver You can skip this section if you setup your Remote Control during Guided Setup. It is included here if you skipped that part, or if you want to change your Remote setup later. The remote control included with your DIRECTV HD Receiver works in - DIRECTV H20 | User Guide - Page 45
Channels The DIRECTV HD Receiver can receive both satellite and locally transmitted, off-air broadcast channels, and will display these local channels in the Guide. In order to receive off-air channels, attach an off-air antenna to the OFF-AIR IN as instructed in the "Choose Your Setup" section - DIRECTV H20 | User Guide - Page 46
" Now let's watch some TV! - DIRECTV H20 | User Guide - Page 47
Chapter 2 What's On 41 Watching TV 45 The Guide 47 Autotune 49 Pay Per View 39 - DIRECTV H20 | User Guide - Page 48
- DIRECTV H20 | User Guide - Page 49
Lineup (included in your Welcome package) to get familiar with our channel numbers. Watching TV Now that everything's set up, you're ready to grab your remote and start surfing! With the MODE switch to the left (under the DIRECTV logo), press PWR. To access the channel of your choice, simply key - DIRECTV H20 | User Guide - Page 50
1 23 45 67 - DIRECTV H20 | User Guide - Page 51
displaying 2 DIRECTV Channel info on the channel and show you are currently watching: 1) Current date & time 3 Program Info 2) DIRECTV Channel - Channel logo, number remote (press a second time to clear). Select More Info button to see additional options. Music Channels Your DIRECTV service - DIRECTV H20 | User Guide - Page 52
- DIRECTV H20 | User Guide - Page 53
Category Sort screen. GUIDE The Guide Overview of the DIRECTV Advanced Program Guide® The Guide displays listings of current Guide: 4 - Broadcast in letterbox (16:9 widescreen) format 4 - All Day Ticket Pay Per View showings (pay once, watch all day) 4 - HD program 4 - Dolby Digital audio - DIRECTV H20 | User Guide - Page 54
page. 4 Press the RED or GREEN keys to move forward or back in time. 4 To tune to a program that is on now, highlight the program and press SELECT. Selecting a future program displays program information. 4 Press INFO when you've highlighted a show in the Guide to view a more in-depth description - DIRECTV H20 | User Guide - Page 55
you got distracted. Just set a program to autotune and your DIRECTV® Receiver will tune to it automatically when it starts. To schedule a select Autotune. A screen is displayed where you can set Autotune options for that program. Follow the onscreen instructions to set the program to autotune - DIRECTV H20 | User Guide - Page 56
sure you've connected your VCR properly to your DIRECTV Receiver, then set up your VCR to record at the same time as a scheduled autotune and you're set. See your VCR User's Guide for information on how to set it up for scheduled or manual recording. Use Autotunes to record your favorite shows - DIRECTV H20 | User Guide - Page 57
DIRECTV® Pay Per View. You'll find them listed in the Guide in the 100s. TIP You can also order DIRECTV Pay Per View movies and events on the Internet at DIRECTV.com or over the phone instructions. As long as your receiver has been connected to a land-based phone line, you can use your remote - DIRECTV H20 | User Guide - Page 58
"This is no ordinary menu.... It's really, um, quick! - DIRECTV H20 | User Guide - Page 59
Chapter 3 The Quick Menu 52 Using the Quick Menu 52 Settings 54 Audio Options 55 Dolby® Digital 56 Category Sort 56 Pay Per View 57 Find By 58 Date & Time 58 Favorites 59 Caller ID & Messages 60 Parental Controls 51 - DIRECTV H20 | User Guide - Page 60
that lets you customize, adjust and keep track of your DIRECTV viewing experience. Setup The Setup item in the Quick Menu displays the Setup screen, where you can access the Info & Test, Satellite & Antenna Setup, Remote Setup, Audio Setup, Display Setup, Access Card and System Reset screens. Info - DIRECTV H20 | User Guide - Page 61
This option is useful if your DIRECTV® HD Receiver has lost signal strength, or you need to realign your satellite dish or setup an off-air antenna. Remote: Use this option to setup your remote to control your TV and other equipment. Audio: The Audio option in Setup lets you make lasting adjustments - DIRECTV H20 | User Guide - Page 62
TV, then: To change the default audio, from the Quick Menu, select Settings, select Setup, then select Audio in the left menu and follow the onscreen instructions. To temporarily change the audio, from the Quick Menu, select Audio Options, then select the audio track you prefer. Once the program is - DIRECTV H20 | User Guide - Page 63
for heart-pounding bass. Go ahead. Try this at home. Dolby* Digital The recommended audio format for HDTV is Dolby® Digital. Your DIRECTV HD Receiver is capable of reproducing 5.1-encoded audio: five discrete channels of full-range digital audio, plus one channel of low-frequency (subwoofer - DIRECTV H20 | User Guide - Page 64
the Category Search results, use the RED or GREEN key on your remote to advance or reverse in 90-minute increments. Press GUIDE to return to the regular Guide, or EXIT to return to live TV. Pay Per View This option enables you to check out DIRECTV Pay Per View listings by category. This option - DIRECTV H20 | User Guide - Page 65
; just follow the onscreen instructions. Once you've found a program you're after, all you have to do is highlight and select the title to display when the program is on slated to air within the Guide's number of days of 57 programming supported by your receiver will appear on your list. - DIRECTV H20 | User Guide - Page 66
only display those channels you've chosen - and you'll also only see those channels when you change channels using CHAN UP/DOWN on your remote. Keep in mind, no matter what Favorites list you're currently using, you can still always access any channel you receive by keying in its channel number on - DIRECTV H20 | User Guide - Page 67
Caller ID & Messages This feature lets you receive important messages from DIRECTV about your service. Also, if you have Caller ID service*, you can also view phone calls you've received or turn call notification on or off. Press MENU to display the Quick Menu, select Calls & Msgs, then select Edit - DIRECTV H20 | User Guide - Page 68
watching what, and require a passcode to view restricted programming. Whether want them for the whole family. Press MENU to display the Quick Menu, SELECT Parental Controls, then Edit press SELECT. Note: You can also use RED or GREEN to cycle tabs. Movies Highlight and select the Movies tab, then - DIRECTV H20 | User Guide - Page 69
left menu, SELECT Spending, then set your preferred spending limit for any single pay per view purchase. Simply key in the amount using the numbers on your remote. Hours From the left menu, SELECT Hours, then set your preferred hours during which TV can be viewed. You can set hours based on - DIRECTV H20 | User Guide - Page 70
ll be directed to create a passcode (which you'll want to make easy enough to remember, but hard enough that the little ones won't guess it!). This passcode will be your entry to unlocking will tell you if the receiver is locked, temporarily unlocked, or unlocked. Locked Unlocked Temporarily Unlocked - DIRECTV H20 | User Guide - Page 71
obvious numbers, like birthdays or addresses, for your passcode. Note: If you have Parental Controls set and temporarily unlocked, turning the receiver power off will relock the box. Making multiple entries aimed at guessing the passcode is discouraged by a time delay; each invalid passcode entered - DIRECTV H20 | User Guide - Page 72
"Is there anything else you want to know? It's probably here in the back.... - DIRECTV H20 | User Guide - Page 73
Chapter 4 Other Info 66 Troubleshooting 77 Limited 90-Day Warranty 82 Product Information 83 DIRECTV PROTECTION PLAN 85 FCC Customer Information 89 Index 65 - DIRECTV H20 | User Guide - Page 74
panel button or remote control, try one of these: 4 Press the red RESET button behind the access card panel door on the front of the DIRECTV HD Receiver, then wait for program guide information to be acquired. 4 If the problems persist, try unplugging the power cord of the DIRECTV HD Receiver for 15 - DIRECTV H20 | User Guide - Page 75
VCR's front panel. 4. TV Input 5. Power 4 Press the TV INPUT button on the DIRECTV remote control. 4 If problems persist, turn off all equipment that is connected to your TV, wait a few minutes, then turn the DIRECTV HD Receiver back on. Most problems 4 Check your connections and cables. have - DIRECTV H20 | User Guide - Page 76
it doesn't, either connect the phone line directly to a standard wall-mount phone jack or install a wireless phone jack that transmits Caller ID information. DIRECTV HD Receiver will not turn on 4 Check to make sure the power cord is plugged into the DIRECTV HD Receiver and the wall outlet. 4 Check - DIRECTV H20 | User Guide - Page 77
, and other lights/appliances in your house do too, you may have blown a circuit breaker or be experiencing a power outage. 4 Consult an electrician if the problem is frequent or severe, especially if other household appliances or electronics are affected. DIRECTV HD Receiver turns on or changes - DIRECTV H20 | User Guide - Page 78
section for instructions about connecting your satellite receiver. 4 Press the TV INPUT key on the remote to make sure your TV input is set to the TV input your DIRECTV HD Receiver is connected to. 4 Press the POWER button on the front of the DIRECTV HD Receiver. 4 Press the red RESET button behind - DIRECTV H20 | User Guide - Page 79
use. Press MENU on the remote, select Favorites, then All Channels, or enter the channel number manually. My video and audio are out of sync. 4 Try changing channels. 4 Press LIST, then EXIT. 4 If neither of those work, restart your DIRECTV HD Receiver. Press the RESET button behind the access panel - DIRECTV H20 | User Guide - Page 80
number to tune immediately. 4 If you are trying to operate a device other than the DIRECTV HD Receiver that you have programmed the remote to control, make sure you first slide the MODE switch to the mode that is programmed for that device (AV1 or AV2). The indicator light for the component you - DIRECTV H20 | User Guide - Page 81
test on your DIRECTV HD Receiver. 1) Turn on your TV and the DIRECTV HD Receiver. 2) Slide the mode switch to the DIRECTV position to put the remote control in satellite receiver-controlling mode, then press MENU to display the Quick Menu. 3) Select Settings. 4) Select Setup, then Info & Test - DIRECTV H20 | User Guide - Page 82
there is a problem. Occasional fluctuations in the phone line or satellite signal can give temporary false readings. Factory Defaults To reset all the remote control and clear all but DIRECTV mode, follow these steps: 1) Point the remote away from your DIRECTV Receiver and components. Press and hold - DIRECTV H20 | User Guide - Page 83
formats See Chapter 1 for a full description of screen resolutions, formats, and Native mode. The DIRECTV HD Receiver provides the display formats shown in the following table: Selected Resolutions 480i, 480p Remote Control FORMAT Key Cycle (➠ = Press FORMAT key) 480i/Stretch ➠ 480i/Letter ➠ 480i - DIRECTV H20 | User Guide - Page 84
"Our warranty may be limited, but our enthusiasm for great TV is not. - DIRECTV H20 | User Guide - Page 85
warrants your DIRECTV HD Receiver (Model Number: H20) and any included accessories against defects in material or workmanship for a period of ninety (90) days after the date of purchase. Who is Covered? You must have proof of purchase to receive warranty service. A sales receipt or other document - DIRECTV H20 | User Guide - Page 86
or setup of the product. 4 Installation, performance of, or repair of: audio/video cabling, telephone line, or accessory attachments used with the product. 4 Product replacement because of misuse, accident, lightning damage, unauthorized repair, or other cause not within the control of DIRECTV - DIRECTV H20 | User Guide - Page 87
used for commercial or institutional purposes. 4 DIRECTV makes no warranty that the access connection will be a local (not long distance) phone call. 4 The continued provisioning of any of the programming and other services delivered through the Receiver including but not limited to television - DIRECTV H20 | User Guide - Page 88
. Before Requesting Repair Service... Please check the troubleshooting section of this guide. This may save you a call to DIRECTV Customer Care. To Get Warranty Service... Warranty service will be provided by DIRECTV. If you believe you need service for your Receiver, contact DIRECTV at 1-800 - DIRECTV H20 | User Guide - Page 89
Don't despair if your warranty has expired. Service is just a phone call away.... WARRANTY. IN NO EVENT WILL DIRECTV BE LIABLE FOR ANY AMOUNT GREATER THAN THE RETAIL PRICE OF THE DIRECTV RECEIVER. DIRECTV SHALL NOT BE LIABLE FOR ANY INCIDENTAL OR CONSEQUENTIAL DAMAGES FOR BREACH OF ANY EXPRESS OR - DIRECTV H20 | User Guide - Page 90
and record the serial and model numbers in case you need them. These numbers are located on the product. (You may have noted some of this information on page 27 when you connected the cables to your receiver.) Model No Serial No Purchase Date Dealer/Address/Phone Access Card Receiver ID 82 - DIRECTV H20 | User Guide - Page 91
(if problem home can not be resolved over the phone) * 4 Defective remote control replacements 4 All parts and labor for repair Get ALL THAT FOR JUST $5.99 a month for accounts with standard DIRECTV Receivers and only $7.99 a month for accounts with DIRECTV PLUS® DVR, DIRECTV® DVR, DIRECTV HD - DIRECTV H20 | User Guide - Page 92
on the "Next" button. 4. REVIEW your change and CLICK on the "Accept These Changes" button. If you have a DIRECTV Plus Receiver, DIRECTV DVR, DIRECTV HD Receiver, DIRECTV HD DVR or DIRECTV Receiver with UltimateTV Service, please call 1-800-DIRECTV to sign up. The DIRECTV PROTECTION PLAN is offered - DIRECTV H20 | User Guide - Page 93
operation. Responsible Party: DIRECTV, Inc. 2230 E. Imperial Hwy El Segundo, CA 90245 1-800-DIRECTV 4 Trade Name: DIRECTV 4 Type of Equipment: DIRECTV Satellite Receiver 4 Model Number: H20 installed and used in accordance with the instructions, may cause harmful interference to radio communications - DIRECTV H20 | User Guide - Page 94
: 4 Reorient or relocate the receiving satellite dish antenna. 4 Increase the separation between the equipment and the DIRECTV Receiver. 4 Connect the equipment into an outlet on a circuit different from that to which the DIRECTV Receiver is connected. 4 Consult the dealer or an experienced radio/TV - DIRECTV H20 | User Guide - Page 95
is a REN of 0.3). If this DIRECTV Receiver causes harm to the telephone network, the telephone company will notify you in advance that temporary discontinuance of service may be required. But if advance notice isn't practical, the telephone company will notify the customer as soon as possible. Also - DIRECTV H20 | User Guide - Page 96
If trouble is experienced with this unit, for repair or warranty information, please contact DIRECTV Customer Care at the address and phone number listed below. If the equipment is causing harm to the network, the telephone company may request that you disconnect the equipment until the problem is - DIRECTV H20 | User Guide - Page 97
Channel blocks 60 Channel list 61 Connections 1, 14, 70, 73 D Date & Time 51 digital audio 14, 19 Digital TV 4 DIRECTV HD Receiver Problems 67 DIRECTV mode 68, 72 DIRECTV PROTECTION PLAN 83 Dish-pointing coordinates 73 Display Formats 4, 9, 11, 29, 34, 35, 37, 75 Dolby® Digital 5.1 55 DVI 14 E EXIT - DIRECTV H20 | User Guide - Page 98
, 74 problems 17, 28, 30, 33, 41, 43, 46, 49, 52, 58, 61, 66, 67, 68, 70, 71, 72, 73, 74 programming 17, 28, 30, 33, 41, 43, 46, 49, 52, 58, 61, 66, 67, 68, 70, 71, 72, 73, 74 RESET 66, 67, 70, 71 Resolution 6, 29, 35, 75 Restart 71 RF REMOTE 19 - DIRECTV H20 | User Guide - Page 99
screen format 34 SDTV 4, 7 Search 45, 57 Settings 28, 63, 73 Setup 1, 20, 28, 70, 71, 73 Showings 45 Spending limit 61 System Test 66, 73, 74 T Temporarily unlock 62 Timer 69 To Do List 48, 49 Troubleshooting 65, 66 Tuning to 72 Tuning to a program 72 TV Aspect Ratio 34 TV - DIRECTV H20 | User Guide - Page 100
operate DIRECTV System hardware. Activate your DIRECTV programming today at 1-800-DIRECTV (1-800-347-3288). Dolby and the double-D symbols are trademarks of Dolby Laboratories. ©2005 DIRECTV, Inc. DIRECTV, the Cyclone Design logo and ADVANCED PROGRAM GUIDE the receiver. Please contact the manufacturer of - DIRECTV H20 | User Guide - Page 101
or end time is earlier or later than is visible in the Guide program cell. LEFT and RIGHT arrows move the highlight in the purchase. Other Icons Denotes one or more alternate audio tracks available for a program. Denotes that no alternate audio tracks available. Indicates one or more new messages - DIRECTV H20 | User Guide - Page 102
-
 1
1 -
 2
2 -
 3
3 -
 4
4 -
 5
5 -
 6
6 -
 7
7 -
8
-
9
-
10
-
11
-
12
-
13
-
14
-
15
-
16
-
17
-
18
-
19
-
20
-
21
-
22
-
23
-
24
-
25
-
26
-
27
-
28
-
29
-
30
-
31
-
32
-
33
-
34
-
35
-
36
-
37
-
38
-
39
-
40
-
41
-
42
-
43
-
44
-
45
-
46
-
47
-
48
-
49
-
50
-
51
-
52
-
53
-
54
-
55
-
56
-
57
-
58
-
59
-
60
-
61
-
62
-
63
-
64
-
65
-
66
-
67
-
68
-
69
-
70
-
71
-
72
-
73
-
74
-
75
-
76
-
77
-
78
-
79
-
80
-
81
-
82
-
83
-
84
-
85
-
86
-
87
-
88
-
89
-
90
-
91
-
92
-
93
-
94
-
95
-
96
-
97
-
98
-
99
-
100
-
101
-
102
 |
 |

“
”
Cool! A highly defined guide
for my high-definition satellite
receiver.
user’s
guide
rethink tv
DIRECTV
®
HD Receiver