Dacor SGM304 Use & Care Manuals - Page 7
Setting Up Your Cooktop - ignitor
 |
View all Dacor SGM304 manuals
Add to My Manuals
Save this manual to your list of manuals |
Page 7 highlights
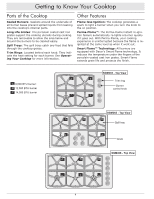
Setting Up Your Cooktop Burner and Grate Assembly WARNING Assemble the burners and grates only when the cooktop is cool. 1. Put the burner ring on the burner head of each burner as shown in Figure 1. Be sure to match the correct sizes. As you put each ring in place, line up the five tabs on the bottom of the ring with the five notches in the top of each burner head (see figure 2). Twist each ring back and forth slightly to make sure it is properly seated. 2. Put the burner cap for each burner over the top of each burner ring (see Figure 1). Be sure to match the correct sizes. The ridge around the bottom edge of the cap goes around the top of the burner ring. 3. Gently set the grates on top of the spill tray. Put the legs of each grate into the corresponding dimples as shown in Figure 1. Tabs 5 places Notches 5 places Figure 2 - Burner Ring Notches Grate Burner cap Burner ring Top frame Porcelain burner cap Burner head (fixed) Figure 1 - Burner and Grate Assembly Burner base Burner ignitor Brass burner ring Figure 3 - Properly Assembled Burner 5
-
 1
1 -
 2
2 -
 3
3 -
 4
4 -
 5
5 -
 6
6 -
 7
7 -
 8
8 -
 9
9 -
 10
10 -
 11
11 -
 12
12 -
13
-
14
-
15
-
16
 |
 |
