Danby DDW611WLED Product Manual
Danby DDW611WLED Manual
 |
View all Danby DDW611WLED manuals
Add to My Manuals
Save this manual to your list of manuals |
Danby DDW611WLED manual content summary:
- Danby DDW611WLED | Product Manual - Page 1
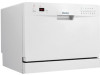
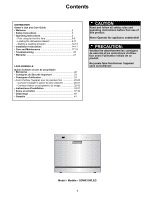
• Owner's Use and Care Guide • Guide d'utilisation et Soins de Propriètaire DISHWASHER LAVE-VAISSELLE Model • Modèle • Modelo DDW611WLED Danby Products Limited, Ontario, Canada N1H 6Z9 Danby Products Inc., Findlay, Ohio, USA 45840 V1.11.10.DM - Danby DDW611WLED | Product Manual - Page 2
4 - Prior using for the first time 5-8 - Loading the dishwasher Basket 9-11 - Starting a washing program 12-13 • Installation Instructions 14-17 • Care and Maintenance 17-19 • Troubleshooting 20 • Warranty 21 LAVE-VAISSELLE Guide d'utiliser et soin de propriètaire • Bienvenue 22 • Consignes - Danby DDW611WLED | Product Manual - Page 3
's Use and Care Guide will provide you with valuable information necessary for the proper care and maintenance of your new appliance. If properly maintained, your Danby appliance will give you many years of trouble free operation. Please take a few moments to read the instructions thoroughly and - Danby DDW611WLED | Product Manual - Page 4
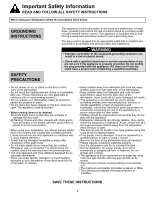
fit into the outlet have a proper outlet installed by a qualified electrician. • Do not abuse, sit on, or stand on the door or dish rack of the dishwasher. • Do not touch the heating element during or immediately after use. (These instructions are only applicable to machines with a visual heating - Danby DDW611WLED | Product Manual - Page 5
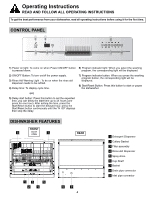
To get the best performance from your dishwasher, read all operating instructions before using it for the first time. CONTROL DISHWASHER FEATURES FRONT 6 DOOR FroOnPt vEieNw 7 REAR 13 5 24 89 4 1 Detergent Dispenser 2 Cutlery Basket 3 Filter assembly 4 Rinse Aid Dispenser 5 Spray Arms - Danby DDW611WLED | Product Manual - Page 6
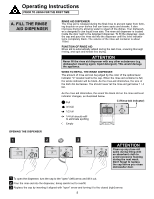
Instructions improves drying by allowing water to sheet off the dishes. Your dishwasher is designed to use liquid rinse aids. The rinse aid dispenser full, the whole indicator will be black. As the rinse-aid diminishes, the size of the dark dot decreases. You should never let the rinse aid get below - Danby DDW611WLED | Product Manual - Page 7
Operating Instructions PRIOR USING FOR THE FIRST TIME A. FILL THE RINSE AID with chemical ingredients are necessary to remove dirt and remove it from the dishwasher. • Use only detergent specifically made for use in dishwashers. Keep your detergent fresh and dry. • Don't put powder detergent - Danby DDW611WLED | Product Manual - Page 8
The dispenser must be refilled before the start of each wash cycle following the instructions provided in the Wash Cycle Table . Your dishwasher uses less detergent and rinse aid than a conventional dishwasher. Generally, only one tablespoon of detergent is needed for a normal wash load. Also, more - Danby DDW611WLED | Product Manual - Page 9
Operating Instructions PRIOR TO USING FOR THE FIRST TIME B. FUNCTION OF DETERGENT (cont) FILL IN DETERGENT Fill the detergent dispenser with detergent.The marking indicates the dosing - Danby DDW611WLED | Product Manual - Page 10
DISHWASHER BASKETS (For best performance of the dishwasher, follow these loading guidelines. Features and appearance of baskets and cutlery baskets may vary from your model that the spray arms can freely rotate during washing. NOTE: Very small items should not be washed in the dishwasher as they - Danby DDW611WLED | Product Manual - Page 11
Operating Instructions LOADING THE DISHWASHER BASKETS LOADING THE BASKET Position the dishes and cookware so that they will not get moved by the spraying water. 6 5 1 1 Cups 2 Serving bowl 3 4 Glasses Saucers 1 5 6 Fruit bowl Oval platter 7 Dinner plates 8 Bread and butter plates 9 - Danby DDW611WLED | Product Manual - Page 12
Operating Instructions LOADING THE DISHWASHER BASKETS CUTLERY BASKET Cutlery should be placed in through the bottom. • Always load sharp utensils with the sharp end down! For personal safety and a top quality clean, place your cutlery in the basket: • Make sure they do not nest together • Place - Danby DDW611WLED | Product Manual - Page 13
Operating Instructions STARTING A WASHING PROGRAM WASH CYCLE TABLE • ( * ) Means: Need TURNING ON THE APPLIANCE Starting a washcycle... Draw out the basket (see the section entitled Loading the Dishwasher). Pour in the detergent and insert the plug into the socket. The power supply is 120V/60 - Danby DDW611WLED | Product Manual - Page 14
Operating Instructions STARTING A WASHING PROGRAM CHANGING THE PROGRAM You can modify the washing program when the dishwasher 3 After the spray arms stop working, you can open the door completely 4 Add forgotten dishes. 5 Close the door 6 Press the start/reset button, the dishwasher will run after - Danby DDW611WLED | Product Manual - Page 15
. One side of the cabinet sink should be chosen to facilitate the connection of drain hoses of the dishwasher. POSITIONING THE APPLIANCE Position the appliance in the desired location on the counter top. Make sure the unit is level and is close enough to electrical and water hook ups. ABOUT POWER - Danby DDW611WLED | Product Manual - Page 16
Installation Instructions WATER CONNECTION Rear of dishwasher: 1. Drain Port 2. Power Cord 3. Inlet Port Back View 12 3 Your dishwasher comes equipped with a 'quick connect' assembly (includes inlet and drain hose). The faucet adapter must be installed on the faucet before you can connect the - Danby DDW611WLED | Product Manual - Page 17
Installation Instructions WATER CONNECTION (cont) 1. Screw the faucet adapter onto (or into) the faucet tap. Check for leaks (use Teflon tape to eliminate if necessary). 2. Connect the six-sided connection of the drain hose to the drain port connection on the back of the dishwasher cabinet. Do not - Danby DDW611WLED | Product Manual - Page 18
Installation Instructions STARTING THE DISHWASHER The following things should be checked before starting the dishwasher: 1 The dishwasher is level and fixed properly 2 The water inlet valve is open 3 Is there a leakage at the connections of the conducts? 4 The wires are tightly connected 5 - Danby DDW611WLED | Product Manual - Page 19
Step 1. Counter-rotate the fine filter. Step 2. Lift it up. CARING FOR THE DISHWASHER Step 3. filter system will be installed. - Inspect the filters for blockage every time the dishwasher has been used. scouring pads or harsh cleaners on any part of the dishwasher. CLEANING THE DOOR To clean the - Danby DDW611WLED | Product Manual - Page 20
to their position. After reassembly, check that the spray arms turn freely. HOW TO MAINTAIN YOUR DISHWASHER • After Every Wash Turn off the water No Solvents or Abrasive Cleaning To clean the exterior and rubber parts of the dishwasher, do not use solvents or abrasive cleaning products. Only use - Danby DDW611WLED | Product Manual - Page 21
call may not be neccessary. Use this troubleshooting guide for a possible solution. If the unit continues to operate improperly, call an authorized service depot or Danby's Toll Free Number 1-800-263-2629 for assistance. PROBLEM POSSIBLE CAUSE Dishwasher doesn't • Fuse blown or circuit breaker - Danby DDW611WLED | Product Manual - Page 22
warranty claims; so, please retain bill of sale. In the event warranty service is required, present this document to our AUTHORIZED SERVICE DEPOT. Warranty Service Carry-In Danby Products Limited PO Box 1778, Guelph, Ontario, Canada N1H 6Z9 Telephone: (519) 837-0920 FAX: (519) 837-0449 1-800-263 - Danby DDW611WLED | Product Manual - Page 23
choisi un appareil électroménager Danby. Ce guide d'utilisation et d'entretien vous utiliser votre appareil Danby sans problème pendant des années. Veuillez prendre quelques minutes pour lire les instructions d'un bout du service à la clientèle, appelez Danby au numéro SANS FRAIS: 1-800-263-2629 22 - Danby DDW611WLED | Product Manual - Page 24
être branchée sur une prise appropriée installée et mise à la terre conformément à l'ensemble des codes et des ordonnances locaux. AVERTISSEMENT • Une en plastique d'entrer en contact avec l'élément chauffant. (Ces instructions ne s'appliquent qu'aux appareils munis d'un élément chauffant visible - Danby DDW611WLED | Product Manual - Page 25
différé. Appuyez sur la touche START / RESET jusqu'à ce que "H: 00" apparait sur le panneau d'affichage pour arrêter le départ différé. CARACTÉRISTIQUES DU LAVE-VAISSELLE AVANT 6 PORTE FOroUnVt EviRewTE 7 ARRIÈRE 13 5 24 89 24 1 Distributeur de détergent 2 Panier à ustensiles 3 Assemblage - Danby DDW611WLED | Product Manual - Page 26
Mode d'emploi AVANT D'UTILISER L'APPAREIL POUR LA PREMIÈRE FOIS A. REMPLISSEZ LE DISTRIBUTEUR D'AGENT DE RINÇAGE OUVERTURE DU DISTRIBUTEUR DISTRIBUTEUR D'AGENT DE RINÇAGE L'agent de rinçage est libéré pendant le rinçage final afin d'empêcher que l'eau ne forme des gouttelettes qui peuvent créer - Danby DDW611WLED | Product Manual - Page 27
Mode d'emploi AVANT D'UTILISER L'APPAREIL POUR LA PREMIÈRE FOIS A. REMPLISSEZ LE DISTRIBUTEUR D'AGENT DE RINÇAGE (suite) RÉGLAGE DU DISTRIBUTEUR D'AGENT DE RINÇAGE Le distributeur d'agent de rinçage a quatre réglages. Le réglage recommandé est « 3 ». Si la vaisselle ne sèche pas correctement ou - Danby DDW611WLED | Product Manual - Page 28
de détergent sont complètement enlevés. DISTRIBUTEUR DE DÉTERGENT Le distributeur doit être rempli avant le début de chaque cycle de lavage en suivant les instructions qui se trouvent dans le tableau des cycles de lavage. Votre lave-vaisselle consomme moins de détergent et d'agent de rinçage qu'un - Danby DDW611WLED | Product Manual - Page 29
Mode d'emploi AVANT D'UTILISER L'APPAREIL POUR LA PREMIÈRE FOIS B. FONCTION DU DÉTERGENT (suite) REMPLISSEZ LE DÉTERGENT Remplissez le distributeur de détergent. Le repère indique la quantité de détergent à utiliser, tel qu'illustré ci-dessous : A Peut contenir 15 g de détergent. (compartiment de - Danby DDW611WLED | Product Manual - Page 30
Mode d'emploi CHARGEMENT DES PANIERS DU LAVE-VAISSELLE RECOMMANDATION • Songez à acheter des ustensiles sur lesquels il est indiqué qu'ils vont au lavevaisselle. • Pour des articles spécifiques, sélectionnez un programme à basse température. • Ne retirez pas les verres et la coutellerie du lave- - Danby DDW611WLED | Product Manual - Page 31
Mode d'emploi CHARGEMENT DES PANIERS DU LAVE-VAISSELLE CHARGEMENT DU PANIER Positionnez la vaisselle et la batterie de cuisine de façon telle que les jets d'eau ne les déplaceront pas. 6 5 1 1 Tasses 2 Bol à servir 3 4 Verres Soucoupes 1 5 6 Bol à fruits Plateau ovale 7 Assiettes à dî - Danby DDW611WLED | Product Manual - Page 32
Mode d'emploi CHARGEMENT DES PANIERS DU LAVE-VAISSELLE PANIER À USTENSILES La coutellerie doit être placée dans le panier à ustensiles les manches vers le bas. Si le panier est équipé de paniers latéraux, les cuillers doivent être placées individuellement dans les fentes appropriées, et les - Danby DDW611WLED | Product Manual - Page 33
Mode d'emploi COMMENT LANCER UN PROGRAMME DE LAVAGE TABLEAU DES CYCLES DE LAVAGE • ( * ) Signifie que le distributeur d'agent de rinçage doit être rempli. • AHAM DW-1-2005 : ce programme est le cycle de test, il est recommandé que le distributeur d'agent de rinçage soit réglé sur la position 6. - Danby DDW611WLED | Product Manual - Page 34
Mode d'emploi COMMENT LANCER UN PROGRAMME DE LAVAGE CHANGEMENT DU PROGRAMME Vous pouvez changer le programme de lavage si le lave-vaisselle ne fonctionne que depuis quelques minutes. Autrement, il est possible que le détergent ait été libéré et que l'appareil ait drainé l'eau de lavage. Dans ce - Danby DDW611WLED | Product Manual - Page 35
propre sécurité : • N'UTILISEZ PAS DE RALLONGE OU DE FICHE D'ADAPTATION AVEC CET APPAREIL. • SOUS AUCUN PRÉTEXTE, VOUS NE DEVEZ COUPER doit être branchée sur une prise appropriée installée et mise à la terre conformément à l'ensemble des codes et des ordonnances locaux. AVERTISSEMENT • Une mauvaise - Danby DDW611WLED | Product Manual - Page 36
3 Votre lave-vaisselle est doté d'un raccord à branchement rapide (comprend l'admission et le tuyau de drainage). L'adaptateur de robinet doit être installé sur le robinet avant de pouvoir raccorder le lave-vaisselle. Cet adaptateur est inclus dans votre lave-vaisselle. L'adaptateur de robinet est - Danby DDW611WLED | Product Manual - Page 37
Notice d'installation RACCORDEMENT ÉLECTRIQUE (suite) 1. Vissez l'adaptateur de robinet sur (ou dans) le robinet. Vérifiez la présence de fuites (au besoin, utilisez du ruban de téflon - Danby DDW611WLED | Product Manual - Page 38
Notice d'installation DÉMARRAGE DU LAVE-VAISSELLE Les éléments suivants doivent être vérifiés avant de démarrer le lavevaisselle : 1 Le lave-vaisselle est de niveau et fixé correctement 2 Le - Danby DDW611WLED | Product Manual - Page 39
Entretien SYSTÈME DE FILTRATION (suite) ENTRETIEN DU LAVE-VAISSELLE AVERTISSEMENT • Ne faites jamais fonctionner le lave-vaisselle si les filtres ne sont pas en place. • Le lave-vaisselle ne doit jamais être utilisé sans les filtres. • Si les filtres sont mal replacés, cela pourrait réduire la - Danby DDW611WLED | Product Manual - Page 40
Entretien ENTRETIEN DU LAVE-VAISSELLE (suite) NETTOYAGE DES GICLEURS Les gicleurs peuvent être enlevés facilement pour un nettoyage périodique des bases, afin d'empêcher le blocage possible. Lavez-les à l'eau courante et remettez-les prudemment en place à la bonne position, en vous assurant que - Danby DDW611WLED | Product Manual - Page 41
service. Consultez ce guide de dépannage pour trouver une solution possible. Si l'appareil continue de mal fonctionner, appelez un atelier de réparation autorisé ou le numéro sans frais de Danby c'est le cas, il arrête la pompe de circulation et démarre la pompe de drainage. Retirez le bouchon - Danby DDW611WLED | Product Manual - Page 42
de l'appareil tel qu'une circulation d'air inadéquate dans la industriel (à savoir, si l'appareil n'est pas installé dans un domicile résidentiel). 6) Incendie, dommage ou s'adresser à: Service sous-garantie En Atelier Danby Products Limited PO Box 1778, Guelph, Ontario, Canada N1H 6Z9 Telephone: - Danby DDW611WLED | Product Manual - Page 43
depot nearest you, call the toll free number listed to the left in Canada and the U.S. When requesting service, or ordering parts, always provide the following information: • Product Type • Model Number • Part Description LAVE-VAISSELLE Le numéro de modèle se trouve sur la plaque signalétique
-
 1
1 -
 2
2 -
 3
3 -
 4
4 -
 5
5 -
 6
6 -
 7
7 -
8
-
9
-
10
-
11
-
12
-
13
-
14
-
15
-
16
-
17
-
18
-
19
-
20
-
21
-
22
-
23
-
24
-
25
-
26
-
27
-
28
-
29
-
30
-
31
-
32
-
33
-
34
-
35
-
36
-
37
-
38
-
39
-
40
-
41
-
42
-
43
 |
 |

Danby Products Limited, Ontario, Canada N1H 6Z9
Danby Products Inc., Findlay, Ohio, USA 45840
Model • Modèle • Modelo
V1.11.10.DM
•
Owner’s Use and Care Guide
•
Guide d’utilisation et Soins de Propriètaire
DISHWASHER
LAVE-VAISSELLE
DDW611WLED