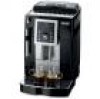
DeLonghi ECAM23210B Owner Manual - Page 5
Turning The Appliance On, Turning The Appliance Off, Menu Settings - coffee
 |
View all DeLonghi ECAM23210B manuals
Add to My Manuals
Save this manual to your list of manuals |
Page 5 highlights
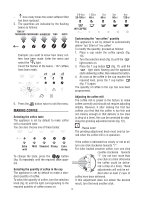
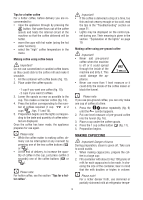
• You should customize water hardness as soon as possible following the instructions in the section "Setting water hardness" on page 17. Follow the instructions: 1. Remove the water tank, fill to the MAX line with fresh water (fig. 1A) then put back in the appliance (fig. 1B). 2. Place a container with a minimum capacity of 3.4oz (100ml) under the cappuccino maker (fig. 2). 3. Plug the appliance into the mains socket and place the main switch on the back of the appliance in the I position (fig. 3). 4. The light flashes on the control panel (fig. 4). 5. Turn the steam knob to the "I" position (fig. 5) and press the button to confirm (fig. 6). The appliance delivers water from the cappuccino maker then goes off. 6. Turn the steam knob to the "0" position. The coffee maker is now ready for normal use. Please note! • When using the appliance for the first time, you need to make 4-5 cups of coffee or 4-5 cappuccinos before the appliance starts to give satisfactory results. • To enjoy your coffee even more and improve the performance of your appliance, we recommend installing a water softener filter as described in the section "WATER SOFTENER FILTER". If your model is not provided with a filter, you can request one from De'Longhi Customer Services. TURNING THE APPLIANCE ON Please note! Before turning the appliance on, make sure the main switch on the back of the appliance is in the I position (fig. 3). Each time the appliance is turned on, it performs an automatic preheat and rinse cycle which cannot be interrupted. The appliance is ready for use only after completion of this cycle. Danger of burns! During rinsing, a little hot water comes out of the coffee spouts and is collected in the drip tray underneath. Avoid contact with splashes of water. • To turn the appliance on, press the button (fig. 7). The light flashes while the appliance is heating up and performing an automatic rinse cycle. By circulating hot water, the appliance heats both the boiler and the internal circuits. The appliance is at temperature when the light goes off and the lights corresponding to the selected coffee taste and quantity come on. TURNING THE APPLIANCE OFF Each time the appliance is turned off, it performs an automatic rinse cycle which cannot be interrupted. Danger of burns! During rinsing, a little hot water flows from the coffee spouts. Avoid contact with splashes of water. To turn the appliance off, press the button (fig. 7). The appliance performs a rinse cycle, then goes off. Please note! If the appliance is not used for an extended period, place the main switch in the 0 position (fig. 3). Important! To avoid damaging the appliance, never place the main switch (fig. 3) in the 0 position while the appliance is on. MENU SETTINGS When you access the programming menu by pressing the P button, the following menu settings are available: Descale, Auto-off, Set temperature, Energy Saving, Water hardness, Install filter, Replace filter, Default values, Statistics. Descale For instructions on descaling, see page 16. 10
-
 1
1 -
 2
2 -
 3
3 -
 4
4 -
 5
5 -
 6
6 -
 7
7 -
 8
8 -
 9
9 -
 10
10 -
 11
11 -
12
-
13
-
14
-
15
-
16
-
17
 |
 |
