Dell 1110 Mono User's Guide
Dell 1110 Mono Manual
 |
View all Dell 1110 Mono manuals
Add to My Manuals
Save this manual to your list of manuals |
Dell 1110 Mono manual content summary:
- Dell 1110 Mono | User's Guide - Page 1
ready to set it up. 2. In addition to the Dell Laser Printer 1110, ensure that you have the following items in the box. If there is a missing item, contact Dell: Starter Toner Cartridge Power Corda Drivers and Utilities CDb Owner's Manual Setup Diagram a. The appearance of the power cord may - Dell 1110 Mono | User's Guide - Page 2
on their sequence. LEDs that are off, on, and/or blinking indicate printer conditions, such as printer status, intervention (for example, out of paper and jammed paper), or service. For more information on what the LEDs sequence means and what you can do, see "Understanding the Operator Panel LEDs - Dell 1110 Mono | User's Guide - Page 3
. For detailed information, see "Printing on Both Sides of Paper (Manual Duplex)". Installing the Starter Toner Cartridge 1. Open the front cover. 2. Unpack the starter toner cartridge from its package and thoroughly shake the cartridge from side-to-side 5 or 6 times to distribute the toner - Dell 1110 Mono | User's Guide - Page 4
toner cartridge life of approximately 1,000 pages for the starter toner cartridge that is shipped with the printer (2,000 pages for a standard toner cartridge). paper: 1. Open the paper input tray. Pull on the length and width guides to extend the tray. 2. Flex the sheets back and forth to loosen - Dell 1110 Mono | User's Guide - Page 5
paper guides can result in paper jams. Connecting a Printer Cable To print from your computer, you need to connect your printer to your USB) cable. USB cables are sold separately. Contact Dell to purchase a USB cable. NOTE: Connecting the printer to the USB port of the computer requires a certified - Dell 1110 Mono | User's Guide - Page 6
it is powered on. If you do, you may receive an electric shock. To power on the printer: 1. Plug one end of the power cord into the power cord connector at the back of the printer and the other end into a properly grounded outlet. 2. Press the power switch to power on the - Dell 1110 Mono | User's Guide - Page 7
instructions in your Owner's Manual prior to setting up and operating your printer. Setup Diagram Express Service Code Express Service Code Identify your printer when you use support.dell.com or contact technical support. • Latest drivers for my printer • Answers to technical service and support - Dell 1110 Mono | User's Guide - Page 8
as smearing or toner specks. Clean inside the printer to prevent these problems. 1. Power the printer off and unplug the power cord. Wait approximately 10 minutes for the printer to cool down. 2. Open the front cover. 3. Gently pull the toner cartridge out, being careful not to scratch against the - Dell 1110 Mono | User's Guide - Page 9
. Oil from your fingers may cause print quality problems. 5. Reinsert the toner cartridge and close the front cover. 6. Plug in the power cord and power the printer on. Maintaining the Toner Cartridge Storing the Toner Cartridge Store the toner cartridge in the original packaging until you are ready - Dell 1110 Mono | User's Guide - Page 10
Order an extra toner cartridge so you will have it on hand when the current cartridge no longer prints satisfactorily. See "Ordering Supplies" for information on ordering toner cartridges. CAUTION: For best results, use Dell toner cartridges. Print quality and printer reliability are not guaranteed - Dell 1110 Mono | User's Guide - Page 11
out and lift it up and away from the printer. CAUTION: Avoid reaching too far into the printer. The fusing area may be hot. 3. Unpack a new toner cartridge. Hold the cartridge carefully and thoroughly shake it from side-to-side 5 or 6 times to distribute the toner. NOTE: If toner comes into - Dell 1110 Mono | User's Guide - Page 12
. OR From the Start menu, click Programs Dell Printers Dell Laser Printer 1110 Dell Toner Reorder Program. OR In the Printing Status window, click the Order Supplies button. 2. The Order Toner Cartridges window appears. Click Visit Dell's cartridge ordering web site to order supplies online. If - Dell 1110 Mono | User's Guide - Page 13
media for your printer helps you avoid printing problems. To get the best possible print quality, use only high-quality, copier-grade paper. Weight: Your printer supports paper weights as follows: l 16~24 lbs (60~90 g/m2) bond for the paper tray l 16~43 lbs (60~163 g/m2) bond for manual feed mode - Dell 1110 Mono | User's Guide - Page 14
envelopes. l Use only envelopes recommended for laser printers. Before loading envelopes in the tray, 356 mm). l Always insert the short-edge into the Manual Feeder first. If you want to print in landscape mode, verify that the ink on the paper is dry. During the fusing process, wet ink can come off - Dell 1110 Mono | User's Guide - Page 15
in the Paper Tray Proper paper loading helps prevent paper jams and ensures trouble-free printing. Do not remove the paper in the tray while a job experience problems with paper feed, place a sheet of paper in the tray using the manual feed mode. Using Manual Feed Mode If you select Manual Feed in - Dell 1110 Mono | User's Guide - Page 16
and width guides against the print material without bending it. 2. To print a document in Manual Feed mode, you must select Manual Feed for Source from the software application, and then select the appropriate paper size and type. For details, see "Paper Tab". 3. Press on the printer's operator - Dell 1110 Mono | User's Guide - Page 17
out. NOTE: Place transparencies on a flat surface after removing them from the printer. NOTE: Do not use transparencies that are separating from the backing sheet. , top edge toward the printer. NOTE: Before you load letterhead, verify that the ink on the paper is dry. During the fusing process, wet - Dell 1110 Mono | User's Guide - Page 18
- Dell 1110 Mono | User's Guide - Page 19
Printing on Both Sides of Paper (Manual Duplex) Fitting Your Document to a Selected Paper Size Printing a Reduced or Enlarged Document Using Watermarks Using Overlays Setting Up a Locally Shared Printer Printing a Document The driver provided with your printer allows a wide variety of options - Dell 1110 Mono | User's Guide - Page 20
Guide) and the Printer tab (see "Printer Tab"). NOTE: Most Windows applications override settings you specify in the printer driver. Settings and point to Printers. For Windows XP, click Printers and Faxes. c. Point to the Dell Laser Printer 1110 icon. d. Right-click on the printer icon and: l For - Dell 1110 Mono | User's Guide - Page 21
Double-sided Printing allows you to print two-sided jobs manually. For details, see "Printing on Both Sides of Paper (Manual Duplex)". Paper Tab Use the following options to set paper handling needs when you access printer properties. See step 3 in "Printing a Document" for more information about - Dell 1110 Mono | User's Guide - Page 22
for the best results. If you are using recycled paper or color paper, select Color Paper. Scaling allows you to automatically or manually scale your cartridge and reduces your cost per page without a significant reduction in print quality. Darkness • On: Select this option to allow the printer to - Dell 1110 Mono | User's Guide - Page 23
Advanced Options You can set advanced settings by clicking the Advanced Options button. TrueType Options This option determines what the driver tells the printer about how to print the text in your document. Select the appropriate setting according to the status of your document. This option is - Dell 1110 Mono | User's Guide - Page 24
menu. 2. For Windows 98/Me/2000, select Settings and then Printer. For Windows XP, select Printers and Faxes. 3. Select the Dell Laser Printer 1110 icon. 4. Right-click on the printer icon and select Properties. 5. Click the Printer tab and set the options. Property High Altitude Correction Power - Dell 1110 Mono | User's Guide - Page 25
has a help screen that can be activated by the Help button in the printer's properties window. These help screens give detailed information about the printer features provided by the printer driver. You can also click from the upper right hand corner, and then click on any setting. Printing Multiple - Dell 1110 Mono | User's Guide - Page 26
Printing on Both Sides of Paper (Manual Duplex) You can print on both sides of a sheet of paper manually. Before printing, decide how you of labels, transparencies, envelopes, or thick paper. Paper jamming and damage to the printer may result. NOTE: To use double-sided printing, you can use only the - Dell 1110 Mono | User's Guide - Page 27
paper source, size, and type. 5. Click OK and print the document. The printer prints every other page of the document first. Once the first side of your back into the printer with the already-printed side down and the top of the page toward the front of the tray according to the instructions in the - Dell 1110 Mono | User's Guide - Page 28
reading "DRAFT" or "CONFIDENTIAL" printed diagonally across the first page or all pages of a document. There are several predefined watermarks that come with your printer, and they can be modified or you can add new ones to the list. Using an Existing Watermark 1. To change the print settings from - Dell 1110 Mono | User's Guide - Page 29
, select [No Watermark] from the Watermark drop-down list. Editing a Watermark 1. To change the print settings from your software application, access printer properties. See step 3 in "Printing a Document". 2. Click the Extras tab and click Edit in the Watermark section. The Edit Watermark window - Dell 1110 Mono | User's Guide - Page 30
when printed as an overlay. If needed, save the file for later use. 2. To change the print settings from your software application, access printer properties. See step 3 in "Printing a Document". 3. Click the Extras tab and click Edit in the Overlay section. 4. In the Edit Overlay window, click - Dell 1110 Mono | User's Guide - Page 31
to print an overlay on your document. Answering Yes to the window means that the selected overlay will be printed with your document. Answering No You can delete page overlays that are no longer used. 1. In the printer properties window, click the Extras tab. 2. Click Edit in the Overlay section - Dell 1110 Mono | User's Guide - Page 32
Computer 1. Right-click the Start button and select Explore. 2. Open your network folder in the left column. 3. Right-click the shared name and click Capture Printer Port. 4. Select the port you want, check the Reconnect at log on box, and then click OK. 5. Click the Start button and select Settings - Dell 1110 Mono | User's Guide - Page 33
appears. Follow the instructions to install the software. 2. Insert the Drivers and Utilities CD. 3. If necessary, select a language by pressing the Language button on the main screen. 4. Select Typical Installation to install the User's Guide, the printer driver, and Dell Toner Management System - Dell 1110 Mono | User's Guide - Page 34
all programs before uninstalling software. 1. From the Start menu, select Programs Dell Printers Dell Laser Printer 1110 Dell Printer Software uninstall. 2. Select the software you want to remove and click Next. The selected driver and all of its components are removed from your computer. 3. Click - Dell 1110 Mono | User's Guide - Page 35
. NOTE: Before purchasing large quantities of paper, insure the paper meets the requirements specified in this User's Guide. CAUTION: Using paper that does not meet these specifications may cause problems, requiring repairs. These repairs are not covered by the Dell warranty or service agreements. - Dell 1110 Mono | User's Guide - Page 36
manual feed mode 90 to 163 g/m² bond (16 to 43 lb) for manual feed mode 60 to 120 g/m² bond (16 to 32 lb) for manual feed mode a. The printer supports paper correctly. Please refer to "Printer and Paper Storage Environment". Guidelines for Using Paper For best results, use conventional 75 g/m² ( - Dell 1110 Mono | User's Guide - Page 37
direction, or short-grain construction Jamming, damage to printer Problems with feeding Cutouts or perforations Ragged edges Solution Try with low-temperature inks, such as those used in some types of thermography. NOTE: Do not use raised or embossed letterhead. NOTE: The printer uses heat - Dell 1110 Mono | User's Guide - Page 38
l The best way to store an opened ream of paper is to rewrap it tightly in its moisture-proof wrapping. If the printer environment is subject to extremes, unwrap only the amount of paper to be used during the day's operation to prevent unwanted moisture changes. - Dell 1110 Mono | User's Guide - Page 39
Dell™ Laser Printer 1110 User's Guide Click the links to the left for information on the features, options, and operation of your printer. For information on other documentation included with your printer, see "Finding Information". To order replacement toner cartridges or supplies from Dell: 1. - Dell 1110 Mono | User's Guide - Page 40
Operator Panel LEDs Troubleshooting Checklist Solving General Printing Problems Solving Print Quality Problems Clearing Jams in the guides are not properly positioned. l Paper that does not meet paper specifications has been used. See "Paper Specifications". l Paper that is outside of the supported - Dell 1110 Mono | User's Guide - Page 41
inner cover. CAUTION: The top and inner cover themselves may also be hot due to the heat roller(located underneath the inner cover). Allow the printer to cool before opening the covers. 3. Loosen the paper if it is caught in the heat roller. Then remove the paper by gently pulling it - Dell 1110 Mono | User's Guide - Page 42
paper in the printer. 5. Reinstall the toner cartridge and close the front cover. Your printer resumes printing guides are correctly positioned. l Do not overload the paper tray. l Do not remove the paper from the tray while your printer is printing. l Do not add paper to the tray while your printer - Dell 1110 Mono | User's Guide - Page 43
. Find the LED pattern below that matches the printer LED pattern and check the meaning and solution. LED Status Legend LED Pattern Meaning and Suggested Solution Your printer has some problems. If this problem occurs, contact your service representative. • A paper jam has occurred. To solve the - Dell 1110 Mono | User's Guide - Page 44
service representative. • Close the corresponding cover. • Clear the paper jam. See "Clearing Jams in the Paper Tray". • Load paper. See "Loading Paper" • Install a toner cartridge. See "Replacing the Toner Cartridge". The printer may be in Manual and Printers. Right-click Dell Laser Printer 1110, - Dell 1110 Mono | User's Guide - Page 45
is off (see "Graphics Tab"). l Clear general printing problems (see "Solving General Printing Problems"). l Install a new toner cartridge and check print quality (see "Replacing the Toner Cartridge"). Printing Quality Problems The inside of the printer may be dirty or improper paper loading may - Dell 1110 Mono | User's Guide - Page 46
Cartridge". • Parts of the printer may have toner on them. If the defects occur on the back of the page, the problem will likely correct itself after a few more pages. • The fusing assembly may be damaged. Contact a service other material is loaded correctly and the guides are not too tight or too - Dell 1110 Mono | User's Guide - Page 47
Check the paper type and quality. See "Paper Specifications". • Install a new toner cartridge. See "Replacing the Toner Cartridge". • If the problem persists, the printer may require repair. Contact a service representative. Character voids are white areas where they should be solid black: • If you
-
 1
1 -
 2
2 -
 3
3 -
 4
4 -
 5
5 -
 6
6 -
 7
7 -
8
-
9
-
10
-
11
-
12
-
13
-
14
-
15
-
16
-
17
-
18
-
19
-
20
-
21
-
22
-
23
-
24
-
25
-
26
-
27
-
28
-
29
-
30
-
31
-
32
-
33
-
34
-
35
-
36
-
37
-
38
-
39
-
40
-
41
-
42
-
43
-
44
-
45
-
46
-
47
 |
 |
Unpacking Your Printer
1.
Select a location for your printer.
l
Leave enough room to open the printer tray, covers, doors, and options. It is also important to allow enough space around the printer for proper
ventilation.
l
Provide the proper environment:
l
A firm, level surface
l
Away from the direct airflow of air conditioners, heaters, or ventilators
l
Away from sunlight, extreme humidity, or wide fluctuations in temperature
l
A clean, dry, and dust-free location
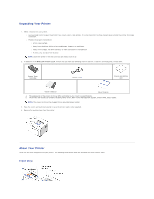
2.
In addition to the
Dell Laser Printer 1110
, ensure that you have the following items in the box. If there is a missing item, contact Dell:
a.
The appearance of the power cord may differ according to your country's specifications.
b.
The
Drivers and Utilities
CD contains the Dell printer driver, Dell™ Toner Management System, and an HTML User's Guide.
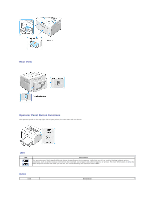
3.
Save the carton and packing material in case the printer needs to be repacked.
4.
Remove the packing tape from the printer.
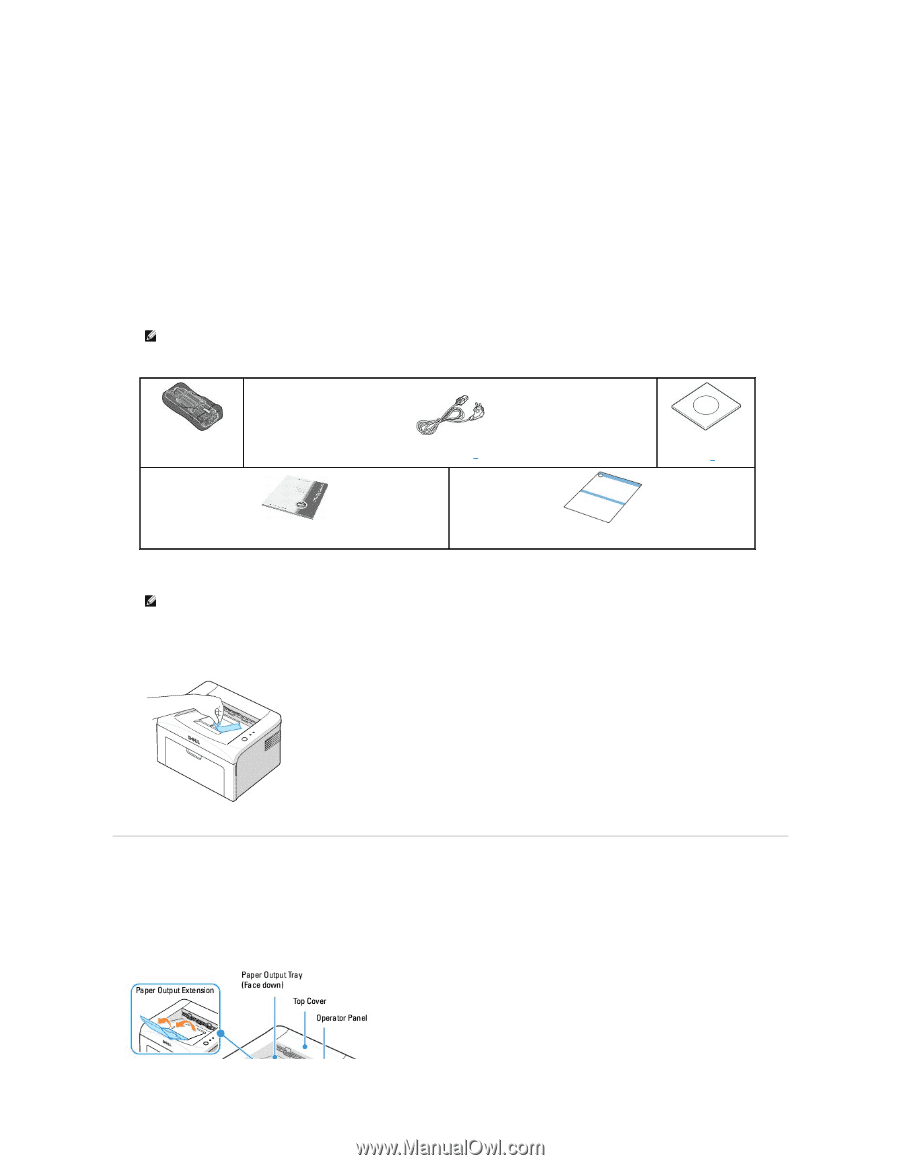
About Your Printer
These are the main components of your printer. The following illustrations show the standard Dell Laser Printer 1110:
Front View
NOTE:
Leave the printer in the box until you are ready to set it up.
Starter Toner
Cartridge
Power Cord
a
Drivers and Utilities
CD
b
Owner's Manual
Setup Diagram
NOTE:
The power cord must be plugged into a grounded power socket.