Dell 1503FP Quick Setup Guide - Page 3
Setting Display Resolution, Accessing the User's Guide Online or via CD, Troubleshooting Tips - part number
 |
View all Dell 1503FP manuals
Add to My Manuals
Save this manual to your list of manuals |
Page 3 highlights
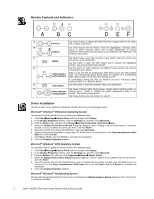
1. Insert the monitor CD into the CD-ROM drive, and click Next> twice when the Add New Hardware Wizard dialog box appears. 2. Click the CD-ROM drive box to install the drivers from the CD and then click Next>. 3. Confirm that the driver was found on the CD, and click Next> twice to install the driver. 4. Click Finish to exit the Add New Hardware Wizard dialog box. To manually install or update the driver, perform the following steps: 1. Click Start!Settings!Control Panel and then double-click Display. 2. In the Display Properties window, click the Settings tab, and then click Advanced. 3. Click the Monitor tab, and then click Change. 4. When the Update Device Driver Wizard dialog box appears, follow the steps in the previous paragraph. Microsoft® Windows® 95 Operating System First determine the Windows 95 version installed on your computer by right-clicking the My Computer icon on the desktop and selecting Properties. The version number is listed under System. Perform the steps for the appropriate version. Version 4.00.950A 1. Click Start!Settings!Control Panel and then double-click Display. 2. In the Display Properties window, click the Settings tab and then click Change Display Type. 3. In the Change Display Type window, click Change and then click Have Disk. 4. Insert the monitor CD into the CD-ROM drive, type d:\ (change the drive letter to match your CD-ROM drive if it is not drive D) in the Copy manufacturer's files from: box, and click OK. 5. In the Select Device window, click the appropriate monitor model and then click OK. 6. In the Change Display Type window, click Close. 7. In the Display Properties window, click OK. Version 4.00.950B 1. Click Start!Settings!Control Panel and then double-click Display. 2. In the Display Properties window, click the Settings tab and then click Advanced Properties. 3. In the Advanced Display Properties window, click the Monitor tab and then click Change. 4. In the Select Device window, click Have Disk. 5. Insert the monitor CD into the CD-ROM drive, type d:\ (change the drive letter to match your CD-ROM drive if it is not drive D) in the Copy manufacturer's files from: box, and click OK. 6. In the Select Device window, click the appropriate monitor model and then click OK. 7. In the Advanced Display Properties window, click Close. 8. In the Display Properties window, click OK. Setting Display Resolution For optimal monitor performance while using Microsoft® Windows® 2000, Windows 98, Windows 95 or Windows NT, set the display resolution to 1024 x 768 as follows: 1. Click Start!Settings!Control Panel. 2. Double-click the Display icon in the Control Panel window, and the click the Settings tab. 3. In the Desktop area, move the slidebar to 1024 by 768 pixels. Then click OK. Accessing the User's Guide Online or via CD To view the latest monitor User's Guide, access the SUPPORT section of the Dell Web site (http://support.dell.com). If you do not have Internet access, you can access the guide on the monitor CD: 1. Insert the monitor CD into your CD-ROM drive. A start-up document should launch automatically; however, if the start-up document does not launch automatically, click Start!Run, type D:\monitor.htm, and click OK. (Substitute the correct CD-ROM drive letter if it is not the D drive.) 2. Click the appropriate icon to open the User's Guide in the desired language. NOTE: All applicable warranty and regulatory information regarding your monitor is contained in the User's Guide on your CD. Troubleshooting Tips Monitor Has No Power If the monitor's power indicator is off and no image appears on the display, perform the following checks: • Ensure that the power cable is fully inserted in the monitor's power port and the electrical outlet. • Test the electrical outlet by plugging in a working electrical device such as a lamp. • Ensure that the power button has been depressed, and wait for the power indicator to light. • Try another power cable on the monitor. Use the computer's power cable and turn on the monitor with the signal cable disconnected. If the monitor is working correctly, a self-test pattern appears. Dell™ 1503FP Flat Panel Color Monitor Quick Setup Guide 3
-
 1
1 -
 2
2 -
 3
3 -
 4
4
 |
 |