Dell 2135cn Color Laser Printer User Guide - Page 117
Sending a Fax from the Driver Direct Fax
 |
View all Dell 2135cn Color Laser Printer manuals
Add to My Manuals
Save this manual to your list of manuals |
Page 117 highlights
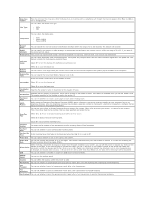
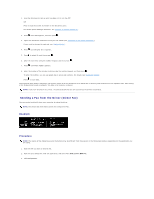
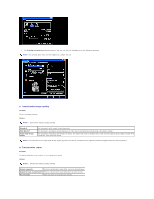
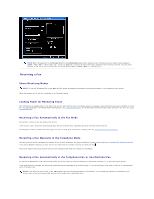
1. Load the document(s) face up with top edge in first into the ADF. OR Place a single document face down on the document glass. For details about loading a document, see "Loading an Original Document". 2. Press until >FAX appears, and then press . 3. Adjust the document resolution to suit your fax needs (see "Adjusting the Document Resolution"). If you need to change the contrast, see "Lighter/Darker". 4. Press until Delayed Start appears. 5. Press to select On, and then press . 6. Enter the start time using the number keypad, and then press . 7. Press until Phone Number appears. 8. Enter the number of the remote machine using the number keypad, and then press . To enter the number, you can use speed dial or group dial numbers. For details, see "Automatic Dialing". Press to scan data. Once Delayed Start mode is activated, your printer stores all of the documents to be faxed into its memory and sends them at the specified time. After faxing in the Delayed Start mode is complete, the data in the memory is cleared. NOTE: If you turn off and on the printer, the stored documents are sent as soon as the printer is activated. Sending a Fax from the Driver (Direct Fax) You can send a fax directly from your computer by using the driver. NOTE: Only black and white faxes can be sent using Direct Fax. Example Procedure NOTE: The names of the dialog boxes and the buttons may be different from those given in the following procedure depending on the application you are using. 1. Open the file you want to send by fax. 2. Open the print dialog box from the application, and then select Dell 2135cn MFP Fax. 3. Click Preferences.
-
 1
1 -
2
-
3
-
4
-
5
-
6
-
7
-
8
-
9
-
10
-
11
-
12
-
13
-
14
-
15
-
16
-
17
-
18
-
19
-
20
-
21
-
22
-
23
-
24
-
25
-
26
-
27
-
28
-
29
-
30
-
31
-
32
-
33
-
34
-
35
-
36
-
37
-
38
-
39
-
40
-
41
-
42
-
43
-
44
-
45
-
46
-
47
-
48
-
49
-
50
-
51
-
52
-
53
-
54
-
55
-
56
-
57
-
58
-
59
-
60
-
61
-
62
-
63
-
64
-
65
-
66
-
67
-
68
-
69
-
70
-
71
-
72
-
73
-
74
-
75
-
76
-
77
-
78
-
79
-
80
-
81
-
82
-
83
-
84
-
85
-
86
-
87
-
88
-
89
-
90
-
91
-
92
-
93
-
94
-
95
-
96
-
97
-
98
-
99
-
100
-
101
-
102
-
103
-
104
-
105
-
106
-
107
-
108
-
109
-
110
-
111
-
 112
112 -
 113
113 -
 114
114 -
 115
115 -
 116
116 -
 117
117 -
 118
118 -
 119
119 -
 120
120 -
 121
121 -
 122
122 -
123
-
124
-
125
-
126
-
127
-
128
-
129
-
130
-
131
-
132
-
133
-
134
-
135
-
136
-
137
-
138
-
139
-
140
-
141
-
142
-
143
-
144
-
145
-
146
-
147
-
148
-
149
-
150
-
151
-
152
-
153
-
154
-
155
-
156
-
157
-
158
-
159
-
160
-
161
-
162
-
163
-
164
-
165
-
166
-
167
-
168
-
169
-
170
-
171
-
172
-
173
-
174
-
175
-
176
-
177
-
178
-
179
-
180
-
181
-
182
-
183
-
184
-
185
-
186
-
187
-
188
-
189
-
190
-
191
-
192
-
193
-
194
-
195
-
196
-
197
-
198
-
199
-
200
-
201
-
202
-
203
-
204
-
205
-
206
-
207
-
208
-
209
-
210
-
211
-
212
-
213
-
214
-
215
-
216
-
217
-
218
-
219
-
220
-
221
-
222
-
223
-
224
-
225
-
226
-
227
-
228
-
229
-
230
-
231
-
232
-
233
-
234
-
235
-
236
-
237
-
238
-
239
-
240
-
241
-
242
-
243
-
244
-
245
-
246
-
247
-
248
-
249
-
250
-
251
-
252
-
253
-
254
-
255
-
256
-
257
-
258
-
259
-
260
 |
 |