Dell 946 User Guide
Dell 946 Manual
 |
View all Dell 946 manuals
Add to My Manuals
Save this manual to your list of manuals |
Dell 946 manual content summary:
- Dell 946 | User Guide - Page 1
™ All-In-One Printer 946 User's Guide Click the links to the left for information on the features and operation of your printer. For information on other documentation included with your printer, see Finding Information. To order ink or supplies from Dell: 1. Double-click the icon on your desktop - Dell 946 | User Guide - Page 2
What are you looking for? Find it here Drivers for my printer My User's Guide Drivers and Utilities CD How to set up my printer If you purchased your Dell computer and printer at the same time, documentation and drivers for your printer are already installed on your computer. You can use the CD - Dell 946 | User Guide - Page 3
, and repair information Downloads - Drivers Reference - Printer documentation and product specifications How to use Windows XP Documentation for my printer Windows XP Help and Support Center 1. Click Start Help and Support. 2. Type a word or phrase that describes your problem, and then click - Dell 946 | User Guide - Page 4
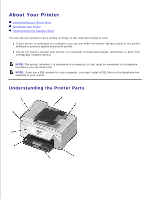
, you can use either the printer operator panel or the printer software to produce quality documents quickly. You do not need to connect your printer to a computer to make photocopies, send faxes, or print from a PictBridge-enabled camera. NOTE: The printer (whether it is connected to a computer - Dell 946 | User Guide - Page 5
, or faxing multiple-page documents. Number: Part: 9 Supplies Reorder Label 10 Express Service Code Description: To order ink cartridges or paper, visit www.dell.com/supplies. Identify your printer when you use support.dell.com or contact technical support. Enter the Express Service Code to - Dell 946 | User Guide - Page 6
to notify you that power is present. NOTE: If the power is off when you unplug your machine, the power will be off when you plug it back in. 14 Power cord Connects printer power supply to power outlet using the supplied country- connector specific power cord. 15 PHONE jack Remove - Dell 946 | User Guide - Page 7
Setting Up Your Printer NOTE: Your printer supports Microsoft® Windows® 2000, Windows XP, and Windows XP Professional X64 Edition. To set up your printer, follow the steps on your Setting Up Your Printer poster. If you encounter problems during setup, see Troubleshooting. NOTE: Your printer modem is - Dell 946 | User Guide - Page 8
Purpose: To turn your printer on or off. To alert you of errors such as paper out or a paper jam. To move back a menu level while navigating through the available menus on the display. Decrease a number on the display. Scroll through a list on the display. Cancel a scan, print, or copy job in - Dell 946 | User Guide - Page 9
10 Start 11 LCD (Liquid Crystal Display) Start a scan, copy, or fax job. NOTE: If you initiate a copy without specifying color or black and white, color is used by default. To show options available to you. - Dell 946 | User Guide - Page 10
Copy, Scan, Fax, Setup, and Maintenance. A sixth mode, PictBridge mode, is also available on the printer. This mode is only available when you plug a PictBridge-enabled camera into your printer. For more information, see PictBridge Mode. Copy Mode Main menu Mode Main Menu Copy Copy Color Copies - Dell 946 | User Guide - Page 11
1. From the main menu, use the left and right Arrow buttons to scroll to Copy. 2. Press the Select button . 3. Press the right Arrow button Select button . until the heading you want appears on the display, and then press the 4. Use the left and right Arrow buttons to scroll through the - Dell 946 | User Guide - Page 12
copies. For more information about collating copies, see Collating Copies. Specify how many different images or pages of a document you want to print on a single page. 1 Up* 2 Up 4 Up NOTE: N-up and Repeat Image cannot be used together. If a value other than 1 Up is specified and then you select - Dell 946 | User Guide - Page 13
Copy Scan Scan Color Scan To Quality Original Size Fax Setup Maintenance 1. Turn on your computer and printer, and make sure they are connected. If you are working over a network, make sure your printer is connected to the network. 2. From the main menu, use the use the left and right - Dell 946 | User Guide - Page 14
Scan Color Color* Black Scan To If your printer is connected locally: Select the application to which you want your scanned image initiated. For more information about scanning across a network, see Scanning Single-Page Documents and Single Photos. Specify the resolution for which you want your original - Dell 946 | User Guide - Page 15
Dialing and Sending Mode Submenu Activity Report Confirmation Print Reports Ringer Volume Answer Fax When Ring Pattern Fax Forward Caller ID Pattern Paper Size Paper Type Fit Fax to Page Fax Footer Your fax number Your fax name Dial Method Redial Time Redial Attempts Dial Prefix Dial Volume - Dell 946 | User Guide - Page 16
Fax Blocking Scan Max Send Speed Error Correction Auto Fax Convert Turn On/Off Add Remove Modify Print Block No-ID 1. From the integrated services digital network) unless you purchase a digital line filter. Contact your Internet Service Provider for more details. If you are using the Dell Printer - Dell 946 | User Guide - Page 17
to perform in your Phone Book. View Add Remove Modify Print On Hook Dial For more information about your Phone Book, see Speed Dial. Press the Select button if you want the printer to go off hook. Delay Fax For more information, see Manually Dialing a Fax While Listening to a Telephone Line (On - Dell 946 | User Guide - Page 18
for how you want faxes to print. Paper Size Paper Type Fit Fax to Page Fax Footer Dialing and Sending For more information on any of the options listed under the Fax Printing heading, see Additional Fax Options. Set various options controlling how your printer sends faxes. Your Fax Number - use - Dell 946 | User Guide - Page 19
Method Redial Time Redial Attempts Dial Prefix Dial Volume Scan Max Send Speed Error Correction Auto Fax Convert For more information on any of the options which you want to block faxes. Turn On/Off Add Remove Modify Print Block No-ID For more information about blocking faxes, see Blocking Faxes. - Dell 946 | User Guide - Page 20
you want to print a fax confirmation. On Error* Off Print for All Print Reports Specify which report or log you want to print. Ringer Volume Answer Fax When Activity Report Send Log Receive Log Settings List Specify the volume of the ringer from the built-in speaker on the printer. Off Low* High - Dell 946 | User Guide - Page 21
to fit on the paper in the paper input tray. Fit-to-Page* Use Two Pages Specify if you want to insert the Time/Date/Page Number/System Identification footer at the bottom of each fax received. On* Off Specify the printer dialing method. Touch-tone* Pulse Behind PBX Specify the amount of time - Dell 946 | User Guide - Page 22
26400 28800 31200 33600* Turn Auto Fax Convert on or off. If you are faxing a high-resolution document to a fax machine that prints at a lower resolution, the printer automatically converts the resolution to match that of the receiving fax machine. Turn On/Off On* Off Turn fax blocking on or off - Dell 946 | User Guide - Page 23
Main menu Mode Main Menu Copy Scan Fax Setup Device Setup Defaults Maintenance Mode Submenu Language Country Date/Time Host Fax Settings Button Beep Power Save Clear Timeout Settings Copy/Fax paper size Copy paper type Set Defaults 1. From the main menu, use the left and right Arrow buttons - Dell 946 | User Guide - Page 24
Device Setup Defaults You can: Select the operator panel setting you want to reconfigure. Language Country Date/Time Host Fax Settings Button Beep Power Save Clear Timeout Settings For more information about any of the Device Setup options, see Additional Setup Options. Change the default settings - Dell 946 | User Guide - Page 25
a beep when you press buttons on the operator panel or not. Power Save On* Off Specify how much time you want to elapse before the printer switches to Power Save mode. Clear Settings Timeout Never After 60 min After 30 min* After 10 min Now Select how much time you want to elapse before - Dell 946 | User Guide - Page 26
button to clean the ink cartridges. A cleaning page prints. You may discard the page when printing is complete. Align Cartridges Press the Select button to align the ink cartridges. An alignment page prints. You may discard the page when printing is complete. Print Test Page Press the Select - Dell 946 | User Guide - Page 27
Mode Mode Main Menu Pictbridge Paper Size Photo Size Layout Quality Paper Type 1. When your printer changes to PictBridge mode, press the right Arrow button you want appears on the display, and on country selection. Specify the size of the photos you want to print. 2.25x3.25" 3.5x5" 4x6"* - Dell 946 | User Guide - Page 28
to resolve the conflict. Specify the layout of the photos on the printed page. Quality Automatic* Borderless 1 per page 2 per page 3 per page 4 per page 6 per page 8 per page 16 per page 1 centered Specify the print quality (resolution) of the photos. Paper Type Automatic* Draft Normal Photo - Dell 946 | User Guide - Page 29
Understanding Paper and Specialty Media Guidelines Loading Paper Understanding the Automatic Paper Type Sensor Loading Original Documents Loading Paper 1. Fan the paper. 2. Lift the paper exit tray, and extend the paper support. 3. Insert paper into the paper input tray. - Dell 946 | User Guide - Page 30
3. NOTE: Do not force the paper into the printer. 4. Squeeze and slide the paper guides to rest against the edges of the paper. 5. Lower the paper exit tray. 6. Extend the paper exit tray stop to catch paper as it exits the printer. NOTE: The paper exit tray can hold up to 50 sheets of paper. - Dell 946 | User Guide - Page 31
: The paper guides rest against the edges of the paper. You load letterhead paper with the print side facing down and the top of the letterhead going into the printer first. You select Automatic, Draft, Normal, or Photo print quality. Do not select Draft if you have a photo cartridge installed. 20 - Dell 946 | User Guide - Page 32
rest against the edges of the transparencies. You select Automatic, Draft, Normal, or Photo print quality. The print side of the labels faces down. The to of the labels feeds into the printer first. The paper guides rest against the edges of the paper. You select Automatic, Draft, Normal, or Photo - Dell 946 | User Guide - Page 33
Black and Color Cartridges Installed Photo and Color Cartridges Installed Plain Normal Photo Transparency Normal Photo Glossy/photo Photo Photo NOTE: Your printer cannot detect the paper size. To choose paper size: 1. With your document open, click File Print. The Print dialog box opens - Dell 946 | User Guide - Page 34
paper type sensor for all print jobs: 1. In Windows XP, click Start Control Panel Printers and Other Hardware Printers and Faxes. In Windows 2000, click Start Settings Printers. 2. Right-click the Dell AIO Printer 946 icon. 3. Click Printing Preferences. The Printing Preferences dialog box opens - Dell 946 | User Guide - Page 35
paper The document is loaded text side up. The paper guides rest against the edges of the paper. The media absorbs ink well. You allow the preprinted media to dry thoroughly before use in the ADF. You do not use media printed with metallic ink particles in the ADF. You avoid embossed designs. The - Dell 946 | User Guide - Page 36
1. 2. Place the original document face down on the scanner glass. NOTE: Make sure the upper left corner of the front of the item aligns with the arrow on the printer. For portrait orientation: For landscape orientation: 3. Close the top cover. - Dell 946 | User Guide - Page 37
Preferences dialog box closes. 7. Click OK or Print (depending on the program or operating system). Printing Photos NOTE: Dell recommends you use a color cartridge and a photo cartridge for printing photos. 1. Turn on your computer and printer, and make sure they are connected. 2. Load the paper - Dell 946 | User Guide - Page 38
(12 to 24 hours, depending on the ambient conditions). This maximizes the life of your prints. Printing Envelopes 1. Turn on your computer and printer, and make sure they are connected. 2. Load the envelope between the paper guides with the print side facing down, with the flap on the left side. 3. - Dell 946 | User Guide - Page 39
in the lower left corner. If you are mailing internationally, print landscape orientation with the stamp in the upper left corner. Printing Photos From a PictBridge-Enabled Camera Your printer supports PictBridge-enabled cameras. 1. Insert one end of the USB cable into the camera. 2. Insert the - Dell 946 | User Guide - Page 40
included with your camera to begin printing photos. NOTE: For many digital cameras, there are two USB mode selections: computer and printer (or PTP). For PictBridge printing, the printer (or PTP) USB selection should be used. For more information, refer to the documentation included with - Dell 946 | User Guide - Page 41
without specifying a color selection, the copy is printed in Using Your Computer 1. Turn on your computer and printer, and make sure they are connected. 2. Programs or All Programs Dell Printers Dell AIO Printer 946. 5. Select Dell All-In-One Center. The Dell All-In-One Center opens. 6. Select - Dell 946 | User Guide - Page 42
Documents. 4. Click Start Programs or All Programs Dell Printers Dell AIO Printer 946. 5. Select Dell All-In-One Center. The Dell All-In-One Center opens. 6. Click Preview Now. 7. Adjust the dotted lines to fit around the portion of the image you want to print. 8. Select the number of copies (1-99 - Dell 946 | User Guide - Page 43
10. When you finish customizing your settings, click Copy Now. Collating Copies Using the Operator Panel 1. Turn on the printer After the page is scanned, you are asked if there is another page. If you have another page to If you do not have another page to scan: Press the right Arrow button until - Dell 946 | User Guide - Page 44
9. On the Print tab, select the Collate Copies check box. 10. Click OK. 11. When you are finished customizing your settings, click Copy Now. Changing Copy Settings 1. Click Start Programs or All Programs Dell Printers Dell AIO Printer 946. 2. Select Dell All-In-One Center. The Dell All-In-One Center - Dell 946 | User Guide - Page 45
such as quality. 6. To make any changes, click the following tabs. Click this tab: Print Scan Image Enhancements Image Patterns To: Select the paper size and type. Select borderless printing options. Select the print quality. Select the color depth and scan resolution. Auto-crop the scanned image - Dell 946 | User Guide - Page 46
or Reducing Images or Documents Scanning Single-Page Documents and Single Photos NOTE: Do button . 5. If your printer is connected locally: a. The printer downloads the application list from the printer is connected to a network: NOTE: This printer can only be attached to a network using a Dell - Dell 946 | User Guide - Page 47
Documents. 3. Click Start Programs or All Programs Dell Printers Dell AIO Printer 946. 4. Select Dell All-In-One Center. The Dell All-In-One Center opens. NOTE: You can also open the Dell All-In-One Center from the operator panel on your printer. When your printer is in Scan mode, press the Start - Dell 946 | User Guide - Page 48
All-In-One Center main page. For more information, see Using the Dell All-In-One Center. The PIN is not required by default; it is only requested if the PIN has been set. d. Press the Select button . 6. Press the Start button . The printer scans all pages loaded in the ADF. When all pages in the - Dell 946 | User Guide - Page 49
support multiple-page scanning. 1. Turn on your computer and printer, and make sure they are connected. 2. Load your original document. For more information, see Loading Original Documents. 3. Click Start Programs or All Programs Dell Printers Dell AIO Printer 946. 4. Select Dell All-In-One Center - Dell 946 | User Guide - Page 50
should have installed at the same time as your printer software. 1. Turn on your computer and printer, and make sure they are connected. 2. Load your original document. For more information, see Loading Original Documents. 3. Click Start Programs or All Programs Dell Printers Dell AIO Printer 946 - Dell 946 | User Guide - Page 51
(OCR) check box. 9. Click OK. 10. When you finish customizing your settings, click Dell Printers Dell AIO Printer 946. 4. Select Dell All-In-One Center. The Dell All-In-One Center opens. NOTE: You can also open the Dell All-In-One Center from the operator panel on your printer. When your printer - Dell 946 | User Guide - Page 52
Documents. 3. Click Start Programs or All Programs Dell Printers Dell AIO Printer 946. 4. Select Dell All-In-One Center. The Dell All-In-One Center opens. NOTE: You can also open the Dell All-In-One Center from the operator panel on your printer. When your printer is in Scan mode, press the Start - Dell 946 | User Guide - Page 53
Documents. 3. Click Start Programs or All Programs Dell Printers Dell AIO Printer 946. 4. Select Dell All-In-One Center. The Dell All-In-One Center opens. NOTE: You can also open the Dell All-In-One Center from the operator panel on your printer. When your printer is in Scan mode, press the Start - Dell 946 | User Guide - Page 54
operator panel for basic faxing. See Faxing Using the Printer Operator Panel. NOTE: For faxing instructions using the computer software, see Sending a Fax From the Computer. Equipment Benefits See this section printer phone cord (provided) Make copies and send and receive faxes Connecting - Dell 946 | User Guide - Page 55
Up the Printer With Equipment Connecting directly to a telephone wall jack 1. Connect one end of the phone cord to the FAX connector ( - left side connector). 2. Connect the other end of the phone cord to an active telephone wall jack. Connecting to a telephone 1. Connect a phone cord from the - Dell 946 | User Guide - Page 56
from the PHONE jack connector ( - right side connector), and insert the supplied yellow terminator for your fax to work correctly. You will not be able machine 1. Connect a phone cord from the FAX connector ( telephone wall jack. - left side connector) on the printer to the 2. Remove the - Dell 946 | User Guide - Page 57
DSL modem, install a DSL filter to avoid interference with the analog fax modem signal. NOTE: ISDN (integrated services digital network) and cable modems are not fax modems and are not supported for faxing. 1. Connect the DSL filter to an active telephone line. 2. Connect the printer directly to the - Dell 946 | User Guide - Page 58
install any splitters between the DSL filter and the printer. Contact your DSL service provider if you need more help. Faxing Using the Printer Operator Panel Sending a Fax 1. Make sure your printer can enter up to 64 digits. 5. Press the Start button . The printer scans your document and sends - Dell 946 | User Guide - Page 59
select or enter is added to the fax list until you press the Start button . 8. Press the Start button . After you initiate the fax, the printer dials the first number, establishes a connection, sends the fax, breaks the connection, and moves to the next number in the list. This continues until the - Dell 946 | User Guide - Page 60
you want appears on the display, press the Select button . When the number of set rings is detected, the printer automatically receives the fax. Receiving a Fax Manually 1. Make sure your printer is on and connected to an active telephone line. 2. Make sure the Auto Answer feature has been turned - Dell 946 | User Guide - Page 61
not fax modems and are not supported for faxing. 1. Connect the DSL filter to an active telephone line. 2. Connect the printer directly to the output of the DSL filter. NOTE: Do not install any splitters between the DSL filter and the printer. Contact your DSL service provider if you need more help - Dell 946 | User Guide - Page 62
Programs or All Programs Dell Printers Dell AIO Printer 946. 4. Select Dell All-In-One Center. The Dell All-In-One Center opens. 5. Click the Fax Now button. 6. Follow the instructions on the screen to send your fax. Sending Fax Using Dell Printer Fax Tools Using the Dell Printer Fax Tools allows - Dell 946 | User Guide - Page 63
Windows installation CD to finish installing this component. 6. Click Finish. 7. In the Add or Remove Programs dialog box, click Close. Configuring Fax Console (Windows XP) or Fax Service Management (Windows not receive voice mail. 7. Click the Manual answer button or Automatically answer after (user - Dell 946 | User Guide - Page 64
you must also have a DSL filter installed. Contact your Internet Service Provider for information. 2. Load your original document. 3. Click Start Programs or All Programs Dell Printers Dell AIO Printer 946. 4. Select Dell All-In-One Center. The Dell All-In-One Center opens. 5. From the Send scanned - Dell 946 | User Guide - Page 65
printer list, select Fax. 10. Click OK or Print, and then follow the instructions on the screen. Sending an Electronic Copy Fax Using Fax Console or Fax Service Management 1. With the file open, click File Print. The Print dialog box opens. 2. In the printer list, select Fax. 3. Click OK or Print - Dell 946 | User Guide - Page 66
information about the settings, see Fax Mode. Using the Printer Setup Utility You can access the Printer Setup Utility if you want to configure the printer's fax settings from your computer. 1. Click Start Programs or All Programs Dell Printers Dell AIO Printer 946. 2. Select Printer Setup Utility. - Dell 946 | User Guide - Page 67
to use error correction. Specify when to print a fax usage report. Specify when to print a fax activity report. Receive Choose whether you want to print a footer (date, time, and page number) on each page. Specify the printer to automatically resize oversize faxes so they print on one page, or - Dell 946 | User Guide - Page 68
3. Press the right Arrow button . until Add appears on the display, and then press the Select button 4. A quick dial number is automatically assigned by the printer. To specify you want to enter a group, use the left and right Arrow buttons or the keypad to scroll to the group contact quick dial - Dell 946 | User Guide - Page 69
button . 8. Press the Select button . The group contact is saved. Creating a Speed or Group Dial List From the Computer 1. Click Start Programs or All Programs Dell Printers Dell AIO Printer 946. 2. - Dell 946 | User Guide - Page 70
for that speed dial number. If a contact exists, the speed dial entry is used. If a contact does not exist, the printer dials the number as entered. 3. Press the Start button . Manually Dialing a Fax While Listening to a Telephone Line (On Hook Dial) 1. From the main menu, use the left and right - Dell 946 | User Guide - Page 71
fax to be sent, and then press the Select button . 7. If your printer is not in 24hr mode, you are prompted to specify if this time is AM until you have identified all the contacts to whom you want to send the fax. 10. Press the Start button . At the designated time, the fax number is dialed, - Dell 946 | User Guide - Page 72
Blocking Faxes You can specify up to 50 numbers from which you want to block faxes. If the printer detects an incoming fax from one of these numbers, the call is disconnected and Blocked Number Call Stopped appears on the display. Creating a Blocked Fax List 1. From the main menu, use - Dell 946 | User Guide - Page 73
the Select button . The block fax entry is saved. Turning Fax Blocking On NOTE: In order to use fax blocking, you must have specified the printer to pick up after two or more rings in the Answer Fax When menu. For more information, see Additional Fax Options. 1. From the main menu - Dell 946 | User Guide - Page 74
4. 5. The fax blocking feature is turned on. If the printer detects a fax from a machine without Caller ID, the transmission is disconnected. - Dell 946 | User Guide - Page 75
Understanding the Software Using the Dell All-In-One Center Using Printing Preferences Using Dell Picture Studio Dell Ink Management System Removing and Reinstalling Software The printer software includes: Dell All-In-One Center - Allows you to perform various scan, copy, fax, and print operations - Dell 946 | User Guide - Page 76
Access troubleshooting and maintenance information. Preview images you want to print or copy. Manage photos (copy them to folders, print them, perform creative copying). To access the Dell All-In-One Center: 1. Click Start Programs or All Programs Dell Printers Dell AIO Printer 946. 2. Select Dell - Dell 946 | User Guide - Page 77
XP, click Start Control Panel Printers and Other Hardware Printers and Faxes. In Windows 2000, click Start Settings Printers. 2. Right-click the printer icon, and then select Printing Preferences. NOTE: Changes made to the printer settings from the Printers folder become the default settings for - Dell 946 | User Guide - Page 78
Options - Allows you to specify Appearance Mode and Complete-A-Print settings. Maintenance Install Print Cartridges Clean Print Cartridges Align Print Cartridges Print a Test Page Network Support Using Dell Picture Studio In Dell Picture Studio, you can explore digital photography and learn how - Dell 946 | User Guide - Page 79
until you install a new ink cartridge. For more information on replacing ink cartridges, see Replacing Ink Cartridges. When one or both of your ink cartridges are empty, the Reserve Tank window appears on your screen when you try to print. If you continue printing, the print job may not print as you - Dell 946 | User Guide - Page 80
Dell Printers Dell AIO Printer 946. 2. Select Uninstall Dell AIO Printer 946. 3. Follow the instructions on the computer screen. 4. Restart your computer. 5. Insert the Drivers and Utilities CD, and then follow the instructions on the screen. If the installation screen does not appear: a. In Windows - Dell 946 | User Guide - Page 81
INSTRUCTIONS" in your Owner's Manual. Dell ink cartridges are available only through Dell. You can order more ink online at www.dell.com/supplies or by phone. To order by phone, see "Ordering Ink Cartridges and Supplies" in your Owner's Manual. Dell recommends Dell ink cartridges for your printer - Dell 946 | User Guide - Page 82
. 6. If you are installing new ink cartridges, remove the sticker and transparent tape from the back and bottom of each ink cartridge. NOTE: The illustration below shows a black cartridge and a color cartridge (use for normal printing). For photo printing, use a photo cartridge (sold separately) and - Dell 946 | User Guide - Page 83
7. Insert the new ink cartridges. Make sure the black or photo ink cartridge is secure in the left ink cartridge carrier, and the color ink cartridge is secure in the right ink cartridge carrier. 8. Snap each lid closed. 9. - Dell 946 | User Guide - Page 84
alignment page automatically prints. Aligning Ink Cartridges Your printer automatically aligns the ink cartridges when they are installed or replaced. After you close the printer unit, the alignment page prints. If you want to verify your ink cartridges are aligned, you can print an alignment page - Dell 946 | User Guide - Page 85
. In Windows 2000, click Start Settings Printers. 3. Right-click the Dell AIO Printer 946 icon. 4. Click Printing Preferences. The Printing Preferences dialog box opens. 5. Click the Maintenance tab. 6. Click Align Print Cartridges. 7. Click Print. A blue and black alignment page prints. The ink - Dell 946 | User Guide - Page 86
and Faxes. In Windows 2000, click Start Settings Printers. 3. Right-click the Dell™ All-In-One Printer 946 icon. 4. Click Printing Preferences. The Printing Preferences dialog box opens. 5. Click the Maintenance tab. 6. Click Clean Print Cartridges. The cleaning page prints. You may discard - Dell 946 | User Guide - Page 87
the instructions on your screen to complete the installation. Determine if the printer software is installed. Click Start Programs or All Programs Dell Printers. If Dell AIO Printer 946 does not appear in the list of programs, the printer software is not installed. Install the printer software. For - Dell 946 | User Guide - Page 88
used for the printer. Also, do not install printer software multiple times from the Drivers and Utilities CD. Printer Problems Ensure the printer power cable is firmly connected to the printer and the electrical outlet. Determine if the printer has been held or paused. 1. In Windows XP, click Start - Dell 946 | User Guide - Page 89
printer is not connected to a PictBridge-enabled camera. For more information, see Printing Photos From a PictBridge-Enabled Camera. General Problems Fax Problems scan your original document one page at a time. Make sure the speed dial is set correctly. Make sure the printer detects the dial tone. - Dell 946 | User Guide - Page 90
the ADF 1. Lift the ADF cover located to the left of the ADF input tray. 2. Firmly grasp the paper, and gently pull it from the printer. 3. Close the ADF cover. 4. Press the Select button . 5. Resend your print job to print any missing pages. Near the paper input tray 1. Lift the paper exit tray. - Dell 946 | User Guide - Page 91
button . 5. Resend your print job to print any missing pages. Near the paper exit tray 1. Raise the paper unit. 2. Firmly grasp the paper, and gently pull it from the printer. 3. Close the printer unit. 4. Press the Select button . 5. Resend your print job to print any missing pages. Near the rear - Dell 946 | User Guide - Page 92
paper. The paper guides rest against the edges of the paper. You select the correct paper type and size. Network Problems If you are using a wireless network printer adapter, ensure you have the latest firmware updates. For the latest updates and information, visit support.dell.com. Error Messages - Dell 946 | User Guide - Page 93
Photo cartridge for your printer. For more information, see Replacing Ink Cartridges. Missing Print Head One of the cartridges is not installed. Install a Color, Black or Photo ink cartridge. For more information, see Replacing Ink Cartridges. Print Head Order The ink cartridges are installed in - Dell 946 | User Guide - Page 94
a higher quality setting. 4. Print your document again. 5. If the print quality does not improve, try aligning or cleaning the ink cartridges. For more information on aligning, see Aligning Ink Cartridges and Cleaning the Ink Cartridge Nozzles. For additional solutions, go to support.dell.com. - Dell 946 | User Guide - Page 95
and Scan Mode Capabilities Operating System Support Memory Specifications and Requirements Print Media Guidelines for the Paper Input Tray Cables Overview Memory Connectivity Printer life 32 MB SDRAM 4 MB FLASH 2 MB Fax USB 2.0 high-speed Printer: 18,000 pages Scanner: 18,000 scans ADF: 18,000 - Dell 946 | User Guide - Page 96
power install a DSL filter to avoid interference with the analog fax modem signal. NOTE: You cannot fax with an ISDN (integrated services digital network) or cable modem. ISDN and cable modems are not fax modems and are not supported for faxing. Print and Scan Mode Capabilities Your printer - Dell 946 | User Guide - Page 97
Support The printer supports: Windows XP Professional x64 Windows XP Windows 2000 For Vista compatible drivers, consult www.support.dell.com. Memory Specifications and Requirements Your operating system must meet the minimum system requirements. Operating system Processor speed (Mhz) Windows - Dell 946 | User Guide - Page 98
(76.2x215.9 mm) Length: 5.0x14.0 inches (127.0x355.6 mm) 35 cards 75 sheets 25 iron-on transfers 75 transparencies 35 sheets 100 sheets Cables Your printer uses a Universal Serial Bus (USB) cable (sold separately). - Dell 946 | User Guide - Page 99
in the troubleshooting process and provides for restoration of the Operating System, application software and hardware drivers to the original default configuration as shipped from Dell, as well as the verification of appropriate functionality of the printer and all Dell-installed hardware. In - Dell 946 | User Guide - Page 100
/Pacific countries only) Warranty and Return Policy Dell Inc. ("Dell") manufactures its hardware products from parts and components that are new or equivalent to new in accordance with industry-standard practices. For information about the Dell warranty for your printer, refer to the Owner's Manual. - Dell 946 | User Guide - Page 101
disclaimers in the referenced licenses for additional details. To obtain source code files for the Dell modified GNU licensed software, launch the Drivers and Utilities CD that shipped with your printer and click Contact Dell, or refer to the "Contacting Dell" section of your Owner's Manual.
-
 1
1 -
 2
2 -
 3
3 -
 4
4 -
 5
5 -
 6
6 -
 7
7 -
8
-
9
-
10
-
11
-
12
-
13
-
14
-
15
-
16
-
17
-
18
-
19
-
20
-
21
-
22
-
23
-
24
-
25
-
26
-
27
-
28
-
29
-
30
-
31
-
32
-
33
-
34
-
35
-
36
-
37
-
38
-
39
-
40
-
41
-
42
-
43
-
44
-
45
-
46
-
47
-
48
-
49
-
50
-
51
-
52
-
53
-
54
-
55
-
56
-
57
-
58
-
59
-
60
-
61
-
62
-
63
-
64
-
65
-
66
-
67
-
68
-
69
-
70
-
71
-
72
-
73
-
74
-
75
-
76
-
77
-
78
-
79
-
80
-
81
-
82
-
83
-
84
-
85
-
86
-
87
-
88
-
89
-
90
-
91
-
92
-
93
-
94
-
95
-
96
-
97
-
98
-
99
-
100
-
101
 |
 |

Dell™ All-In-One Printer 946 User's Guide
Click the links to the left for information on the features and operation of your printer. For information on
other documentation included with your printer, see
Finding Information
.
To order ink or supplies from Dell:
Double-click the icon on your desktop.
1.
Visit Dell's website:
www.dell.com/supplies
.
2.
Order Dell printer supplies by phone. Refer to the
Owner's Manual
for the correct phone number for
your country.
3.
For the best service, make sure you have the Dell printer Service Tag available. See
Express Service
Code and Service Tag number
.
Notes, Notices, and Cautions
NOTE:
A
NOTE
indicates important information that helps you make better use of your printer.
NOTICE:
A
NOTICE
indicates either potential damage to hardware or loss of data and tells you how
to avoid the problem.
CAUTION:
A CAUTION indicates a potential for property damage, personal injury, or death.
Information in this document is subject to change without notice.
© 2006 Dell Inc. All rights reserved.
Reproduction in any manner whatsoever without the written permission of Dell Inc.
is strictly forbidden.
Trademarks used in this text:
Dell
, the
DELL
logo,
Dell Picture Studio
, and
Dell Ink Management System
are trademarks of Dell
Inc.;
Microsoft
and
Windows
are registered trademarks of Microsoft Corporation.
Other trademarks and trade names may be used in this document to refer to either the entities claiming the marks and names or
their products. Dell Inc. disclaims any proprietary interest in trademarks and trade names other than its own.
Model 946
June 2006
SRV KJ941
Rev. A00