Dell 946 User Guide - Page 67
Speed Dial, Creating a Speed Dial List From the Operator Panel
 |
View all Dell 946 manuals
Add to My Manuals
Save this manual to your list of manuals |
Page 67 highlights
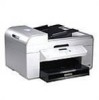
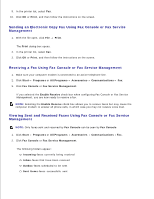
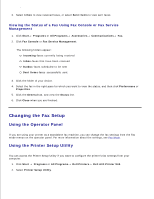
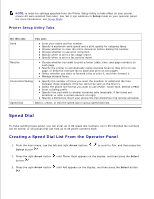
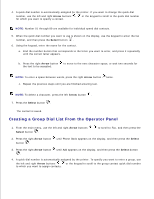
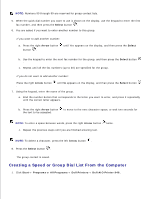
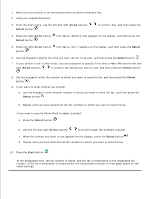
2. NOTE: In order for settings specified from the Printer Setup Utility to take effect on your printer, ensure Allow is selected from Host Fax Settings submenu in Setup mode on your operator panel. For more information, see Setup Mode. Printer Setup Utility Tabs On this tab: You can: Send Enter your name and fax number. Specify a maximum send speed and a print quality for outgoing faxes. Choose whether to scan the entire document before dialing the number. Choose whether to use error correction. Specify when to print a fax usage report. Specify when to print a fax activity report. Receive Choose whether you want to print a footer (date, time, and page number) on each page. Specify the printer to automatically resize oversize faxes so they print on one page, or keep the oversize fax to scale and print on two pages. Select whether you want to forward a fax or print it, and then forward it. Manage blocked faxes. Connection/Dialing Specify the number of times you want the machine to redial and the time between those attempts if the fax cannot be sent on the first try. Select the phone line format you want to use (Pulse, Touch-tone, Behind a PBX). Enter a dialing prefix. Specify how you want to answer incoming calls (manually, if fax tones are detected, or after a certain amount of rings). Specify a distinctive ring if your phone line has distinctive ring service activated. Speed Dial Add to, create, or edit the speed dial or group speed dial lists. Speed Dial To make sending faxes easier, you can enter up to 99 speed dial numbers. Up to 89 individual fax numbers can be stored, or 10 groups that can hold up to 30 phone numbers each. Creating a Speed Dial List From the Operator Panel 1. From the main menu, use the left and right Arrow buttons Select button . to scroll to Fax, and then press the 2. Press the right Arrow button button . until Phone Book appears on the display, and then press the Select 3. Press the right Arrow button . 4. until Add appears on the display, and then press the Select button
-
 1
1 -
2
-
3
-
4
-
5
-
6
-
7
-
8
-
9
-
10
-
11
-
12
-
13
-
14
-
15
-
16
-
17
-
18
-
19
-
20
-
21
-
22
-
23
-
24
-
25
-
26
-
27
-
28
-
29
-
30
-
31
-
32
-
33
-
34
-
35
-
36
-
37
-
38
-
39
-
40
-
41
-
42
-
43
-
44
-
45
-
46
-
47
-
48
-
49
-
50
-
51
-
52
-
53
-
54
-
55
-
56
-
57
-
58
-
59
-
60
-
61
-
 62
62 -
 63
63 -
 64
64 -
 65
65 -
 66
66 -
 67
67 -
 68
68 -
 69
69 -
 70
70 -
 71
71 -
 72
72 -
73
-
74
-
75
-
76
-
77
-
78
-
79
-
80
-
81
-
82
-
83
-
84
-
85
-
86
-
87
-
88
-
89
-
90
-
91
-
92
-
93
-
94
-
95
-
96
-
97
-
98
-
99
-
100
-
101
 |
 |