Dell Alienware X51 R2 Owner's Manual
Dell Alienware X51 R2 Manual
 |
View all Dell Alienware X51 R2 manuals
Add to My Manuals
Save this manual to your list of manuals |
Dell Alienware X51 R2 manual content summary:
- Dell Alienware X51 R2 | Owner's Manual - Page 1
Alienware X51 R2 Owner's Manual Regulatory model: D05S Regulatory type: D05S002 - Dell Alienware X51 R2 | Owner's Manual - Page 2
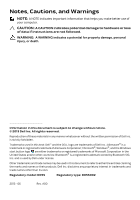
Warnings NOTE: A NOTE indicates important information that helps you make better use of your computer. CAUTION: A CAUTION indicates potential damage to hardware or loss of data if instructions are not followed. WARNING: A WARNING indicates a potential for property damage, personal injury, or death - Dell Alienware X51 R2 | Owner's Manual - Page 3
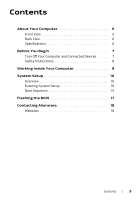
Back View 6 Specifications 6 Before You Begin 7 Turn Off Your Computer and Connected Devices 7 Safety Instructions 8 Working Inside Your Computer 9 System Setup 10 Overview 10 Entering System Setup 10 Boot Sequence 15 Flashing the BIOS 17 Contacting Alienware 18 Websites 18 Contents | 3 - Dell Alienware X51 R2 | Owner's Manual - Page 4
4 | Contents - Dell Alienware X51 R2 | Owner's Manual - Page 5
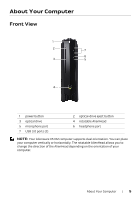
About Your Computer Front View 1 2 7 6 3 5 4 1 power button 3 optical drive 5 microphone port 7 USB 3.0 ports (2) 2 optical-drive eject button 4 rotatable AlienHead 6 headphone port NOTE: Your Alienware X51 R2 computer supports dual orientation. You can place your computer vertically or - Dell Alienware X51 R2 | Owner's Manual - Page 6
USB 3.0 ports (2) 5 rear L/R surround port 7 microphone port 9 label tab 11 discrete graphics card 13 line-in port 15 security-cable slot 17 network port and network lights 2 HDMI port 4 USB 2.0 ports (2) 6 side L/R surround port 8 hard-drive activity light 10 power adapter port 12 line-out port 14 - Dell Alienware X51 R2 | Owner's Manual - Page 7
open programs. 2 Access the Settings charm in the Charms sidebar. Tap or click Power and then choose Shut Down. Microsoft Windows shuts down and then the computer turns off. NOTE: If you are using a different operating system, see the documentation of your operating system for shut-down instructions - Dell Alienware X51 R2 | Owner's Manual - Page 8
Regulatory Compliance Homepage at dell.com/regulatory_compliance. WARNING: Only a certified service technician is authorized to remove the computer cover and access any of the components inside. CAUTION: To avoid damaging the computer, ensure that the work surface is flat and clean. CAUTION: When - Dell Alienware X51 R2 | Owner's Manual - Page 9
Working Inside Your Computer WARNING: Only a certified service technician is authorized to remove the computer cover and access any of the components inside the computer. For information on removing and replacing the internal component of your computer, contact Alienware. See "Contacting Alienware" - Dell Alienware X51 R2 | Owner's Manual - Page 10
about the hardware installed in your computer, such as the amount of RAM, the size of the hard drive, and so on • change the system configuration information • set or change a user-selectable option, such as user password, type of hard drive installed, enabling or disabling base devices, and so - Dell Alienware X51 R2 | Owner's Manual - Page 11
Setup Item - This field appears on the left side of the system setup window. The field is a scrollable list containing features that define the configuration of your computer, including installed hardware, power conservation, and security features. Scroll up and down the list using the mouse or with - Dell Alienware X51 R2 | Owner's Manual - Page 12
on the computer. Memory Technology Displays the type of memory technology used. Memory Speed Displays the memory speed. CPU Information Processor ID Displays the processor identification code. CPU Speed Displays the processor speed. Cache L2 Displays the processor L2 cache size. Cache L3 - Dell Alienware X51 R2 | Owner's Manual - Page 13
UEFI PXE Driver Allows you to enable to disable boot option for UEFI (Unified Extensible Firmware Interface) Network Devices. PCIE Gen3 Allows you to enable or disable PCIE Gen3 capability. Advanced - Power Management Setup AC Recovery Sets what action the computer takes when power is restored - Dell Alienware X51 R2 | Owner's Manual - Page 14
Set Boot Priority Boot Mode Allows you to select Legacy or UEFI boot mode. NOTE: Legacy boot mode if selected, enables booting to devices that support Legacy BIOS. UEFI boot mode if selected, enables UEFI drivers. CAUTION: Changing boot modes require that your boot storage device be partitioned to - Dell Alienware X51 R2 | Owner's Manual - Page 15
the drive, or if the disc is not bootable, the computer generates an error message. • USB Storage Device - Insert the memory device into a USB connector and restart the computer. When F12 Boot Options appear in the lower-right corner of the screen, press . The BIOS detects the device and adds - Dell Alienware X51 R2 | Owner's Manual - Page 16
keys to highlight the Boot menu option and press to access the menu. NOTE: Write down your current boot sequence in case you want to restore it. 3 Navigate to Set Boot Priority to change the devices assigned to the following: - 1st Boot - 2nd Boot - 3rd Boot - 4th Boot - 5th Boot 4 Double - Dell Alienware X51 R2 | Owner's Manual - Page 17
flashing when an update is available or when replacing the system board. To flash the BIOS: 1 Turn on the computer. 2 Go to dell.com/support/downloads. 3 Under the category Support for Home Users, click Drivers & Downloads Home. 4 Locate the Service Tag of your computer. The Service Tag for your - Dell Alienware X51 R2 | Owner's Manual - Page 18
NOTE: Dell provides online and telephone-based support and service options for your Alienware computer. These services may vary by country and product and may not be available in your area. To contact Dell for sales, technical support, or customer service issues: 1 Go to dell.com/contactdell
-
 1
1 -
 2
2 -
 3
3 -
 4
4 -
 5
5 -
 6
6 -
 7
7 -
8
-
9
-
10
-
11
-
12
-
13
-
14
-
15
-
16
-
17
-
18
 |
 |

Alienware X51 R2
Owner’s Manual
Regulatory model: D05S
Regulatory type: D05S002