Dell Axim X5 Getting Started Sheet - Page 1
Dell Axim X5 Manual
 |
View all Dell Axim X5 manuals
Add to My Manuals
Save this manual to your list of manuals |
Page 1 highlights
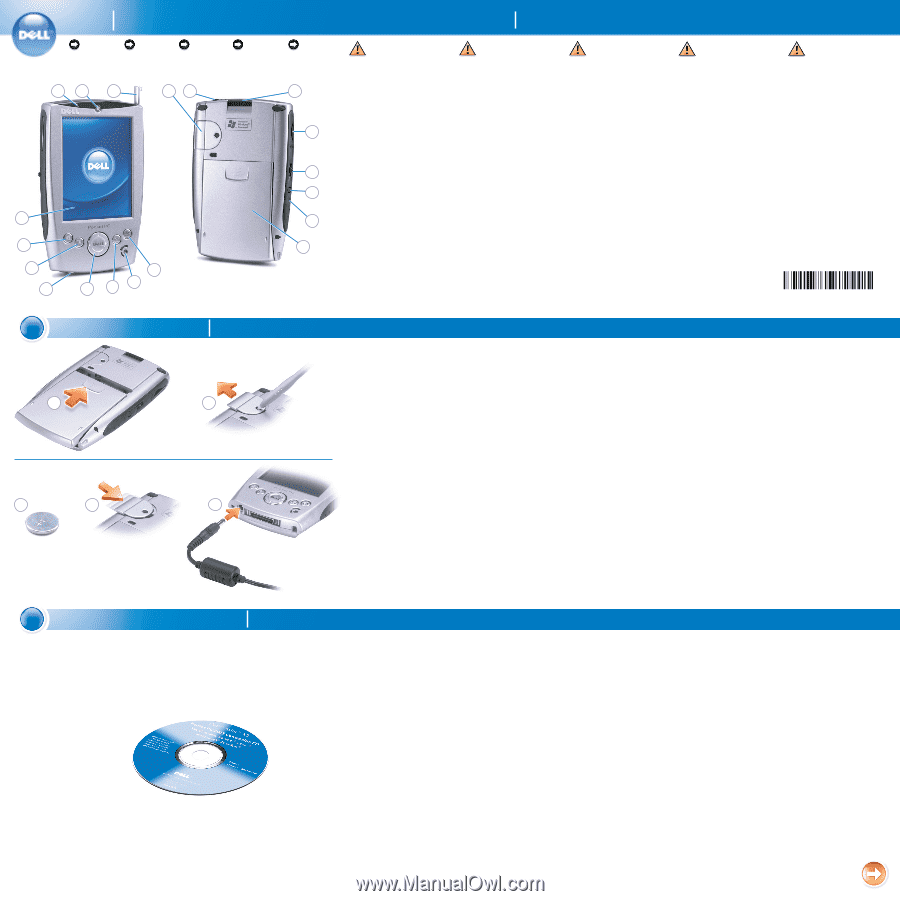
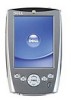
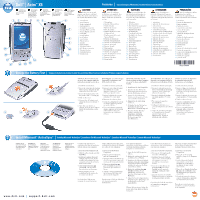
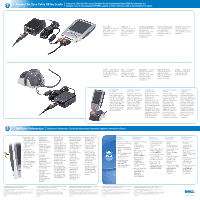
Dell™ Axim™ X5 NOTICE: First charge the main battery for at least 4 hours. REMARQUE : avant toute première utilisation, chargez la batterie principale pendant au moins 4 heures. HINWEIS: Laden Sie zuerst den Hauptakku mindestens 4 Stunden lang auf. AVVERTENZA: prima di procedere, caricare la batteria principale per almeno 4 ore. AVISO: primero debe cargar la batería principal durante 4 horas como mínimo. CAUTION: Before you set up and operate your device, read and follow the safety instructions in the System Information Guide. 12 3 45 19 18 6 7 8 9 10 11 1. microphone 2. power button 3. stylus (extended) 4. backup battery 5. headphone connector 6. CompactFlash card slot 7. Secure Digital card slot 8. scroll dial 9. record button 10. reset button 11. main battery 12. Home button 13. speaker 14. Inbox button 15. navigator button 16. AC adapter connector 17. Contacts button 18. Calendar button 19. touch screen 17 16 12 15 14 13 Features Caractéristiques | Merkmale | Caratteristiche | Características ATTENTION : avant de configurer et d'utiliser votre appareil, lisez attentivement les instructions dans le Guide des informations système. 1. Microphone 2. Bouton d'alimentation 3. Stylet (étendu) 4. Batterie de secours 5. Prise du casque 6. Emplacement de la carte CompactFlash 7. Emplacement de la carte Secure Digital 8. Bouton de défilement 9. Bouton d'enregistrement 10. Bouton de réinitialisation 11. Batterie principale 12. Bouton Accueil 13. Haut-parleur 14. Bouton Boîte de réception 15. Bouton de navigation 16. Prise de l'adapteur secteur 17. Bouton Contacts 18. Bouton Calendrier 19. Écran tactile ACHTUNG: Lesen und befolgen Sie die Sicherheitsanleitungen im Systeminformationshandbuch, bevor Sie das Gerät einrichten und verwenden. 1. Mikrofon 2. Betriebsschalter 3. Stift (leicht herausgezogen) 4. Sicherungsbatterie 5. Kopfhöreranschluss 6. Steckplatz für CompactFlash-Karte 7. Steckplatz für Secure Digital-Karte 8. Scrollrad 9. Aufzeichnungstaste 10. Reset-Taste 11. Hauptakku 12. Home-Taste 13. Lautsprecher 14. Posteingangs-Taste 15. Navigatortaste 16. Netzteilanschluss 17. Kontakte-Taste 18. Kalender-Taste 19. Touchscreen ATTENZIONE: prima di configurare e utilizzare il dispositivo, leggere e seguire le istruzioni sulla sicurezza contenute nella guida Informazioni sul sistema. 1. microfono 2. pulsante di alimentazione 3. stilo (esteso) 4. batteria di backup 5. connettore per cuffie 6. slot per scheda CompactFlash 7. slot per scheda Secure Digital 8. selettore di scorrimento 9. pulsante di registrazione 10. pulsante di reset 11. batteria principale 12. pulsante Home 13. altoparlante 14. pulsante Posta in arrivo 15. pulsante di navigazione 16. connettore per adattatore c.a. 17. pulsante Contatti 18. pulsante Calendario 19. touchscreen PRECAUCIÓN: antes de configurar y utilizar el dispositivo, lea y siga las instrucciones de seguridad de la Guía de información sobre el sistema. 1. micrófono 2. botón de alimentación 3. lápiz (extraído) 4. batería de reserva 5. conector de auriculares 6. ranura de la tarjeta CompactFlash 7. ranura de la tarjeta Secure Digital 8. botón de desplazamiento 9. botón de grabación 10. botón de reinicio 11. batería principal 12. botón Home 13. altavoz 14. botón de la bandeja de entrada 15. botón de navegación 16. conector del adaptador de CA 17. botón de contactos 18. botón de la agenda 19. pantalla táctil 0N1064A00 1 Charge the Battery First Chargez la batterie en premier | Laden Sie zuerst den Akku | Caricare la batteria | Primero cargue la batería 1 2 3 4 5 NOTICE: Do not connect your device to the computer until the instructions prompt you to do so. REMARQUE : ne connectez pas l'appareil à l'ordinateur avant d'être invité à le faire. 1. Install the main battery. 2. Insert the stylus into the backup battery release and push in and outward to release the cover. 3. Insert the backup battery with the positive side (+) facing up. 4. Slide on the cover. 5. Connect the AC adapter and charge the device for at least 4 hours. 6. After the main battery is charged, press the power button. Follow the instructions on the screen. 1. Installez la batterie principale. 2. Insérez le stylet dans le loquet de la batterie de secours. Appuyez et poussez le cache vers l'avant pour le retirer. 3. Insérez la batterie de secours, côté plus (+) vers le haut. 4. Remettez le cache en place. 5. Connectez l'adaptateur secteur et chargez l'appareil pendant au moins 4 heures. 6. Une fois la batterie principale chargée, appuyez sur le bouton d'alimentation. Suivez les instructions qui s'affichent à l'écran. HINWEIS: Schließen Sie Ihr Gerät erst dann an den Computer an, wenn Sie dazu aufgefordert werden. 1. Installieren Sie den Hauptakku. 2. Drücken Sie den Stift in die Sicherungsbatterie-Auslösung, um die Abdeckung zu lösen. 3. Setzen Sie die Sicherungsbatterie mit der positiven Seite (+) nach oben weisend ein. 4. Bringen Sie die Abdeckung wieder an. 5. Schließen Sie das Netzteil an, und laden Sie das Gerät mindestens 4 Stunden lang auf. 6. Drücken Sie den Betriebsschalter, nachdem der Hauptakku vollständig geladen ist. Befolgen Sie die Anweisungen auf dem Bildschirm. AVVERTENZA: non collegare il dispositivo al computer finché le istruzioni non richiedono di farlo. AVISO: no conecte el dispositivo al ordenador hasta que las instrucciones se lo indiquen. 1. Installare la batteria principale. 2. Inserire lo stilo nel foro per lo sblocco della batteria di backup e premere verso l'esterno per rilasciare il coperchio. 3. Inserire la batteria di backup con il lato positivo (+) verso l'alto. 4. Far scorrere il coperchio per richiuderlo. 5. Collegare l'adattatore c.a. e caricare il dispositivo per almeno 4 ore. 6. Dopo che la batteria principale si è completamente caricata, premere il pulsante di alimentazione. Seguire le istruzioni sullo schermo. 1. Instale la batería principal. 2. Inserte el lápiz en el orificio de la tapa de la batería de reserva y presione en la tapa hacia fuera para abrirla. 3. Inserte la batería de reserva con el polo positivo (+) hacia arriba. 4. Vuelva a colocar la tapa. 5. Conecte el adaptador de CA y cargue el dispositivo durante 4 horas como mínimo. 6. Una vez cargada la batería principal, pulse el botón de alimentación. Siga las instrucciones que aparecen en la pantalla. 2 Install Microsoft® ActiveSync® Installez Microsoft® ActiveSync® | Installieren Sie Microsoft® ActiveSync® | Installare Microsoft® ActiveSync® | Instale Microsoft® ActiveSync® NOTICE: Do not connect your device to the computer until the instructions prompt you to do so. REMARQUE : ne connectez pas l'appareil à l'ordinateur avant d'être invité à le faire. HINWEIS: Schließen Sie Ihr Gerät erst dann an den Computer an, wenn Sie dazu aufgefordert werden. AVVERTENZA: non collegare il dispositivo al computer finché le istruzioni non richiedono di farlo.j , AVISO: no conecte el dispositivo al ordenador hasta que las instrucciones se lo indiquen. Use Microsoft ActiveSync to synchronize the data on your device with the data on your computer. 1. Insert the Dell Companion CD. 2. Click the yellow triangle and click Start Here. 3. Install and configure Microsoft Outlook only if it is not already installed and configured on your computer and you do not have a more recent version. 4. Click Install ActiveSync x.x, click Install, and then follow the instructions on the screen. 5. When prompted, use the instructions on the reverse side to connect your device. See ActiveSync Help on your computer for more information. Utilisez Microsoft ActiveSync pour synchroniser les données de l'appareil avec celles de votre ordinateur. 1. Insérez le CD-ROM Dell Companion. 2. Cliquez sur le triangle jaune, puis sur Commencer ici. 3. N'installez Microsoft Outlook que s'il ne l'est pas encore et que vous n'avez pas de version plus récente. 4. Cliquez sur ActiveSync x.x, puis sur Installer et suivez les instructions qui s'affichent à l'écran. 5. A l'invite, suivez les instructions qui se trouvent de l'autre côté pour connecter l'appareil. Reportez-vous à l'aide sur ActiveSync sur votre poste pour plus d'informations. Verwenden Sie Microsoft ActiveSync, um die Daten auf Ihrem Gerät mit den Daten auf Ihrem Computer zu synchronisieren. 1. Legen Sie die Dell Companion CD ein. 2. Klicken Sie auf das gelbe Dreieck, und klicken Sie auf Starten. 3. Installieren Sie Microsoft Outlook nur dann, wenn diese Anwendung noch nicht auf Ihrem Computer installiert ist und wenn Sie keine neuere Version haben. 4. Klicken Sie auf ActiveSync x.x installieren, klicken Sie auf Installieren, und folgen Sie dann den Anleitungen auf dem Bildschirm. 5. Folgen Sie bei der entsprechenden Aufforderung den Anleitungen auf der Rückseite, um Ihr Gerät anzuschließen. Weitere Informationen finden Sie in der ActiveSync Hilfe auf Ihrem Computer. Usare Microsoft ActiveSync per sincronizzare i dati sul dispositivo con i dati sul computer. 1. Inserire il CD Dell Companion. 2. Selezionare il triangolo giallo e fare clic su Inizia qui. 3. Installare Microsoft Outlook solo se non è ancora installato sul computer e se non si possiede una versione più recente. 4. Fare clic su Installazione di ActiveSync x.x, selezionare Installa, quindi seguire le istruzioni visualizzate sullo schermo. 5. Quando il sistema lo richiede, collegare il dispositivo seguendo le istruzioni fornite sul retro. Consultare la Guida di ActiveSync sul computer per maggiori informazioni. Sincronice los datos del dispositivo con los datos del ordenador mediante Microsoft ActiveSync. 1. Introduzca el CD Dell Companion. 2. Haga clic en el triangulo amarillo y haga clic en Empezar aquí. 3. Instale Microsoft Outlook únicamente si no lo tiene instalado en el ordenador y no dispone de una versión más reciente. 4. Haga clic en Instalar ActiveSync x.x, haga clic en Instalar y siga las instrucciones que aparecen en pantalla. 5. Cuando el sistema lo solicite, conecte el dispositivo siguiendo las instrucciones del reverso. Para obtener más información, consulte la ayuda de ActiveSync en el ordenador. www.dell.com | support.dell.com
-
 1
1 -
 2
2
 |
 |