Dell B5460dn Dell Laser Printer Users Guide - Page 134
Erasing volatile memory, Disposing of a printer hard disk
 |
View all Dell B5460dn manuals
Add to My Manuals
Save this manual to your list of manuals |
Page 134 highlights
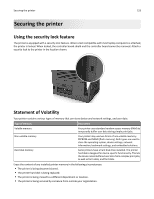
Securing the printer 134 • The printer is being removed from your premises for service. • The printer is being sold to another organization. Disposing of a printer hard disk Note: Some printer models may not have a printer hard disk installed. In high‑security environments, it may be necessary to take additional steps to make sure that confidential data stored in the printer hard disk cannot be accessed when the printer-or its hard disk-is removed from your premises. • Degaussing-Flushes the hard disk with a magnetic field that erases stored data • Crushing-Physically compresses the hard disk to break component parts and render them unreadable • Milling-Physically shreds the hard disk into small metal bits Note: Most data can be erased electronically, but the only way to guarantee that all data is completely erased is to physically destroy each hard disk where data is stored. Erasing volatile memory The volatile memory (RAM) installed in your printer requires a power source to retain information. To erase the buffered data, turn off the printer. Erasing non‑volatile memory Erase individual settings, device and network settings, security settings, and embedded solutions by following these steps: 1 Turn off the printer. 2 Hold down 2 and 6 on the keypad while turning the printer on. Release the buttons only when the screen with the progress bar appears. The printer performs a power-on sequence, and then the Configuration menu appears. When the printer is fully turned on, a list of functions appears on the printer display. 3 Press the up or down arrow button until Wipe All Settings appears. The printer will restart several times during this process. Note: Wipe All Settings securely removes device settings, solutions, jobs, and passwords from the printer memory. 4 Navigate to: Back > Exit Config Menu The printer will perform a power‑on reset, and then return to normal operating mode.
-
 1
1 -
2
-
3
-
4
-
5
-
6
-
7
-
8
-
9
-
10
-
11
-
12
-
13
-
14
-
15
-
16
-
17
-
18
-
19
-
20
-
21
-
22
-
23
-
24
-
25
-
26
-
27
-
28
-
29
-
30
-
31
-
32
-
33
-
34
-
35
-
36
-
37
-
38
-
39
-
40
-
41
-
42
-
43
-
44
-
45
-
46
-
47
-
48
-
49
-
50
-
51
-
52
-
53
-
54
-
55
-
56
-
57
-
58
-
59
-
60
-
61
-
62
-
63
-
64
-
65
-
66
-
67
-
68
-
69
-
70
-
71
-
72
-
73
-
74
-
75
-
76
-
77
-
78
-
79
-
80
-
81
-
82
-
83
-
84
-
85
-
86
-
87
-
88
-
89
-
90
-
91
-
92
-
93
-
94
-
95
-
96
-
97
-
98
-
99
-
100
-
101
-
102
-
103
-
104
-
105
-
106
-
107
-
108
-
109
-
110
-
111
-
112
-
113
-
114
-
115
-
116
-
117
-
118
-
119
-
120
-
121
-
122
-
123
-
124
-
125
-
126
-
127
-
128
-
 129
129 -
 130
130 -
 131
131 -
 132
132 -
 133
133 -
 134
134 -
 135
135 -
 136
136 -
 137
137 -
 138
138 -
 139
139 -
140
-
141
-
142
-
143
-
144
-
145
-
146
-
147
-
148
-
149
-
150
-
151
-
152
-
153
-
154
-
155
-
156
-
157
-
158
-
159
-
160
-
161
-
162
-
163
-
164
-
165
-
166
-
167
-
168
-
169
-
170
-
171
-
172
-
173
-
174
-
175
-
176
-
177
-
178
-
179
-
180
-
181
-
182
-
183
-
184
-
185
-
186
-
187
-
188
-
189
-
190
-
191
-
192
-
193
-
194
-
195
-
196
-
197
-
198
-
199
-
200
-
201
-
202
-
203
-
204
-
205
-
206
-
207
-
208
-
209
-
210
-
211
-
212
-
213
-
214
-
215
-
216
-
217
-
218
-
219
-
220
-
221
-
222
-
223
-
224
-
225
-
226
-
227
-
228
-
229
-
230
-
231
-
232
-
233
 |
 |