Dell DJ42F61 Owner's Manual
Dell DJ42F61 - Dimension 3000 Desktop PC Manual
 |
UPC - 027714920233
View all Dell DJ42F61 manuals
Add to My Manuals
Save this manual to your list of manuals |
Dell DJ42F61 manual content summary:
- Dell DJ42F61 | Owner's Manual - Page 1
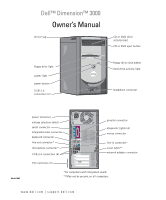
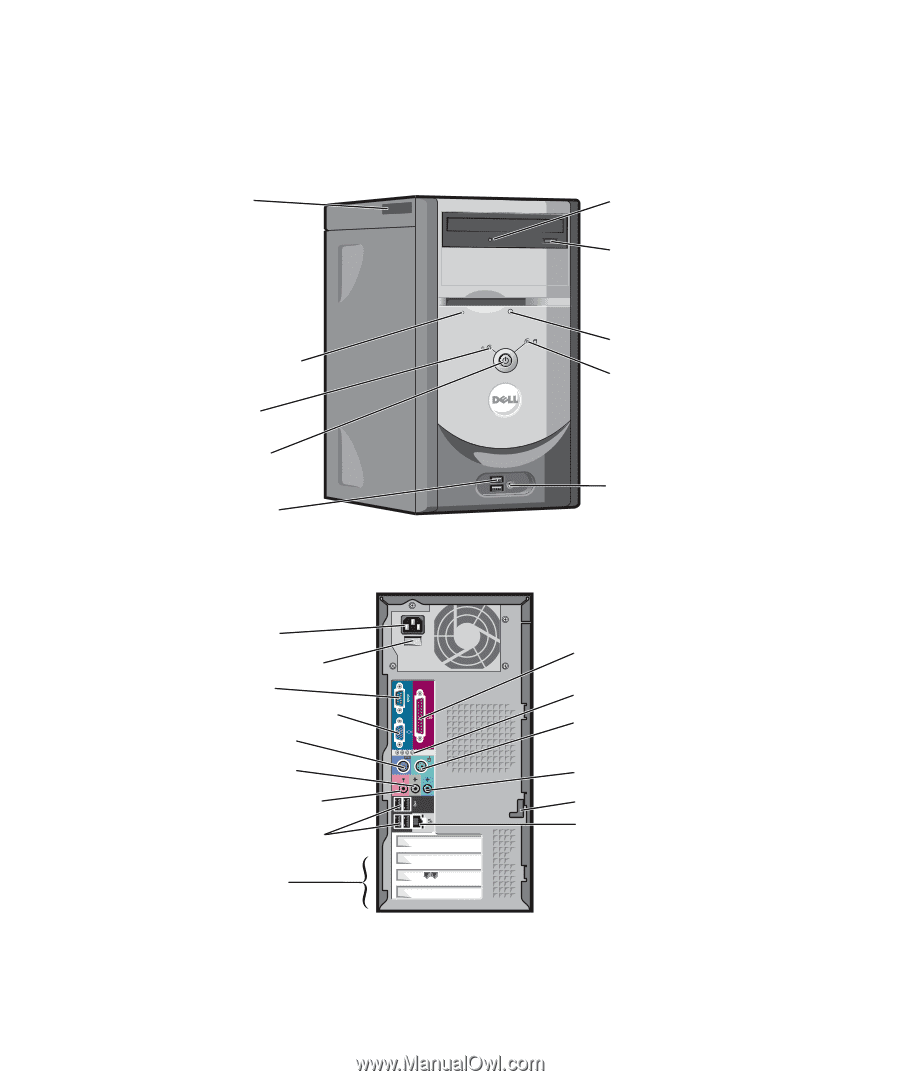
Dell™ Dimension™ 3000 Owner's Manual service tag CD or DVD drive activity light CD or DVD eject button floppy line-in connector* cover latch** network adapter connector PCI card slots (3) *On computers with integrated sound. **May not be present on all computers. www.dell.com | support.dell.com - Dell DJ42F61 | Owner's Manual - Page 2
7. If you purchased a Dell™ n Series computer, any references in this Dell Inc. is strictly forbidden. Trademarks used in this text: Dell, the DELL logo, Inspiron, Dell Precision, Dimension, OptiPlex, Latitude, PowerEdge, PowerVault, PowerApp, PowerConnect, and Dell OpenManage are trademarks of Dell - Dell DJ42F61 | Owner's Manual - Page 3
Contents Finding Information 7 1 Setting Up and Using Your Computer Setting Up a Printer 9 Printer Cable 9 Connecting Solving Problems Troubleshooting Tips 17 Battery Problems 17 Drive Problems 17 CD and DVD drive problems 18 Hard drive problems 19 E-Mail, Modem, and Internet Problems 19 - Dell DJ42F61 | Owner's Manual - Page 4
30 Video and Monitor Problems 30 If the screen is blank 30 If the screen is difficult to read 31 3 Advanced Troubleshooting Diagnostic Lights 33 Dell Diagnostics 36 Dell Diagnostics Main Menu 36 Drivers 38 What Is a Driver 38 Identifying Drivers 38 Reinstalling Drivers 38 4 Contents - Dell DJ42F61 | Owner's Manual - Page 5
Restore 40 Using Dell PC Restore by Symantec 41 Using the Operating System CD 43 Follow the instructions on the Computer 45 Before Working Inside Your Computer 46 Front and Back View of the Computer 47 Front View 47 Back View 48 Removing the Computer Cover 50 Inside View of Your Computer - Dell DJ42F61 | Owner's Manual - Page 6
Adding a Second CD or DVD Drive 71 Battery 73 Replacing the Computer Cover 75 5 Appendix Specifications 77 System Setup 80 Overview 80 Entering System 85 Clearing Forgotten Passwords 86 Dell Technical Support Policy (U.S. Only 87 Definition of "Dell-Installed" Software and Peripherals 87 - Dell DJ42F61 | Owner's Manual - Page 7
Are You Looking For? • Warranty information • Safety instructions • Regulatory information • Ergonomics information • End User License Agreement • Terms and Conditions Find It Here Dell™ Product Information Guide • How to set up my computer Setup Diagram • Tips on using Microsoft® Windows® XP - Dell DJ42F61 | Owner's Manual - Page 8
contacting technical support. The Express Service Code is not available in all countries. Dell Support Website - support.dell.com NOTE: Select your region to view the appropriate support site. The Dell Support website provides several online tools, including: • Solutions - Troubleshooting hints and - Dell DJ42F61 | Owner's Manual - Page 9
. See the documentation that came with the printer for setup information, including how to: • Obtain and install updated drivers. • Connect the printer to the computer. • Load paper and install the toner or ink cartridge. • Contact the printer manufacturer for technical assistance. Printer Cable - Dell DJ42F61 | Owner's Manual - Page 10
(see page 45). NOTICE: For best results, use a 3-m (10-ft) or shorter parallel cable. 3 Attach the parallel printer cable to the parallel connector on the computer and tighten the two screws. Attach the cable to the connector on the printer and snap the two clips into the two notches. 10 Setting - Dell DJ42F61 | Owner's Manual - Page 11
printer clips (2) notches (2) parallel printer cable 4 Turn on the printer and then turn on the computer. If the Add New Hardware Wizard window appears, click Cancel. 5 Install the printer driver if necessary. See the documentation that came with your printer. Setting Up a Home and Office Network - Dell DJ42F61 | Owner's Manual - Page 12
the connection method This computer connects directly to the Internet enables the integrated firewall provided with Windows XP Service Pack 1 (SP1). 4 Complete the checklist and required preparations. 5 Return to the Network Setup Wizard and follow the instructions on the screen. Connecting - Dell DJ42F61 | Owner's Manual - Page 13
, see "E-Mail, Modem, and Internet Problems" on page 19. If you cannot connect to the Internet but have successfully connected in the past, the ISP might have a service outage. Contact your ISP to check the service status, or try connecting again later. Setting Up and Using Your Computer 13 - Dell DJ42F61 | Owner's Manual - Page 14
to DVD media. If you have a CD-RW/DVD combo drive and you experience recording problems, check for available software patches on the Sonic support website at www.sonic.com. The DVD-writable drives installed in Dell™ computers can write to and read DVD+/-R, DVD+/-RW and DVD+R DL (dual layer) media - Dell DJ42F61 | Owner's Manual - Page 15
MP3 files can be played only on MP3 players or on computers that have MP3 software installed. • Commercially available DVD players used in home theater systems may not support all available DVD formats. For a list of formats supported by your DVD player refer to the documentation provided with your - Dell DJ42F61 | Owner's Manual - Page 16
certain tasks simultaneously. It is recommended that you use the Microsoft® Windows® XP Service Pack 1 (SP1) or later operating system because Windows XP is optimized to Hyper-Threading, search the Knowledge Base on the Dell Support website at support.dell.com. 16 Setting Up and Using Your Computer - Dell DJ42F61 | Owner's Manual - Page 17
89). Drive Problems CAUTION: Before you begin any of the procedures in this section, follow the safety instructions located in the Product Information Guide. E N S U R E T H A T M I C R O S O F T ® W I N D O W S ® R E C O G N I Z E S T H E D R I V E - Click the Start button and click My Computer. If - Dell DJ42F61 | Owner's Manual - Page 18
Insert a bootable floppy disk and restart the computer. C L E A N T H E D R I V E O R DISK - See the Dell Dimension Help file. To access help files, A K E R S A N D S U B W O O F E R - See "Sound and Speaker Problems" on page 29. Problems writing to a CD/DVD-RW drive C L O S E O T H E R P R O G R - Dell DJ42F61 | Owner's Manual - Page 19
and attempt recovery of bad sectors. 7 Click Start. E-Mail, Modem, and Internet Problems CAUTION: Before you begin any of the procedures in this section, follow the safety instructions located in the Product Information Guide. NOTE: Connect the modem to an analog telephone jack only. The modem does - Dell DJ42F61 | Owner's Manual - Page 20
upgrade) to scan the computer and remove spyware. For more information, go to support.dell.com and search for the keyword spyware. Error Messages CAUTION: Before you begin any of the procedures in this section, follow the safety instructions located in the Product Information Guide. If the message - Dell DJ42F61 | Owner's Manual - Page 21
O R - Remove the floppy disk from the drive and restart your computer. N O T E N O U G H M E M O Dell (see "Contacting Dell" on page 89). IEEE 1394 Device Problems CAUTION: Before you begin any of the procedures in this section, follow the safety instructions located in the Product Information Guide - Dell DJ42F61 | Owner's Manual - Page 22
TR O U B L E S H O O T E R - See page 44. Lockups and Software Problems CAUTION: Before you begin any of the procedures in this section, follow the safety instructions located in the Product Information Guide. The computer does not start up C H E C K T H E D I A G N O S T I C L I G H T S - See page - Dell DJ42F61 | Owner's Manual - Page 23
All Programs→ Accessories, and then click Program Compatibility Wizard. 2 In the welcome screen, click Next. 3 Follow the instructions on the screen. A solid blue screen appears TU R N T H E C O M P U T E 8 to 10 seconds until the computer turns off. Then restart your computer. Solving Problems 23 - Dell DJ42F61 | Owner's Manual - Page 24
AND CLOSE ANY OPEN FILES OR PROGRAMS AND SHUT DOWN YOUR COMPUTER THROUGH THE START MENU Memory Problems CAUTION: Before you begin any of the procedures in this section, follow the safety instructions located in the Product Information Guide. IF YOU RECEIVE AN INSUFFICIENT MEMORY MESSAGE - • Save and - Dell DJ42F61 | Owner's Manual - Page 25
supported by your computer, see "Memory" on page 77. • Run the Dell Diagnostics (see page 36). Mouse Problems CAUTION: Before you begin any of the procedures in this section, follow the safety instructions located in the Product Information Guide. C L E A N T H E M O U S E - See the Dell Dimension - Dell DJ42F61 | Owner's Manual - Page 26
of the procedures in this section, follow the safety instructions located in the Product Information Guide. C H E C K T H E N E T W O R K C A B L E C O N N E C T O R - Ensure that the network cable is firmly inserted into both the network connector on the back of the computer and the network jack - Dell DJ42F61 | Owner's Manual - Page 27
power extension cables to verify that the computer turns on properly. • Ensure that the electrical outlet is working by testing it with outlet Printer Problems CAUTION: Before you begin any of the procedures in this section, follow the safety instructions located in the Product Information Guide - Dell DJ42F61 | Owner's Manual - Page 28
, follow the safety instructions located in the Product Information Guide. NOTE: If you need technical assistance for your scanner, contact the scanner's manufacturer. C H E C K T H E S C A N N E R D O C U M E N T A T I O N - See the scanner documentation for setup and troubleshooting information - Dell DJ42F61 | Owner's Manual - Page 29
instructions. Sound and Speaker Problems CAUTION: Before you begin any of the procedures in this section, follow the safety instructions located in the Product Information Guide to the computer's front-panel headphone connector. TEST THE ELECTRICAL OUTLET - Ensure that the electrical outlet is - Dell DJ42F61 | Owner's Manual - Page 30
the sound is not muted. Video and Monitor Problems CAUTION: Before you begin any of the procedures in this section, follow the safety instructions located in the Product Information Guide. NOTE: See the monitor documentation for troubleshooting procedures. If the screen is blank CHECK THE MONITOR - Dell DJ42F61 | Owner's Manual - Page 31
. If the screen is difficult to read C H E C K T H E M O N I T O R S E T T I N G S - See the monitor documentation for instructions on adjusting the contrast and brightness, demagnetizing (degaussing) the monitor, and running the monitor self-test resolution and Color quality. Solving Problems 31 - Dell DJ42F61 | Owner's Manual - Page 32
32 Solving Problems - Dell DJ42F61 | Owner's Manual - Page 33
Diagnostic Lights CAUTION: Before you begin any of the procedures in this section, follow the safety instructions located in the Product Information Guide. To help you troubleshoot a problem, your computer has four lights labeled "A," "B," "C," and "D" on the back panel (see page 48). The lights can - Dell DJ42F61 | Owner's Manual - Page 34
no special memory module/memory connector placement requirements exist (see page 53). • Verify that the memory modules that you are installing are compatible with your computer (see page 53). • If the problem persists, contact Dell (see page 89). 34 Advanced Troubleshooting - Dell DJ42F61 | Owner's Manual - Page 35
3 Repeat this process for each card. If the computer starts normally, troubleshoot the last card removed from the computer for resource conflicts (see "Resolving Software and Hardware Incompatibilities" on page 44). 4 If the problem persists, contact Dell (see page 89). • Ensure that the cables are - Dell DJ42F61 | Owner's Manual - Page 36
instructions located in the Product Information Guide. If you experience a problem with your computer, perform the checks in "Solving Problems" on page 17 and run the Dell Diagnostics before you contact Dell for technical assistance. NOTICE: The Dell Diagnostics works only on Dell™ computers problem - Dell DJ42F61 | Owner's Manual - Page 37
down the error code and problem description and follow the instructions on the screen. If you cannot resolve the error condition, contact Dell (see page 89). NOTE: The Service Tag for your computer is located at the top of each test screen. If you contact Dell, technical support will ask for your - Dell DJ42F61 | Owner's Manual - Page 38
may need to reinstall the driver or install a new driver. Reinstalling Drivers NOTICE: The Dell Support website at support.dell.com provides approved drivers for Dell™ computers. If you install drivers obtained from other sources, your computer might not work correctly. 38 Advanced Troubleshooting - Dell DJ42F61 | Owner's Manual - Page 39
tab. 8 Click Roll Back Driver. If Device Driver Rollback does not resolve the problem, then use System Restore to return your computer to the operating state that existed before you installed the new driver. Manually Reinstalling Drivers 1 After copying the required driver files to your hard drive - Dell DJ42F61 | Owner's Manual - Page 40
if you set your Dell™ computer to the Windows Classic view. Creating a Restore Point 1 Click the Start button and click Help and Support. 2 Click the task for System Restore. 3 Follow the instructions on the screen. Restoring the Computer to an Earlier Operating State If problems occur after you - Dell DJ42F61 | Owner's Manual - Page 41
on the hard drive and removes any applications or drivers installed after you received your computer. If possible, back up the data before using PC Restore. Use PC Restore only if System Restore did not resolve your operating system problem. NOTE: Dell PC Restore by Symantec is not available in all - Dell DJ42F61 | Owner's Manual - Page 42
to complete. 5 When prompted, click Finish to reboot the computer. NOTE: Do not manually shut down the computer. Click Finish and let the computer completely reboot. 6 When prompted, click Yes. The computer restarts. Because the computer is restored to its original operating state, the screens that - Dell DJ42F61 | Owner's Manual - Page 43
do not reinstall Windows XP unless a Dell technical support representative instructs you to do so. 1 Save and close any open files and exit any open programs. 2 Insert the Operating System CD. Click Exit if the Install Windows XP message appears. 3 Restart the computer. Advanced Troubleshooting 43 - Dell DJ42F61 | Owner's Manual - Page 44
and click Help and Support. 2 Type hardware troubleshooter in the Search field and click the arrow to start the search. 3 Click Hardware Troubleshooter in the Search Results list. 4 In the Hardware Troubleshooter list, click I need to resolve a hardware conflict on my computer, and click Next. 44 - Dell DJ42F61 | Owner's Manual - Page 45
following conditions exist: • You have performed the steps in "Turning Off Your Computer" and "Before Working Inside Your Computer." • You have read the safety information in your Dell™ Product Information Guide. • A component can be replaced or-if purchased separately-installed by performing the - Dell DJ42F61 | Owner's Manual - Page 46
Hold a component such as a processor by its edges, not by its pins. NOTICE: Only a certified service technician should perform repairs on your computer. Damage due to servicing that is not authorized by Dell is not covered by your warranty. NOTICE: When you disconnect a cable, pull on its connector - Dell DJ42F61 | Owner's Manual - Page 47
DVD drive. button 3 floppy-drive eject button Press to eject a floppy disk from the floppy drive. (On computers with an optional floppy drive.) 4 hard-drive activity light The light is on when the computer reads data from or writes data to the hard drive. The light might also be on when a device - Dell DJ42F61 | Owner's Manual - Page 48
light turns off before you remove the floppy disk from the drive. (On computers with an optional floppy drive.) Used to identify your computer when you access the Dell Support website or call technical support. 16 15 1 14 2 13 3 12 4 11 5 10 6 9 7 8 48 Removing and Installing Parts - Dell DJ42F61 | Owner's Manual - Page 49
parallel connector. If you have a USB printer, plug it into a USB connector. 2 diagnostic lights (4) Use the lights to help you troubleshoot a computer problem based on the diagnostic code. For more information, see "Diagnostic Lights" on page 33. 3 mouse connector Plug a standard mouse into the - Dell DJ42F61 | Owner's Manual - Page 50
you begin any of the procedures in this section, follow the safety instructions located in the Product Information Guide. CAUTION: To guard against electrical shock, always unplug your computer from the electrical outlet before opening the cover. 1 Follow the procedures in "Before You Begin" on - Dell DJ42F61 | Owner's Manual - Page 51
computer cover cover latch 5 Place the computer cover on a level surface. back of computer Removing and Installing Parts 51 - Dell DJ42F61 | Owner's Manual - Page 52
begin any of the procedures in this section, see the safety instructions located in the Product Information Guide. CAUTION: To guard against electrical shock, always unplug your computer from the electrical outlet before opening the computer cover. release lever* CD or DVD drive floppy drive hard - Dell DJ42F61 | Owner's Manual - Page 53
chassis speaker connector PCI card slots (3) (PCI1, PCI2, PCI3) Memory You can increase your computer memory by installing memory modules on the system board. For information on the type of memory supported by your computer, see "Memory" on "Memory" on page 77. NOTE: DDR 333 memory operates at 320 - Dell DJ42F61 | Owner's Manual - Page 54
memory modules in connectors DIMM3 and DIMM4. If possible, do not pair an original memory module with a new memory module. Otherwise, your computer may not function at optimal performance. NOTE: Memory purchased from Dell is covered under your computer warranty. 54 Removing and Installing Parts - Dell DJ42F61 | Owner's Manual - Page 55
procedures in this section, follow the safety instructions located in the Product Information Guide. 1 Shut down the computer through the Start menu (see page 45). 2 Ensure that your computer and attached devices are turned off. If your computer and attached devices did not automatically turn off - Dell DJ42F61 | Owner's Manual - Page 56
Computer, and then click Properties. 14 Click the General tab. 15 To verify that the memory is installed correctly, check the amount of memory (RAM) listed. Cards CAUTION: Before you begin any of the procedures in this section, follow the safety instructions located in the Product Information Guide - Dell DJ42F61 | Owner's Manual - Page 57
. Your Dell™ computer provides three slots for PCI cards. PCI Cards If you are installing or replacing a card, follow the procedures in the next section. If you are removing but not replacing a card, see "Removing a PCI Card" on page 59. If you are replacing a card, remove the current driver for the - Dell DJ42F61 | Owner's Manual - Page 58
3 Align the cutout on the bottom of the card with the crossbar in the system board connector. Gently rock the card into the connector until it is fully seated. card card cutout card connector on system board crossbar Ensure that the card is fully seated and that its bracket is within the card slot. - Dell DJ42F61 | Owner's Manual - Page 59
plug the cable into the network wall jack and then plug it into the computer. 6 Close the computer cover, reconnect the computer and devices to electrical outlets, and then turn them on. 7 Remove the card's driver from the operating system. 8 If you removed a sound card: a Enter system setup (see - Dell DJ42F61 | Owner's Manual - Page 60
you begin any of the procedures in this section, follow the safety instructions located in the Product Information Guide. CAUTION: To guard against electrical shock, always unplug your computer from the electrical outlet before opening the cover. Removing the Front Panel 1 Follow the procedures in - Dell DJ42F61 | Owner's Manual - Page 61
Removing the Front-Panel Insert 1 Press in the two insert tabs. tabs (2) insert 2 Push out the front-panel insert. Removing and Installing Parts 61 - Dell DJ42F61 | Owner's Manual - Page 62
front panel to the side hinges. side hinges (3) front panel 2 Rotate the front panel until it snaps onto the front of the computer. Drives Your computer supports a combination of these devices: • One hard drive • One optional floppy • Up to two CD or DVD drives 62 Removing and Installing Parts - Dell DJ42F61 | Owner's Manual - Page 63
General Installation Guidelines Connect IDE hard drives to the system board connector labeled PRI IDE. Connect CD/DVD drives to the connector labeled J6J1. When you connect two IDE devices to a single IDE interface cable and configure them for the cable select setting, the device attached to the - Dell DJ42F61 | Owner's Manual - Page 64
: Before you begin any of the procedures in this section, follow the safety instructions located in the Product Information Guide. CAUTION: To guard against electrical shock, always unplug your computer from the electrical outlet before opening the cover. NOTICE: To avoid damage to the drive, do not - Dell DJ42F61 | Owner's Manual - Page 65
hard drive bracket-securing screw drive bracket bracket-securing screw 3 If you are replacing the hard drive, remove the drive from the bracket: a Remove the hard drive-securing screws. b Remove the hard drive from the bracket. small bracket tabs (2) drive bracket drive-securing screws (3) - Dell DJ42F61 | Owner's Manual - Page 66
plug the cable into the network wall jack and then plug it into the computer. 9 Connect your computer and devices to electrical outlets, and turn them on. See the documentation that came with the drive for instructions on installing any software required for drive operation. 10 If the drive you just - Dell DJ42F61 | Owner's Manual - Page 67
you begin any of the procedures in this section, follow the safety instructions located in the Product Information Guide. CAUTION: To guard against electrical shock, always unplug your computer from the electrical outlet before opening the cover. 1 Follow the procedures in "Before You Begin" on - Dell DJ42F61 | Owner's Manual - Page 68
bracket. Installing a Floppy Drive 1 Remove the floppy drive bracket from the computer (see page 67). 2 If you are replacing a floppy drive, remove the floppy drive bracket is properly mounted, it remains in place without support. 5 Secure the floppy drive bracket with the top bracket screw that - Dell DJ42F61 | Owner's Manual - Page 69
running the Dell Diagnostics (see page 36). CD/DVD Drive CAUTION: Before you begin any of the procedures in this section, follow the safety instructions located in the Product Information Guide. CAUTION: To guard against electrical shock, always unplug your computer from the electrical outlet before - Dell DJ42F61 | Owner's Manual - Page 70
Removing a CD/DVD Drive 1 Disconnect the power, audio, and CD/DVD drive cables from the back of the drive and from the system board. data cable power cable 2 Remove the CD/DVD drive securing screw. 3 Slide the drive forward and remove it from the drive bay. securing screw 70 Removing and - Dell DJ42F61 | Owner's Manual - Page 71
the cable in to the network wall jack and then plug it into the computer. 11 Connect your computer and devices to their electrical outlets, and turn them on. See the documentation that came with the drive for instructions on installing any software required for drive operation. 12 Enter system setup - Dell DJ42F61 | Owner's Manual - Page 72
2 Remove two extra alignment screws, shown in the illustration on page 72, from the front of the computer and insert them into the drive. drive alignment screws (2) NOTE: Some computers come with only two extra alignment screws; others come with four. You only need two alignment screws for this - Dell DJ42F61 | Owner's Manual - Page 73
computer. 10 Connect your computer and devices to electrical outlets, and then turn them on. 11 See the documentation that came with the drive for instructions safety instructions located in the Product Information Guide. NOTICE: To prevent static damage to components inside your computer, discharge - Dell DJ42F61 | Owner's Manual - Page 74
you have to repeatedly reset time and date information after turning on the computer, replace the battery. CAUTION: A new battery can explode if it by the manufacturer. Discard used batteries according to the manufacturer's instructions. To replace the battery: 1 Record all the screens in system - Dell DJ42F61 | Owner's Manual - Page 75
device and then plug it into the computer. 7 Connect your computer and devices to electrical outlets, and turn them on. 8 Enter Guide). Replacing the Computer Cover CAUTION: Before you begin any of the procedures in this section, follow the safety instructions located in the Product Information Guide - Dell DJ42F61 | Owner's Manual - Page 76
76 Removing and Installing Parts - Dell DJ42F61 | Owner's Manual - Page 77
BIOS chip (NVRAM) Intel® Pentium® 4 with HT Technology and Intel Celeron® NOTE: Not all Pentium 4 processors support Hyper-Threading technology. 8 KB 128-KB or 512-KB (depending on your computer configuration) pipelined-burst, eight-way set associative, write-back SRAM 333- and 400-MHz DDR SDRAM - Dell DJ42F61 | Owner's Manual - Page 78
Computer Information (continued) NIC System Clock Video Type Audio Type Expansion Bus Bus type Bus speed integrated network interface capable of 10/100 communication. Intel Pentium 4: - Dell DJ42F61 | Owner's Manual - Page 79
Wattage 250 W Heat dissipation 853 BTU/hr (fully loaded computer without monitor) Voltage (see the safety instructions Fixed-voltage power supply - 100 to 120 V at 60 Hz; 200 to 240 V located in the Product Information at 50 Hz Guide for - Dell DJ42F61 | Owner's Manual - Page 80
ft) System Setup Overview Use system setup as follows: • To change the system configuration information after you add, change, or remove any hardware in your computer • To set or change a user-selectable option such as the user password • To read the current amount of memory or set the type of - Dell DJ42F61 | Owner's Manual - Page 81
System Setup 1 Turn on (or restart) your computer. 2 When the blue DELL™ logo appears, press immediately. If you wait too long and the operating system logo appears, continue to wait until you see the Microsoft® Windows® desktop. Then shut down your computer (see page 45) and try again. System - Dell DJ42F61 | Owner's Manual - Page 82
name, the BIOS version number and date, system tags, and other system-specific information. Identifies whether the computer's processor supports Hyper-Threading and lists the processor bus speed, processor ID, clock speed, and L2 cache. Indicates amount of installed memory, memory speed, channel - Dell DJ42F61 | Owner's Manual - Page 83
. Sets the amount of system memory to be reserved for the onboard video controller. If your computer's processor supports Hyper-Threading, this options appears in the Options List. • Bypass - Your computer does not test or change the current acoustics mode setting. • Quiet (default) - The hard drive - Dell DJ42F61 | Owner's Manual - Page 84
and time fields. This feature does not work if you turn off your computer using a power strip or surge protector. Low Power Mode When Low longer power up from Hibernate or Off. Remote Wake Up This option allows the computer to power up when a NIC or Remote Wakeup-capable modem receives a wake - Dell DJ42F61 | Owner's Manual - Page 85
>. If you wait too long and the operating system logo appears, continue to wait until you see the Microsoft Windows desktop. Then shut down your computer (see page 45) and try again. The Boot Device Menu appears, listing all available boot devices. Each device has a number next to it. Appendix 85 - Dell DJ42F61 | Owner's Manual - Page 86
move a selected device up or down the list. Clearing Forgotten Passwords CAUTION: Before you begin any of the procedures in this section, follow the safety instructions located in the Product Information Guide. 1 Follow the procedures in "Before You Begin" on page 45. PSWRD 86 Appendix - Dell DJ42F61 | Owner's Manual - Page 87
and then plug it into the computer. 11 Connect your computer and devices to electrical outlets, and turn them on. Dell Technical Support Policy (U.S. Only) Technician-assisted technical support requires the cooperation and participation of the customer in the troubleshooting process and provides for - Dell DJ42F61 | Owner's Manual - Page 88
Dell not under the Dell brand (printers, scanners, cameras, games, and so on). Support for all third-party software and peripherals is provided by the original manufacturer of the product. FCC Notices (U.S. Only) Most Dell computer with the manufacturer's instruction manual, may cause interference - Dell DJ42F61 | Owner's Manual - Page 89
equipment and the receiver. • Connect the equipment into an outlet on a circuit different from that to which the receiver is Dell To contact Dell electronically, you can access the following websites: • www.dell.com • support.dell.com (technical support) • premiersupport.dell.com (technical support - Dell DJ42F61 | Owner's Manual - Page 90
E-mail for desktop and portable computers: [email protected] E-mail for servers and EMC: [email protected] Customer Care Tech Support Tech Support Services Sales Aruba General Support Australia (Sydney) E-mail (Australia): [email protected] International Access Code: 0011 - Dell DJ42F61 | Owner's Manual - Page 91
(City) International Access Code Country Code City Code Department Name or Service Area, Website and E-Mail Address Austria (Vienna) Website: support.euro.dell.com International Access Code: 900 E-mail: [email protected] Country Code: 43 Home/Small Business Sales City Code - Dell DJ42F61 | Owner's Manual - Page 92
Access Code Country Code City Code Department Name or Service Area, Website and E-Mail Address Canada (North York, Ontario) Online Order Status: www.dell.ca/ostatus International Access Code: 011 AutoTech (automated technical support) Customer Care (Home Sales/Small Business) Customer Care (med - Dell DJ42F61 | Owner's Manual - Page 93
Name or Service Area, Website and E-Mail Address Technical Support website: support.dell.com.cn Technical Support E-mail: [email protected] Technical Support Fax Technical Support (Dimension™ and Inspiron™) Technical Support (OptiPlex™, Latitude™, and Dell Precision™) Technical Support (servers - Dell DJ42F61 | Owner's Manual - Page 94
Name or Service Area, Website and E-Mail Address Website: support.euro.dell.com E-mail: [email protected] Technical Support Technical Support Fax Customer Care Customer Care Fax Switchboard Website: support.euro.dell.com E-mail Support (portable computers): [email protected] E-mail - Dell DJ42F61 | Owner's Manual - Page 95
Name or Service Area, Website and E-Mail Address Finland (Helsinki) Website: support.euro.dell.com International Access Code: 990 E-mail: [email protected] Country Code: 358 City Code: 9 E-mail Support (servers): [email protected] Technical Support Technical Support Fax Relational - Dell DJ42F61 | Owner's Manual - Page 96
Public Accounts Customer Care Switchboard Website: support.euro.dell.com E-mail: support.euro.dell.com/gr/en/emaildell/ Technical Support Gold Service Technical Support Switchboard Gold Service Switchboard Sales Fax General Support General Support General Support Area Codes, Local Numbers, and Toll - Dell DJ42F61 | Owner's Manual - Page 97
or Service Area, Website and E-Mail Address Hong Kong Website: support.ap.dell.com International Access Code: 001 E-mail: [email protected] Country Code: 852 Technical Support (Dimension™ and Inspiron™) Technical Support (OptiPlex™, Latitude™, and Dell Precision™) Technical Support (PowerApp - Dell DJ42F61 | Owner's Manual - Page 98
City Code: 02 Jamaica Department Name or Service Area, Website and E-Mail Address Website: support.euro.dell.com E-mail: support.euro.dell.com/it/it/emaildell/ Home and Small Business Technical Support Customer Care Fax Switchboard Corporate Technical Support Customer Care Fax Switchboard General - Dell DJ42F61 | Owner's Manual - Page 99
Name or Service Area, Website and E-Mail Address Japan (Kawasaki) Website: support.jp.dell.com International Access Code: 001 Technical Support (servers) Country Code: 81 Technical Support outside of Japan (servers) City Code: 44 Technical Support (Dimension™ and Inspiron™) Technical Support - Dell DJ42F61 | Owner's Manual - Page 100
(Brussels, Belgium) Technical Support Customer Service (Penang, Malaysia) Transaction Sales Technical Support (Dell Precision, OptiPlex, and Latitude) Technical Support (Dimension and Inspiron) Technical Support (PowerEdge and PowerVault) Customer Service Transaction Sales Corporate Sales Area - Dell DJ42F61 | Owner's Manual - Page 101
52 Department Name or Service Area, Website and E-Mail Address Customer Technical Support Sales Customer Service Main Montserrat Netherlands Antilles [email protected] E-mail (Australia): [email protected] Technical Support (for desktop and portable computers) Technical Support (for - Dell DJ42F61 | Owner's Manual - Page 102
Name or Service Area, Website and E-Mail Address Norway (Lysaker) Website: support.euro.dell.com International Access Code: 00 E-mail Support (portable computers): Country Code: 47 [email protected] E-mail Support (desktop computers): [email protected] E-mail Support (servers - Dell DJ42F61 | Owner's Manual - Page 103
and Inspiron) International Access Code: 005 Technical Support (Optiplex, Latitude, and Country Code: 65 Precision) Technical Support (PowerEdge and PowerVault) Customer Service (Penang, Malaysia) Transaction Sales Corporate Sales South Africa (Johannesburg) Website: support.euro.dell.com - Dell DJ42F61 | Owner's Manual - Page 104
Department Name or Service Area, Website and E-Mail Address Sweden (Upplands Vasby) Website: support.euro.dell.com International Access Code: 00 E-mail: [email protected] Country Code: 46 City Code: 8 E-mail Support for Latitude and Inspiron: [email protected] E-mail Support for OptiPlex - Dell DJ42F61 | Owner's Manual - Page 105
: 1344 Uruguay Department Name or Service Area, Website and E-Mail Address Area Codes, Local Numbers, and Toll-Free Numbers General Support 1-800-805-8035 General Support toll-free: 1-866-540-3355 Website: support.euro.dell.com Customer Care website: support.euro.dell.com/uk/en/ECare/Form - Dell DJ42F61 | Owner's Manual - Page 106
, education, and healthcare) Customer Service and Technical Support toll-free: 1-800-456-3355 Employee Purchase Program (EPP) Customers toll-free: 1-800-234-1490 Dell Sales toll-free: 1-800-289-3355 or toll-free: 1-800-879-3355 Dell Outlet Store (Dell refurbished computers) toll-free: 1-888 - Dell DJ42F61 | Owner's Manual - Page 107
PCI slots, 49 removing PCI, 59 slots, 49, 56 types supported, 56 CD/DVD drive activity light, 47 eject button, 47 installing, 71 installing second, 71 problems, 18 removing, 70 CD-RW drive problems, 18 CDs, 14 Check Disk, 19 computer components inside, 52 crashes, 22-23 inside view, 52 restore to - Dell DJ42F61 | Owner's Manual - Page 108
Support Center, 8 help file Dell Dimension Help, 7 Windows Help and Support Center, 8 Hyper-Threading, 16 internet connection, about, 12 connection, options, 12 connection, setting up, 13 K keyboard connector, 50 problems, 22 L labels Microsoft Windows, 8 Service Tag, 8, 48 lights back of computer - Dell DJ42F61 | Owner's Manual - Page 109
and speakers, 29 technical support policy, 87 troubleshooting tips, 17 video and monitor, 30 volume adjusting, 29 Product Information Guide, 7 Program Compatibility Wizard, 23 R regulatory information, 7 S safety instructions, 7 scanner problems, 28 screen. See monitor Service Tag, 8, 48 settings - Dell DJ42F61 | Owner's Manual - Page 110
-out, 50 speaker problems, 29 volume, 29 specifications, 77 support contacting Dell, 89 policy, 87 support.dell.com, 8 system board, 53 System Restore, 39-40 system setup, 80 entering, 81 options, 82 screens, 81 T technical support policy, 87 troubleshooting Dell Diagnostics, 36 diagnostic lights
-
 1
1 -
 2
2 -
 3
3 -
 4
4 -
 5
5 -
 6
6 -
 7
7 -
8
-
9
-
10
-
11
-
12
-
13
-
14
-
15
-
16
-
17
-
18
-
19
-
20
-
21
-
22
-
23
-
24
-
25
-
26
-
27
-
28
-
29
-
30
-
31
-
32
-
33
-
34
-
35
-
36
-
37
-
38
-
39
-
40
-
41
-
42
-
43
-
44
-
45
-
46
-
47
-
48
-
49
-
50
-
51
-
52
-
53
-
54
-
55
-
56
-
57
-
58
-
59
-
60
-
61
-
62
-
63
-
64
-
65
-
66
-
67
-
68
-
69
-
70
-
71
-
72
-
73
-
74
-
75
-
76
-
77
-
78
-
79
-
80
-
81
-
82
-
83
-
84
-
85
-
86
-
87
-
88
-
89
-
90
-
91
-
92
-
93
-
94
-
95
-
96
-
97
-
98
-
99
-
100
-
101
-
102
-
103
-
104
-
105
-
106
-
107
-
108
-
109
-
110
 |
 |
www.dell.com | support.dell.com
Dell™ Dimension™ 3000
Owner’s Manual
Model DMC
keyboard connector
mouse connector
USB 2.0 connectors (4)
microphone connector*
line-in connector*
line-out connector*
parallel connector
serial connector
PCI card slots (3)
voltage selection switch
power connector
network adapter connector
diagnostic lights (4)
cover latch**
*On computers with integrated sound.
**May not be present on all computers.
integrated video connector
CD or DVD drive
activity light
CD or DVD eject button
floppy drive light
floppy drive eject button
hard-drive activity light
power button
power light
USB 2.0
connectors (2)
headphone connector
service tag