Dell GX280DT Setup Guide
Dell GX280DT - GX280 Desktop Computer Manual
 |
UPC - 851846002006
View all Dell GX280DT manuals
Add to My Manuals
Save this manual to your list of manuals |
Dell GX280DT manual content summary:
- Dell GX280DT | Setup Guide - Page 1
the integrated graphics driver's user interface, which is located under the Control Panel in Microsoft® Windows® operating systems. The DVI adapter plugs into the PCI Express x16 slot on your system board. Safety Instructions Installation Instructions Troubleshooting Specifications Regulatory - Dell GX280DT | Setup Guide - Page 2
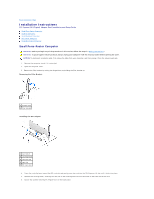
Back to Contents Page Installation Instructions PCI Express DVI (Digital) Adapter Card Installation and Setup Guide Small Form-Factor Computer Desktop Computer Small Desktop Computer Mini-Tower Computer Small Mini-Tower Computer Small Form-Factor Computer CAUTION: Before you begin any of the - Dell GX280DT | Setup Guide - Page 3
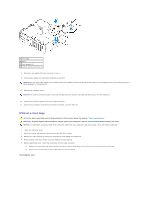
. 9. Connect the monitor cable to the card's video connector. 10. Connect your computer and devices to their electrical outlets, and turn them on. Desktop Computer With a Card Cage 1. Open the computer cover. 2. Remove the card cage: a. Check any cables that are connected to cards through the - Dell GX280DT | Setup Guide - Page 4
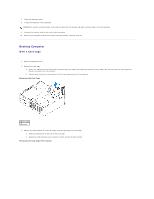
NOTE: See the documentation that came with the card for information on configuring the card, making internal connections, or customizing it for your computer. 4. Prepare the new card for installation in the card cage. CAUTION: Some network adapters automatically start the computer when you connect - Dell GX280DT | Setup Guide - Page 5
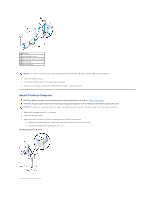
to the card's video connector. 12. Connect your computer and devices to electrical outlets, and turn them on. Without a Card Cage CAUTION: Before you begin any of the procedures in this section, follow the steps in "Safety Instructions." CAUTION: To guard against electrical shock, always unplug - Dell GX280DT | Setup Guide - Page 6
to the card's video connector. 8. Connect your computer and devices to their electrical outlets, and turn them on. Small Desktop Computer CAUTION: Before you begin any of the procedures in this section, follow the steps in "Safety Instructions." CAUTION: To guard against electrical shock, always - Dell GX280DT | Setup Guide - Page 7
the card's video connector. 10. Connect your computer and devices to their electrical outlets, and turn them on. Mini-Tower Computer CAUTION: Before you begin any of the procedures in this section, follow the steps in "Safety Instructions." CAUTION: To guard against electrical shock, always unplug - Dell GX280DT | Setup Guide - Page 8
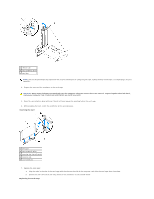
to the card's video connector. 8. Connect your computer and devices to electrical outlets, and turn them on. Small Mini-Tower Computer CAUTION: Before you begin any of the procedures in this section, follow the steps in "Safety Instructions." CAUTION: To guard against electrical shock, always unplug - Dell GX280DT | Setup Guide - Page 9
fits into the notch on the front end of the card. 5. Secure the card by lowering the hinged lever on the back panel. 6. Close the computer cover. NOTICE: To connect a network cable, first plug the cable into the network wall jack, and then plug it into the - Dell GX280DT | Setup Guide - Page 10
instruction manual, may cause interference with radio communications. This device complies with Part 15 of the FCC Rules. Operation is subject to the following two for help. IC Notice (Canada Only) Most Dell computer systems (and other Dell digital apparatus) are classified by the Industry Canada - Dell GX280DT | Setup Guide - Page 11
BSMI Notice (Taiwan Only) If you find a or mark on the regulatory label on the bottom, side, or back panel of your computer, the following section is applicable: Back to Contents Page - Dell GX280DT | Setup Guide - Page 12
Dell documentation or otherwise provided to you. Always follow installation and service instructions closely. NOTICE: To help avoid possible damage to the system board, wait 5 seconds after turning off the computer bracket. Hold a component such as a microprocessor chip by its edges, not by its pins. - Dell GX280DT | Setup Guide - Page 13
(Digital) Adapter Card Installation and Setup Guide Cable Connectors Computer DVI digital-only connector Physical Configuration Bus type Maximum resolution supported Power requirements 12 V 3.3 V Intel® Digital Video Output (DVO) 1600 x 1200 at 60 Hz Max Power 1135 mW 728 mW Dimensions Bracket - Dell GX280DT | Setup Guide - Page 14
Troubleshooting: PCI Express DVI (Digital) Adapter Card PCI Express DVI (Digital) Adapter Card Installation and Setup Guide 1. If the computer detects the card and lists it in the Device Manager, ensure that the advanced graphics setting and options on the Intel® GMA Driver Installation Instructions.
-
 1
1 -
 2
2 -
 3
3 -
 4
4 -
 5
5 -
 6
6 -
 7
7 -
8
-
9
-
10
-
11
-
12
-
13
-
14
 |
 |

PCI Express DVI (Digital) Adapter Card Installation and Setup Guide
The Digital Visual Interface (DVI) adapter card, using the integrated graphics controller on your computer, provides a DVI port. The DVI port provides a direct,
digital connection to a digital display, such as a digital flat panel display. The DVI adapter works through the integrated graphics on your computer and is
controlled through the integrated graphics driver's user interface, which is located under the Control Panel in Microsoft
®
Windows
®
operating systems. The
DVI adapter plugs into the PCI Express x16 slot on your system board.
Safety Instructions
Installation Instructions
Troubleshooting
Specifications
Regulatory Notices
Notes, Notices, and Cautions
Information in this document is subject to change without notice.
© 2004 Dell Inc. All rights reserved.
Reproduction in any manner whatsoever without the written permission of Dell Inc. is strictly forbidden.
Trademarks used in this text:
Dell
and the
DELL
logo are trademarks of Dell Inc.;
Microsoft,
Windows
, and
Windows NT
are registered trademarks of Microsoft Corporation;
Intel
is a
registered trademark of Intel Corporation.
Other trademarks and trade names may be used in this document to refer to either the entities claiming the marks and names or their products. Dell Inc. disclaims any
proprietary interest in trademarks and trade names other than its own.
December 2004
Rev. A01
NOTE:
A NOTE indicates important information that helps you make better use of your computer.
NOTICE:
A NOTICE indicates either potential damage to hardware or loss of data and tells you how to avoid the problem.
CAUTION:
A CAUTION indicates a potential for property damage, personal injury, or death.