Dell Inspiron 1420 Service Manual - Page 13
Before You Begin, Replacing the Microprocessor Module, Back to Contents
 |
View all Dell Inspiron 1420 manuals
Add to My Manuals
Save this manual to your list of manuals |
Page 13 highlights
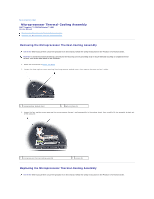
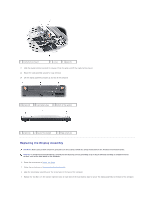
NOTICE: To avoid electrostatic discharge, ground yourself by using a wrist grounding strap or by periodically touching an unpainted metal surface, such as the back panel on the computer. 1. Follow the instructions in Before You Begin. 2. Follow the instructions in Replacing the Microprocessor Module. 3. Align the four captive screws on the new microprocessor thermal-cooling assembly with the screw holes on the system board. 4. Tighten the four captive screws in the order that they are numbered to secure the microprocessor thermal-cooling assembly to the system board. 5. Replace the microprocessor module cover. Back to Contents Page
-
 1
1 -
2
-
3
-
4
-
5
-
6
-
7
-
 8
8 -
 9
9 -
 10
10 -
 11
11 -
 12
12 -
 13
13 -
 14
14 -
 15
15 -
 16
16 -
 17
17 -
 18
18 -
19
-
20
-
21
-
22
-
23
-
24
-
25
-
26
-
27
-
28
-
29
-
30
-
31
-
32
-
33
-
34
-
35
-
36
-
37
-
38
-
39
-
40
-
41
-
42
-
43
-
44
-
45
 |
 |

1.
Follow the instructions in
Before You Begin
.
2.
Follow the instructions in
Replacing the Microprocessor Module
.
3.
Align the four captive screws on the new microprocessor thermal-cooling assembly with the screw holes on the system board.
4.
Tighten the four captive screws in the order that they are numbered to secure the microprocessor thermal-cooling assembly to the system board.
5.
Replace the microprocessor module cover.
Back to Contents Page
NOTICE:
To avoid electrostatic discharge, ground yourself by using a wrist grounding strap or by periodically touching an unpainted metal
surface, such as the back panel on the computer.