Dell Inspiron Mini Duo 1090 Inspiron Duo Service Manual
Dell Inspiron Mini Duo 1090 Manual
 |
View all Dell Inspiron Mini Duo 1090 manuals
Add to My Manuals
Save this manual to your list of manuals |
Dell Inspiron Mini Duo 1090 manual content summary:
- Dell Inspiron Mini Duo 1090 | Inspiron Duo Service Manual - Page 1
Dell™ Inspiron™ 1090 Service Manual Before You Begin Hard-Drive Assembly Label Door Coin-Cell Battery Keyboard Display Palm-Rest Assembly Battery Memory Module AC-Adapter Connector Processor Fan and Heat-Sink Assembly Ambient-Light Sensor Board Camera Module System Board Connector Covers - Dell Inspiron Mini Duo 1090 | Inspiron Duo Service Manual - Page 2
Back to Contents Page Ambient-Light Sensor Board Dell™ Inspiron™ 1090 Service Manual Removing the Ambient-Light Sensor Board Replacing the Ambient-Light Sensor Board WARNING: Before working inside your computer, read the safety information that shipped with your computer. For additional safety best - Dell Inspiron Mini Duo 1090 | Inspiron Duo Service Manual - Page 3
(see Replacing the Display Assembly). 9. Replace the memory module (see Replacing the Memory Module). 10. Replace the battery (see Replacing the Battery). 11. Replace the palm-rest assembly (see Replacing the Palm-Rest Assembly). 12. Replace the keyboard (see Replacing the Keyboard). 13. Replace the - Dell Inspiron Mini Duo 1090 | Inspiron Duo Service Manual - Page 4
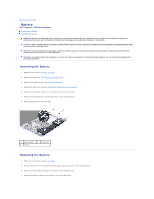
Back to Contents Page Battery Dell™ Inspiron™ 1090 Service Manual Removing the Battery Replacing the Battery WARNING: Before working inside your computer, read the safety information that shipped with your computer. For additional safety best practices information, see the Regulatory Compliance - Dell Inspiron Mini Duo 1090 | Inspiron Duo Service Manual - Page 5
the palm-rest assembly (see Replacing the Palm-Rest Assembly). 6. Replace the keyboard (see Replacing the Keyboard). 7. Replace the label door (see Replacing the Label Door). CAUTION: Before turning on the computer, replace all screws and ensure that no stray screws remain inside the computer - Dell Inspiron Mini Duo 1090 | Inspiron Duo Service Manual - Page 6
Dell™ Inspiron™ 1090 Service Manual Recommended Tools Turning Off Your Computer Before Working Inside Your Computer This manual . l A component can be replaced or-if purchased separately-installed by l BIOS executable update program available at support.dell.com Turning Off Your Computer CAUTION: - Dell Inspiron Mini Duo 1090 | Inspiron Duo Service Manual - Page 7
3. Disconnect your computer and all attached devices from their electrical outlets. 4. Disconnect all attached devices from your computer. 5. Open the display and press the power button to ground the system board. CAUTION: Before touching anything inside your computer, ground yourself by touching an - Dell Inspiron Mini Duo 1090 | Inspiron Duo Service Manual - Page 8
Dell™ Inspiron™ 1090 Service Manual The BIOS may require flashing when an update is available or when replacing the system board. To flash the BIOS: 1. Turn on the computer. 2. Go to support.dell.com/support . The File Download window appears. 6. Click Save Download Complete window appears. The - Dell Inspiron Mini Duo 1090 | Inspiron Duo Service Manual - Page 9
Back to Contents Page Camera Module Dell™ Inspiron™ 1090 Service Manual Removing the Camera Module Replacing the Camera Module WARNING: Before working inside your computer, read the safety information that shipped with your computer. For additional safety best practices information, see - Dell Inspiron Mini Duo 1090 | Inspiron Duo Service Manual - Page 10
(see Replacing the Display Assembly). 9. Replace the memory module (see Replacing the Memory Module). 10. Replace the battery (see Replacing the Battery). 11. Replace the palm-rest assembly (see Replacing the Palm-Rest Assembly). 12. Replace the keyboard (see Replacing the Keyboard). 13. Replace the - Dell Inspiron Mini Duo 1090 | Inspiron Duo Service Manual - Page 11
Back to Contents Page Coin-Cell Battery Dell™ Inspiron™ 1090 Service Manual Removing the Coin-Cell Battery Replacing the Coin-Cell Battery WARNING: Before working inside your computer, read the safety information that shipped with your computer. For additional safety best practices information, see - Dell Inspiron Mini Duo 1090 | Inspiron Duo Service Manual - Page 12
4. Replace the battery (see Replacing the Battery). 5. Replace the palm-rest assembly (see Replacing the Palm-Rest Assembly). 6. Replace the keyboard (see Replacing the Keyboard). 7. Replace the label door (see Replacing the Label Door). CAUTION: Before turning on the computer, replace all screws - Dell Inspiron Mini Duo 1090 | Inspiron Duo Service Manual - Page 13
Back to Contents Page AC-Adapter Connector Dell™ Inspiron™ 1090 Service Manual Removing the AC-Adapter Connector Replacing the AC-Adapter Connector WARNING: Before working inside your computer, read the safety information that shipped with your computer. For additional safety best practices - Dell Inspiron Mini Duo 1090 | Inspiron Duo Service Manual - Page 14
5. Replace the memory module (see Replacing the Memory Module). 6. Replace the battery (see Replacing the Battery). 7. Replace the palm-rest assembly (see Replacing the Palm-Rest Assembly). 8. Replace the keyboard (see Replacing the Keyboard). 9. Replace the label door (see Replacing the Label Door - Dell Inspiron Mini Duo 1090 | Inspiron Duo Service Manual - Page 15
Back to Contents Page Display Dell™ Inspiron™ 1090 Service Manual Display Assembly Hinge Caps Display Bezel Display Hinges Display Panel Display Cable WARNING: Before working inside your computer, read the safety information that shipped with - Dell Inspiron Mini Duo 1090 | Inspiron Duo Service Manual - Page 16
cables through the routing guides. 6. Connect the appropriate antenna cables to the Mini-Cards(s) on your computer (see Replacing the Mini-Card(s)). 7. Replace the memory module (see Replacing the Memory Module). 8. Replace the battery (see Replacing the Battery). 9. Replace the palm-rest assembly - Dell Inspiron Mini Duo 1090 | Inspiron Duo Service Manual - Page 17
10. Replace the keyboard (see Replacing the Keyboard). 11. Replace the label door (see Replacing the Label Door). CAUTION: Before turning on the computer, replace all screws and ensure that no stray screws remain inside the computer. Failure to do so may result in damage to the computer. Hinge Caps - Dell Inspiron Mini Duo 1090 | Inspiron Duo Service Manual - Page 18
of the display bezel off the display frame. 1 display frame 3 display bezel 2 plastic scribe 5. Lift the display bezel off the display frame. Replacing the Display Bezel 1. Follow the instructions in Before You Begin. 2. Align the display bezel on the display frame and gently snap it into place - Dell Inspiron Mini Duo 1090 | Inspiron Duo Service Manual - Page 19
Display Hinges 1. Follow the instructions in Before You Begin. 2. Route the ambient-light sensor cable, touch-screen cable, display cable, and camera cable through the routing guides. 3. Use the alignment posts on the display frame to place the display hinges in position. 4. Replace the four (two on - Dell Inspiron Mini Duo 1090 | Inspiron Duo Service Manual - Page 20
-panel hinge brackets from the display panel. 1 display-panel hinge brackets (2) 9. Remove the eight screws that secure the display back cover to the display panel. 10. Using your fingertips, carefully pry out the display back cover and ease the back cover away from the display panel. - Dell Inspiron Mini Duo 1090 | Inspiron Duo Service Manual - Page 21
routing guide. 7. Replace the six screws that secure the display panel to the display frame. 8. Replace the display hinges (see Replacing the Display Hinges). 9. Replace the display bezel (see Replacing the Display Bezel). 10. Replace the hinge caps (see Replacing the Hinge Caps). 11. Replace the - Dell Inspiron Mini Duo 1090 | Inspiron Duo Service Manual - Page 22
hinges (2) 2 3 display cable 4 pull-tab touch-screen cable connector 11. Gently peel off the display cable from the display panel. Replacing the Display Cable 1. Follow the instructions in Before You Begin. 2. Slide the tabs on the display-panel hinges into the slots on the display panel and - Dell Inspiron Mini Duo 1090 | Inspiron Duo Service Manual - Page 23
Back to Contents Page Hard-Drive Assembly Dell™ Inspiron™ 1090 Service Manual Removing the Hard-Drive Assembly Replacing the Hard-Drive Assembly WARNING: Before working inside your computer, read the safety information that shipped with your computer. For additional safety best practices information - Dell Inspiron Mini Duo 1090 | Inspiron Duo Service Manual - Page 24
to the computer base. 8. Replace the memory module (see Replacing the Memory Module). 9. Replace the battery (see Replacing the Battery). 10. Replace the palm-rest assembly (see Replacing the Palm-Rest Assembly). 11. Replace the keyboard (see Replacing the Keyboard). 12. Replace the label door (see - Dell Inspiron Mini Duo 1090 | Inspiron Duo Service Manual - Page 25
Back to Contents Page Processor Fan and Heat-Sink Assembly Dell™ Inspiron™ 1090 Service Manual Removing the Processor Fan and Heat-Sink Assembly Replacing the Processor Fan and Heat-Sink Assembly WARNING: Before working inside your computer, read the safety information that shipped with your - Dell Inspiron Mini Duo 1090 | Inspiron Duo Service Manual - Page 26
1. Follow the instructions in Before You Begin. Replace the memory module (see Replacing the Memory Module). 6. Replace the battery (see Replacing the Battery). 7. Replace the palm-rest assembly (see Replacing the Palm-Rest Assembly). 8. Replace the keyboard (see Replacing the Keyboard). 9. Replace - Dell Inspiron Mini Duo 1090 | Inspiron Duo Service Manual - Page 27
Back to Contents Page Connector Covers Dell™ Inspiron™ 1090 Service Manual Removing the Connector Covers Replacing the Connector Covers WARNING: Before working inside your computer, read the safety information that shipped with your computer. For additional safety best practices information, see - Dell Inspiron Mini Duo 1090 | Inspiron Duo Service Manual - Page 28
- Dell Inspiron Mini Duo 1090 | Inspiron Duo Service Manual - Page 29
Back to Contents Page Keyboard Dell™ Inspiron™ 1090 Service Manual Removing the Keyboard Replacing the Keyboard WARNING: Before working Keyboard 1. Follow the instructions in Before You Begin. 2. Remove the label door (see Removing the Label Door). 3. Remove the three screws that secure the keyboard - Dell Inspiron Mini Duo 1090 | Inspiron Duo Service Manual - Page 30
cable from the connector on the system board. 1 keyboard tabs (5) 2 3 keyboard-cable connector keyboard cable 8. Lift the keyboard off the computer. Replacing the Keyboard 1. Follow the instructions in Before You Begin. 2. Slide the keyboard cable into the connector on the system board and - Dell Inspiron Mini Duo 1090 | Inspiron Duo Service Manual - Page 31
- Dell Inspiron Mini Duo 1090 | Inspiron Duo Service Manual - Page 32
to Contents Page Label Door Dell™ Inspiron™ 1090 Service Manual Removing the Label Door Replacing the Label Door WARNING: on the computer base. 1 label door 2 label-door tabs (3) Replacing the Label Door 1. Follow the instructions in Before You Begin. 2. Align the label door tabs with the slots - Dell Inspiron Mini Duo 1090 | Inspiron Duo Service Manual - Page 33
Back to Contents Page Memory Module Dell™ Inspiron™ 1090 Service Manual Removing the Memory Module Replacing the Memory Module WARNING: Before working inside your computer, read the safety information that shipped with your computer. For additional safety best practices information, see the - Dell Inspiron Mini Duo 1090 | Inspiron Duo Service Manual - Page 34
notch 3 memory-module connector 4. Replace the battery (see Replacing the Battery). 5. Replace the palm-rest assembly (see Replacing the Palm-Rest Assembly). 6. Replace the keyboard (see Replacing the Keyboard). 7. Replace the label door (see Replacing the Label Door). 8. Connect the AC adapter to - Dell Inspiron Mini Duo 1090 | Inspiron Duo Service Manual - Page 35
Back to Contents Page Wireless Mini-Card(s) Dell™ Inspiron™ 1090 Service Manual Removing the Mini-Card(s) Replacing the Mini-Card(s) WARNING: Before working inside your computer, read the safety information that shipped with your computer. For additional safety best practices information, see the - Dell Inspiron Mini Duo 1090 | Inspiron Duo Service Manual - Page 36
see Removing the Keyboard). 9. Replace the label door (see Replacing the Label Door). CAUTION: Before turning on the computer, replace all screws and ensure that no stray screws remain inside the computer. Failure to do so may result in damage to the computer. 10. Install the drivers and utilities - Dell Inspiron Mini Duo 1090 | Inspiron Duo Service Manual - Page 37
NOTE: If you are installing a communication card from a source other than Dell, you must install the appropriate drivers and utilities. Back to Contents Page - Dell Inspiron Mini Duo 1090 | Inspiron Duo Service Manual - Page 38
Back to Contents Page Palm-Rest Assembly Dell™ Inspiron™ 1090 Service Manual Removing the Palm-Rest Assembly Replacing the Palm-Rest Assembly WARNING: Before working inside your computer, read the safety information that shipped with your computer. For additional safety best practices information, - Dell Inspiron Mini Duo 1090 | Inspiron Duo Service Manual - Page 39
then ease the palm-rest assembly from the computer base. 1 palm-rest assembly 2 plastic scribe 10. Lift the palm-rest assembly off the computer base. Replacing the Palm-Rest Assembly 1. Follow the instructions in Before You Begin. 2. Align the palm-rest assembly on the computer base and gently snap - Dell Inspiron Mini Duo 1090 | Inspiron Duo Service Manual - Page 40
CAUTION: Before turning on the computer, replace all screws and ensure that no stray screws remain inside the computer. Failure to do so may result in damage to the computer. Back to Contents Page - Dell Inspiron Mini Duo 1090 | Inspiron Duo Service Manual - Page 41
to Contents Page Speakers Dell™ Inspiron™ 1090 Service Manual Removing the Speakers Replacing the Speakers WARNING: Replacing the Speakers 1. Follow the instructions in Before You Begin. 2. Place the speakers on the computer base and route the speaker cable through the routing guides. 3. Replace - Dell Inspiron Mini Duo 1090 | Inspiron Duo Service Manual - Page 42
- Dell Inspiron Mini Duo 1090 | Inspiron Duo Service Manual - Page 43
Back to Contents Page System Board Dell™ Inspiron™ 1090 Service Manual Removing the System Board Replacing the System Board Entering the Service Tag in the BIOS WARNING: Before working inside your computer, read the safety information that shipped with your computer. For additional safety best - Dell Inspiron Mini Duo 1090 | Inspiron Duo Service Manual - Page 44
). 10. Replace the Mini-Card(s) (see Replacing the Mini-Card(s)). 11. Replace the memory module (see Replacing the Memory Module). 12. Replace the battery (see Replacing the Battery). 13. Replace the palm-rest assembly (see Replacing the Palm-Rest Assembly). 14. Replace the keyboard (see Replacing - Dell Inspiron Mini Duo 1090 | Inspiron Duo Service Manual - Page 45
system board, enter the computer Service Tag into the BIOS of the replacement system board. 17. Enter the service tag (see Entering the Service Tag in the BIOS). Entering the Service Tag in the BIOS 1. Ensure that the AC adapter is plugged in and that the main battery is installed properly. 2. Turn - Dell Inspiron Mini Duo 1090 | Inspiron Duo Service Manual - Page 46
Back to Contents Page Dell™ Inspiron™ 1090 Service Manual NOTE: A NOTE indicates important information that helps you make better use of your computer. CAUTION: A CAUTION indicates potential damage to hardware or loss of data if instructions are not followed. WARNING: A WARNING indicates a
-
 1
1 -
 2
2 -
 3
3 -
 4
4 -
 5
5 -
 6
6 -
 7
7 -
8
-
9
-
10
-
11
-
12
-
13
-
14
-
15
-
16
-
17
-
18
-
19
-
20
-
21
-
22
-
23
-
24
-
25
-
26
-
27
-
28
-
29
-
30
-
31
-
32
-
33
-
34
-
35
-
36
-
37
-
38
-
39
-
40
-
41
-
42
-
43
-
44
-
45
-
46
 |
 |

Dell™ Inspiron™ 1090 Service Manual
Notes, Cautions, and Warnings
Information in this document is subject to change without notice.
© 2010 Dell Inc. All rights reserved.
Trademarks used in this text: Dell™ and the DELL logo, and Inspiron™ are trademarks of Dell Inc.;
Microsoft
®
,
Windows
®
,
and the
Windows
start button logo
are either
trademarks or registered trademarks of Microsoft Corporation in the United States and/or other countries.
Reproduction of these materials in any manner whatsoever without the written permission of Dell Inc. is strictly forbidden.
Regulatory model: P08T Regulatory type: P08T001
November 2010 Rev. A00
Before You Begin
Label Door
Keyboard
Palm
-
Rest Assembly
Battery
Memory Module
AC
-
Adapter Connector
Processor Fan and Heat
-
Sink
Assembly
Wireless Mini
-
Card(s)
Hard
-
Drive Assembly
Coin
-
Cell Battery
Display
Ambient
-
Light Sensor
Board
Camera Module
System Board
Connector Covers
Speakers
Flashing the BIOS
NOTE:
A NOTE indicates important information that helps you make better use of your computer.
CAUTION:
A CAUTION indicates potential damage to hardware or loss of data if instructions are not followed.
WARNING:
A WARNING indicates a potential for property damage, personal injury, or death.