Dell PowerConnect 2708 Getting Started Guide - Page 11
Connecting a Device to a Power Supply - configuration
 |
View all Dell PowerConnect 2708 manuals
Add to My Manuals
Save this manual to your list of manuals |
Page 11 highlights
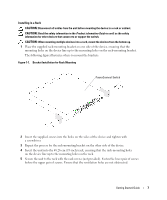
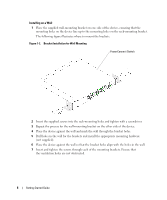
Figure 1-3. Mounting Device on Wall Drilled Holes Wall Drilled Holes Connecting a Device to a Power Supply Connect the supplied AC power cable to the AC power connector on the back panel. NOTE: Do not connect the power cable to a grounded AC outlet at this time. You will connect the device to a power source in the steps detailed in Starting and Configuring the Device. Figure 1-4. Back-Panel Power Connectors PowerConnect Switch Rear View Power Connector Connect the device to an AC outlet. After you have connected the device to a power source, confirm that the device is connected and operating correctly by examining the LEDs on the front panel. Getting Started Guide 9
-
 1
1 -
2
-
3
-
4
-
5
-
 6
6 -
 7
7 -
 8
8 -
 9
9 -
 10
10 -
 11
11 -
 12
12 -
 13
13 -
 14
14 -
 15
15 -
 16
16 -
17
-
18
-
19
-
20
-
21
-
22
-
23
-
24
-
25
-
26
-
27
-
28
-
29
-
30
-
31
-
32
-
33
-
34
-
35
-
36
-
37
-
38
-
39
-
40
-
41
-
42
-
43
-
44
-
45
-
46
-
47
-
48
-
49
-
50
-
51
 |
 |

Getting Started Guide
9
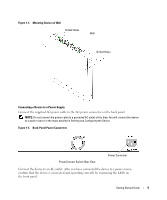
Figure 1-3.
Mounting Device on Wall
Connecting a Device to a Power Supply
Connect the supplied AC power cable to the AC power connector on the back panel.
NOTE:
Do not connect the power cable to a grounded AC outlet at this time. You will connect the device
to a power source in the steps detailed in Starting and Configuring the Device.
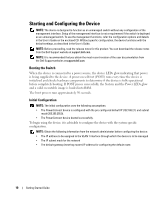
Figure 1-4.
Back-Panel Power Connectors
Connect the device to an AC outlet. After you have connected the device to a power source,
confirm that the device is connected and operating correctly by examining the LEDs on
the front panel.
Drilled Holes
Drilled Holes
Wall
Power Connector
PowerConnect Switch Rear View