Dell PowerEdge 2300 Dell PowerEdge Systems Microprocessor Upgrade Guide - Page 19
Removing and Replacing the Cooling Shroud, Removing the Cooling Shroud
 |
View all Dell PowerEdge 2300 manuals
Add to My Manuals
Save this manual to your list of manuals |
Page 19 highlights
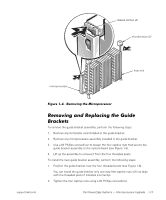
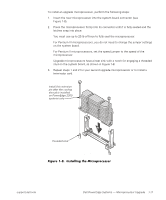
The plastic cooling shroud inside the system is used to improve airflow over the microprocessors. You may need to remove this shroud to access certain components on the system board. To remove the cooling shroud, perform the following steps. 1. Turn off the system, including any attached peripherals, and disconnect the power cable from the electrical outlet. 2. Remove the right-side computer cover. 3. Unscrew and remove the two retention pins (see Figure 1-7). 4. Remove the shroud by lifting the end of the shroud closest to the microproces- sor(s) until the opposite end of the shroud disengages from the cooling fan on the system back panel. support.dell.com Dell PowerEdge Systems - Microprocessor Upgrade 1-15
-
 1
1 -
2
-
3
-
4
-
5
-
6
-
7
-
8
-
9
-
10
-
11
-
12
-
13
-
 14
14 -
 15
15 -
 16
16 -
 17
17 -
 18
18 -
 19
19 -
 20
20 -
 21
21 -
 22
22 -
 23
23 -
 24
24
 |
 |

support.dell.com
Dell PowerEdge Systems
—
Microprocessor Upgrade
1-15
!³"¹#¸ºÂ¼µºÇ¼!³Æĵ´¸ºÂ¼·È³¼&¹¹Ä¸ºÂ¼
'Ȳ¹¶Ç
The plastic cooling shroud inside the system is used to improve airflow over the
microprocessors. You may need to remove this shroud to access certain components
on the system board.
ĴȲ"¸½Á·³Å´·º²²#¸½Á·ÆÅÀ²¼¾
To remove the cooling shroud, perform the following steps.
±²³´µ¶·¸²ÎÁÀÃÍÀ¸¿ÂÀ¸º»ÊÅÃǾ¿ºÅ»¸ÈºÍÀ»¸º»¸)'ÃÀ½¾Ì¿ºÅ»¾Ã˸2À¾ÁÌÃÀÁ+¸¾»¼¸
)6ÀÊÅÃÀ¸-Å̸6ÀȺ»+¸¿Å¸À»ÁÌÃÀ¸¿Â¾¿¸¿ÂÀ¸ÁËÁ¿ÀǸ½Å»ÊºÈÌþ¿ºÅ»¸Á½ÃÀÀ»Á¸¾ÃÀ¸
ÃÀ½ÅüÀ¼¸¾»¼¸¿ÂÀ¸ÁËÁ¿ÀǸºÁ¸ÄÃÅÄÀÃÆ˸ÁÂÌ¿¸¼ÅÉ»¸¾»¼¸¼ºÁ½Å»»À½¿À¼¸ÊÃÅǸ¾ÆƸ
ÄÅÉÀøÁÅÌýÀÁÏ
1.
Turn off the system, including any attached peripherals, and disconnect the
power cable from the electrical outlet.
2.
Remove the right-side computer cover.
3.
Unscrew and remove the two retention pins (see Figure 1-7).
4.
Remove the shroud by lifting the end of the shroud closest to the microproces-
sor(s) until the opposite end of the shroud disengages from the cooling fan on
the system back panel.