Dell PowerEdge 2321DS Dell 180AS/2160AS Analog Console Switch User's Guide - Page 17
Locate the SIPs for your Console Switch., Console Switch.
 |
View all Dell PowerEdge 2321DS manuals
Add to My Manuals
Save this manual to your list of manuals |
Page 17 highlights
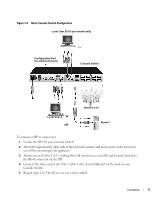
Figure 2-3. Basic Console Switch Configuration Local User B (16-port model only) Configuration Port (for updating firmware) Console Switch Local User A SIP Servers 2-16 Server 1 To connect a SIP to each server: 1 Locate the SIPs for your Console Switch. 2 Attach the appropriately cable ends to the keyboard, monitor and mouse ports on the first server you will be connecting to the appliance. 3 Attach one end of the CAT 5 cabling that will run between your SIP and Console Switch to the RJ-45 connector on the SIP. 4 Connect the other end of the CAT 5 cable to the desired ARI port on the back of your Console Switch. 5 Repeat steps 2 to 4 for all servers you wish to attach. Installation 17
-
 1
1 -
2
-
3
-
4
-
5
-
6
-
7
-
8
-
9
-
10
-
11
-
 12
12 -
 13
13 -
 14
14 -
 15
15 -
 16
16 -
 17
17 -
 18
18 -
 19
19 -
 20
20 -
 21
21 -
 22
22 -
23
-
24
-
25
-
26
-
27
-
28
-
29
-
30
-
31
-
32
-
33
-
34
-
35
-
36
-
37
-
38
-
39
-
40
-
41
-
42
-
43
-
44
-
45
-
46
-
47
-
48
-
49
-
50
-
51
-
52
-
53
-
54
-
55
-
56
-
57
-
58
-
59
-
60
 |
 |

Installation
17
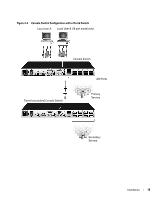
Figure 2-3.
Basic Console Switch Configuration
To connect a SIP to each server:
1
Locate the SIPs for your Console Switch.
2
Attach the appropriately cable ends to the keyboard, monitor and mouse ports on the first server
you will be connecting to the appliance.
3
Attach one end of the CAT 5 cabling that will run between your SIP and Console Switch to
the RJ-45 connector on the SIP.
4
Connect the other end of the CAT 5 cable to the desired ARI port on the back of your
Console Switch.
5
Repeat steps 2 to 4 for all servers you wish to attach.
Configuration Port
(for updating firmware)
Console Switch
Local User A
Servers 2-16
Server 1
SIP
Local User B (16-port model only)