Dell PowerEdge 2850 Processor Upgrade Installation Guide - Page 6
Go to step 7., If you are upgrading an existing processor - processors
 |
View all Dell PowerEdge 2850 manuals
Add to My Manuals
Save this manual to your list of manuals |
Page 6 highlights
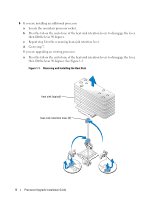
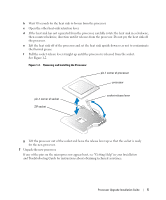
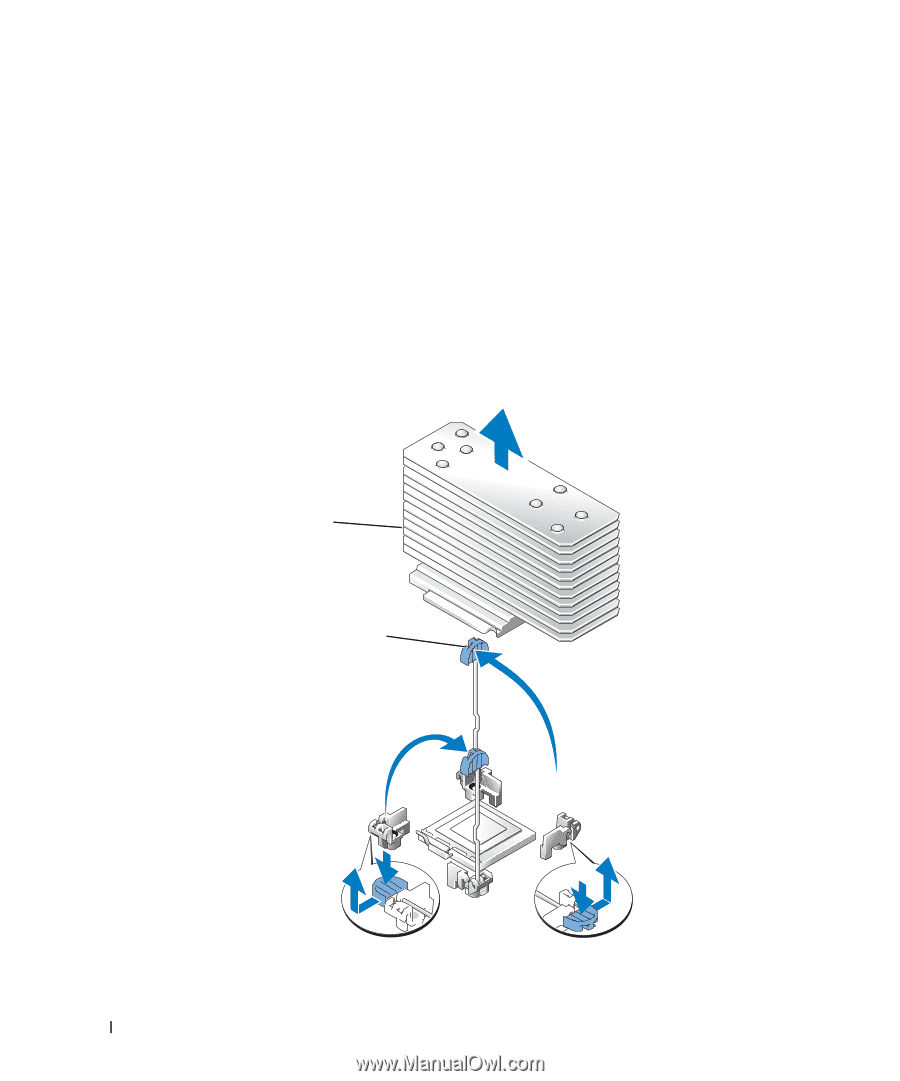
6 If you are installing an additional processor: a Locate the secondary processor socket. b Press the tab on the end of one of the heat-sink retention levers to disengage the lever, then lift the lever 90 degrees. c Repeat step b for the remaining heat-sink retention lever. d Go to step 7. If you are upgrading an existing processor: a Press the tab on the end of one of the heat-sink retention levers to disengage the lever, then lift the lever 90 degrees. See Figure 1-1. Figure 1-1. Removing and Installing the Heat Sink heat sink (typical) heat-sink retention lever (2) 4 Processor Upgrade Installation Guide
-
 1
1 -
 2
2 -
 3
3 -
 4
4 -
 5
5 -
 6
6 -
 7
7 -
 8
8 -
 9
9 -
 10
10 -
 11
11 -
 12
12 -
13
-
14
-
15
-
16
-
17
-
18
-
19
-
20
-
21
-
22
-
23
-
24
-
25
-
26
-
27
-
28
-
29
-
30
-
31
-
32
-
33
-
34
-
35
-
36
-
37
-
38
-
39
-
40
-
41
-
42
-
43
-
44
-
45
-
46
-
47
-
48
-
49
-
50
-
51
-
52
-
53
-
54
-
55
-
56
 |
 |
4
Processor Upgrade Installation Guide
6
If you are installing an additional processor:
a
Locate the secondary processor socket.
b
Press the tab on the end of one of the heat-sink retention levers to disengage the lever,
then lift the lever 90 degrees.
c
Repeat step b for the remaining heat-sink retention lever.
d
Go to step 7.
If you are upgrading an existing processor:
a
Press the tab on the end of one of the heat-sink retention levers to disengage the lever,
then lift the lever 90 degrees. See Figure 1-1.
Figure 1-1.
Removing and Installing the Heat Sink
heat sink (typical)
heat-sink retention lever (2)