Dell STUDIO XPS 16 Service Manual - Page 24
Replacing the Processor Heat Sink, Replacing the Rear Caps, Replacing the Base Cover, Back - fan
 |
UPC - 067540444442
View all Dell STUDIO XPS 16 manuals
Add to My Manuals
Save this manual to your list of manuals |
Page 24 highlights
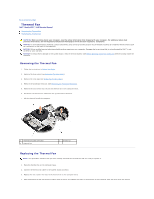
processor unit and the graphic processor unit. NOTE: If the processor, thermal fan, or system board is replaced, use the thermal cooling pads provided in the kit on the processor heat sink to ensure that thermal conductivity is achieved. Do not reuse the old thermal cooling pads. 5. Replace the processor heat sink (see Replacing the Processor Heat Sink). 6. Replace the rear caps (see Replacing the Rear Caps). 7. Replace the base cover (see Replacing the Base Cover). 8. Slide the battery into the battery bay until it clicks into place. Back to Contents Page
-
 1
1 -
2
-
3
-
4
-
5
-
6
-
7
-
8
-
9
-
10
-
11
-
12
-
13
-
14
-
15
-
16
-
17
-
18
-
 19
19 -
 20
20 -
 21
21 -
 22
22 -
 23
23 -
 24
24 -
 25
25 -
 26
26 -
 27
27 -
 28
28 -
 29
29 -
30
-
31
-
32
-
33
-
34
-
35
-
36
-
37
-
38
-
39
-
40
-
41
-
42
-
43
-
44
-
45
-
46
-
47
 |
 |

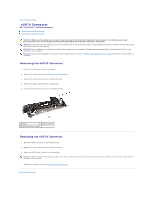
processor unit and the graphic processor unit.
5.
Replace the processor heat sink (see
Replacing the Processor Heat Sink
).
6.
Replace the rear caps (see
Replacing the Rear Caps
).
7.
Replace the base cover (see
Replacing the Base Cover
).
8.
Slide the battery into the battery bay until it clicks into place.
Back to Contents Page
NOTE:
If the processor, thermal fan, or system board is replaced, use the thermal cooling pads provided in the kit on the processor heat sink to ensure
that thermal conductivity is achieved. Do not reuse the old thermal cooling pads.