Dell Studio Slim Service Manual - Page 23
Replacing the Front Panel
 |
View all Dell Studio Slim manuals
Add to My Manuals
Save this manual to your list of manuals |
Page 23 highlights
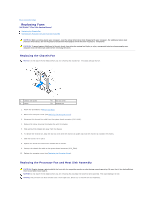
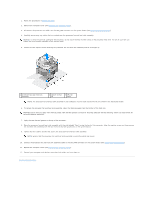
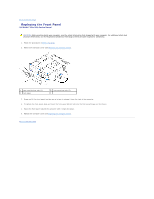
Back to Contents Page Replacing the Front Panel Dell Studio™ Slim 540s Service Manual CAUTION: Before working inside your computer, read the safety information that shipped with your computer. For additional safety best practices information, see the Regulatory Compliance Homepage at www.dell.com/regulatory_compliance. 1. Follow the procedures in Before You Begin. 2. Remove the computer cover (see Replacing the Computer Cover). 1 front panel bottom tabs (3) 3 front panel 2 front panel top tabs (3) 3. Grasp and lift the front panel top tabs one at a time to release it from the front of the computer. 4. To replace the front panel, align and insert the front panel bottom tabs into the front panel hinges on the chassis. 5. Rotate the front panel towards the computer until it snaps into place. 6. Replace the computer cover (see Replacing the Computer Cover). Back to Contents Page
-
 1
1 -
2
-
3
-
4
-
5
-
6
-
7
-
8
-
9
-
10
-
11
-
12
-
13
-
14
-
15
-
16
-
17
-
 18
18 -
 19
19 -
 20
20 -
 21
21 -
 22
22 -
 23
23 -
 24
24 -
 25
25 -
 26
26 -
 27
27 -
 28
28 -
29
-
30
-
31
-
32
-
33
-
34
-
35
-
36
-
37
 |
 |
