Denon AVR-4311CI Owners Manual - English - Page 101
Monitor Select
 |
UPC - 883795001885
View all Denon AVR-4311CI manuals
Add to My Manuals
Save this manual to your list of manuals |
Page 101 highlights
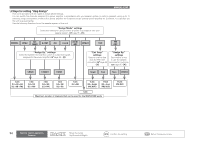
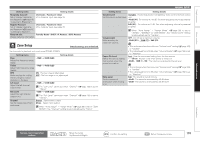
Setting items Setting details Crossover Freq. 40Hz / 60Hz / 80Hz / 90Hz / 100Hz / 110Hz / 120Hz / 150Hz / 200Hz / Set the maximum frequency 250Hz : Set the crossover frequency. of the bass signal output from each channel to the subwoofer. Set the Crossover Frequency to suit the bass reproduction capability of the speaker Advanced : Specify crossover frequency for each speaker. • Front / Center / Surround / Surr. Back / Front Height / Front Wide : Select the speaker. • 40Hz / 60Hz / 80Hz / 90Hz / 100Hz / 110Hz / 120Hz / 150Hz / 200Hz / 250Hz : Set the crossover frequency. being used. Speaker Impedance Set the impedance of connected speakers. • "Crossover Freq." can be set when the "Bass Setting" - "Subwoofer Mode" (vpage 96) setting is "LFE+Main", or when you have a speaker that is set to "Small". • Always set the crossover frequency to "80Hz". When using small speakers, however, we recommend setting the crossover frequency to a higher frequency. • For speakers set to "Small", sound below the crossover frequency is cut from the sound output. The cut bass sound is output from the subwoofer or front speakers. • The speakers that can be set when "Advanced" is selected differ depending on to the "Subwoofer Mode" setting (vpage 96). • When "LFE" is selected, speakers set to "Small" at "Speaker Config." can be set. If the speakers are set to "Large", "Full Band" is displayed and the setting cannot be made. • If set to "LFE+Main", this setting can be made regardless of the speaker size. 8Ω/ohms : Select when the impedance of the connected speaker is 8 Ω or more. 6Ω/ohms : Select when the impedance of the connected speaker is at least 6 Ω but less than 8 Ω. 4Ω/ohms : Select when the impedance of the connected speaker is at least 4 Ω but less than 8 Ω. Front Speaker Setup Set the front speakers to use for every surround mode. NOTE This can be set when "Amp Assign" - "Assign Mode" is set to "Front B" (vpage 95). Check the speaker impedance (Ω) shown on the back of your speakers or in the instruction manual beforehand. 2CH DIRECT/STEREO : The front speakers used in the direct, stereo and pure direct play modes (2 channel) are set in advance. • A : Front speaker A is used. • B : Front speaker B is used. • A+B : Both front speakers A and B are used. MULTI CH : The front speakers used in modes other than the direct, stereo and pure direct play modes (2 channel) are set in advance. • A : Front speaker A is used. • B : Front speaker B is used. • A+B : Both front speakers A and B are used. MANUAL SETUP HDMI Setup Default settings are underlined. Make settings for HDMI video/audio output. Setting items RGB Range Set the video range of RGB output from the HDMI connector. Vertical Stretch Expand image signal in vertical direction. Auto Lip Sync Make automatic compensation for timing shift in audio and video output. HDMI Audio Out Select HDMI audio output device. Monitor Out Make settings for HDMI monitor output. Setting details Normal : Output with RGB video range (16 (black) to 235 (white)). Enhanced : Output with RGB video range (0 (black) to 255 (white)). This setting is active when using a TV equipped with a DVI terminal. ON : Expand image signal in vertical direction. OFF : Do not expand signal in vertical direction. ON : Compensated. OFF : Not compensated. Amp : Play back through speakers connected to the receiver. TV : Play back through TV connected to the receiver. When the HDMI control function is activated, priority is given to the TV audio setting (vpage 65 "HDMI control function"). Auto (Dual) : The presence of a TV connected to the MONITOR 1 or MONITOR 2 terminal is detected automatically, and that TV connection is used. Monitor 1 : A TV connected to the MONITOR 1 terminal is always used. Monitor 2 : A TV connected to the MONITOR 2 terminal is always used. • If both the Monitor 1 and 2 connectors are connected and "Resolution" (vpage 84) is set to "Auto", the signals are output with a resolution compatible with both TV. • With "Resolution" (vpage 84) not set to "Auto", check whether the TV you are using is compatible with the resolution under "HDMI Information" - "Monitor 1" and "Monitor 2" (vpage 107). • You can also set "Monitor Out" by pressing MONITOR SELECT. NOTE Depending on the monitor you have connected, the display may not be correct when you set to "Auto (Dual)". In such a case, set to either "Monitor 1" or "Monitor 2". 98 Remote control operation buttons Move the cursor (Up/Down/Left/Right) Confirm the setting Return to previous menu
-
 1
1 -
2
-
3
-
4
-
5
-
6
-
7
-
8
-
9
-
10
-
11
-
12
-
13
-
14
-
15
-
16
-
17
-
18
-
19
-
20
-
21
-
22
-
23
-
24
-
25
-
26
-
27
-
28
-
29
-
30
-
31
-
32
-
33
-
34
-
35
-
36
-
37
-
38
-
39
-
40
-
41
-
42
-
43
-
44
-
45
-
46
-
47
-
48
-
49
-
50
-
51
-
52
-
53
-
54
-
55
-
56
-
57
-
58
-
59
-
60
-
61
-
62
-
63
-
64
-
65
-
66
-
67
-
68
-
69
-
70
-
71
-
72
-
73
-
74
-
75
-
76
-
77
-
78
-
79
-
80
-
81
-
82
-
83
-
84
-
85
-
86
-
87
-
88
-
89
-
90
-
91
-
92
-
93
-
94
-
95
-
 96
96 -
 97
97 -
 98
98 -
 99
99 -
 100
100 -
 101
101 -
 102
102 -
 103
103 -
 104
104 -
 105
105 -
 106
106 -
107
-
108
-
109
-
110
-
111
-
112
-
113
-
114
-
115
-
116
-
117
-
118
-
119
-
120
-
121
-
122
-
123
-
124
-
125
-
126
-
127
-
128
-
129
-
130
-
131
-
132
-
133
-
134
-
135
-
136
-
137
-
138
-
139
-
140
-
141
-
142
-
143
-
144
-
145
 |
 |