Denon AVR-5805CI Owners Manual - English - Page 123
Setting the Crossover Frequency for ZONE2, Setting the Video Setup for ZONE2
 |
UPC - 081757507424
View all Denon AVR-5805CI manuals
Add to My Manuals
Save this manual to your list of manuals |
Page 123 highlights
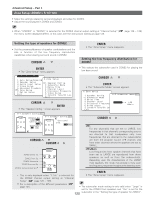
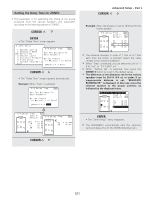
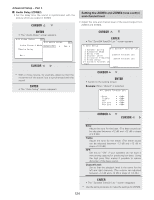
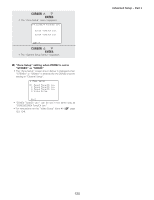
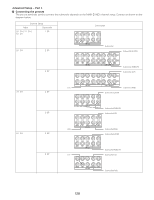
• When adjusting the level of an active subwoofer system, you may also need to adjust the subwoofer's own volume control. • When you adjust the channel levels while in the SYSTEM SETUP CHANNEL LEVEL mode, the channel level adjustments made will affect all surround modes for ZONE2. • After you have completed the SYSTEM SETUP CHANNEL LEVEL adjustments, you can then activate the individual surround modes and adjust channel levels that will be remembered for each of those modes. Then, whenever you activate a particular surround sound mode, your preferred channel level adjustments for just that mode will be recalled. Check the instructions for adjusting channel levels within each surround mode ( page 95, 96). • You can adjust the channel levels for each of the following surround modes for ZONE2: STEREO, STANDARD (DOLBY/DTS SURROUND), 5/7 CH STEREO, WIDE SCREEN, SUPER STADIUM, ROCK ARENA, JAZZ CLUB, CLASSIC CONCERT, MONO MOVIE, VIDEO GAME, MATRIX and VIRTUAL. Advanced Setup - Part 1 Setting the Video Setup for ZONE2 2 Video Convert Mode (ZONE2) • This sets whether or not to use the video conversion function. 1 Press the CURSOR D or H button to select "Video Setup" at the "Zone Setup" menu, then press the ENTER button. • The "Video Setup" screen appears. Setting the Crossover Frequency for ZONE2 • Set the frequency (in Hz) below which deep bass appearing in the main channels will be routed to the ZONE2 subwoofer. 2 Press the CURSOR D or H button to select "Video Convert Mode", then press the ENTER button. • The "Video Convert Mode" screen appears. 1 Press the CURSOR D or H button to select "Crossover Frequency" at the "Zone Setup" menu, then press the ENTER button. • The "Crossover Frequency" screen appears. 2 Press the CURSOR F or G button to select the frequency. VARIABLE 40, 60, 80, 100, 120, 150, 200, 250 Hz: Set as desired according to your speakers' bass playback ability. 3 Press the ENTER button to enter the setting. • The "Zone Setup" menu reappears. 3 Press the CURSOR D or H button to select the ZONE2 input source, then press the CURSOR F or G button to select "ON" or "OFF". ON: When there are multiple input signals for the input sources selected at ZONE2, the input signal is detected and the input signal output to the ZONE2's monitor output terminal is selected automatically, in the following order of priority: Component, S-Video, Composite. OFF: The convert function does not operate. In such cases, the input device's cable type must be the same as the type of cable connected to the AVR-5805CI's monitor output terminal (video, SVideo or component video). • For the majority of home theater speaker systems, we 4 recommend that the crossover frequency be set to 80 Hz. When using very compact speakers, however, it may be advantageous to select a higher crossover frequency. Check the specified low frequency limit of each speaker (usually published in the specifications tables in speaker owner's manuals). • The crossover frequency mode is valid only when subwoofer is set to "Yes", and when one or more speakers are set to SMALL, as described in section "Setting the type of speakers for ZONE2" ( page 120). 123 Press the ENTER button to enter the setting. • The "Zone Setup" menu reappears.
-
 1
1 -
2
-
3
-
4
-
5
-
6
-
7
-
8
-
9
-
10
-
11
-
12
-
13
-
14
-
15
-
16
-
17
-
18
-
19
-
20
-
21
-
22
-
23
-
24
-
25
-
26
-
27
-
28
-
29
-
30
-
31
-
32
-
33
-
34
-
35
-
36
-
37
-
38
-
39
-
40
-
41
-
42
-
43
-
44
-
45
-
46
-
47
-
48
-
49
-
50
-
51
-
52
-
53
-
54
-
55
-
56
-
57
-
58
-
59
-
60
-
61
-
62
-
63
-
64
-
65
-
66
-
67
-
68
-
69
-
70
-
71
-
72
-
73
-
74
-
75
-
76
-
77
-
78
-
79
-
80
-
81
-
82
-
83
-
84
-
85
-
86
-
87
-
88
-
89
-
90
-
91
-
92
-
93
-
94
-
95
-
96
-
97
-
98
-
99
-
100
-
101
-
102
-
103
-
104
-
105
-
106
-
107
-
108
-
109
-
110
-
111
-
112
-
113
-
114
-
115
-
116
-
117
-
 118
118 -
 119
119 -
 120
120 -
 121
121 -
 122
122 -
 123
123 -
 124
124 -
 125
125 -
 126
126 -
 127
127 -
 128
128 -
129
-
130
-
131
-
132
-
133
-
134
-
135
-
136
-
137
-
138
-
139
-
140
-
141
-
142
-
143
-
144
-
145
-
146
-
147
-
148
-
149
-
150
-
151
-
152
-
153
-
154
-
155
-
156
-
157
-
158
-
159
-
160
-
161
-
162
-
163
-
164
-
165
-
166
-
167
-
168
-
169
-
170
-
171
-
172
-
173
-
174
-
175
-
176
-
177
-
178
-
179
-
180
-
181
-
182
-
183
-
184
-
185
-
186
-
187
-
188
-
189
-
190
-
191
-
192
-
193
-
194
-
195
-
196
-
197
-
198
-
199
-
200
-
201
-
202
-
203
-
204
-
205
-
206
-
207
-
208
-
209
-
210
-
211
-
212
-
213
-
214
 |
 |
