Dewalt D25413K Instruction Manual - Page 9
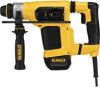
Quick Change SDS Chuck Fig. 5, Inserting and, Removing SDS Plus, Accessories Fig. 1, OPERATION, E-
 |
View all Dewalt D25413K manuals
Add to My Manuals
Save this manual to your list of manuals |
Page 9 highlights
English HAMMERDRILL MODE To use hammerdrill mode, press the mode selector button (H) and turn the mode selection dial (G) so the yellow arrow points to the corresponding symbol as shown. Use this mode for masonry drilling. HAMMER-ONLY MODE For light chiseling, press the mode selector button (H) and turn the mode selection dial (G) so the yellow arrow points to the corresponding symbol as shown. NOTE: The yellow arrow on the mode selection dial MUST be aligned with the one of the symbols at all times. There are no operable positions between the positions. E-Clutch and Indicator Light (Fig. 4) (D25415 ONLY) The e-clutch offers increased user FIG. 4 comfort and safety through an on-board anti-rotation technology capable of detecting if the user loses J control of the hammer. When a jam is detected, the torque and speed are reduced instantly. This feature prevents self rotation of the tool reducing the occurrence of wrist injuries. The red indicator LED (J) lights up the electronic clutch is engaged in any mode except the chipping mode. Quick Change SDS Chuck (Fig. 5) (D25415 ONLY) FIG. 5 The SDS chuck can be easily removed by turning the collar (K) into the unlocked position to release the chuck. The SDS chuck can be easily attached by inserting the chuck into the spindle of the tool and turning the collar to the K locked position. The chuck will click when properly installed. Inserting and Removing SDS Plus® Accessories (Fig. 1) WARNING: Burn hazard. ALWAYS wear gloves when changing bits. Accessible metal parts on the tool and bits may get extremely hot during operation. Small bits of broken material may damage bare hands. WARNING: Do not attempt to tighten or loosen drill bits (or any other accessory) by gripping the front part of the chuck and turning the tool on. Damage to the chuck and personal injury may occur. To insert bit, insert shank of bit about 3/4" (19 mm), no further than 7/8" (22 mm) into chuck. Push and rotate bit until it locks in place. The bit will be securely held. To release bit, pull the chuck (F) back and remove the bit. OPERATION WARNING: To reduce the risk of injury, turn unit off and disconnect it from power source before installing and removing accessories, before adjusting or when making repairs. An accidental start-up can cause injury. 7
-
 1
1 -
2
-
3
-
 4
4 -
 5
5 -
 6
6 -
 7
7 -
 8
8 -
 9
9 -
 10
10 -
 11
11 -
 12
12 -
 13
13 -
 14
14 -
15
-
16
-
17
-
18
-
19
-
20
-
21
-
22
-
23
-
24
-
25
-
26
-
27
-
28
-
29
-
30
-
31
-
32
-
33
-
34
-
35
-
36
-
37
-
38
-
39
-
40
-
41
-
42
-
43
-
44
 |
 |
