Dymo LetraTag® Plus LT-100T User Guide 1
Dymo LetraTag® Plus LT-100T Manual
 |
View all Dymo LetraTag® Plus LT-100T manuals
Add to My Manuals
Save this manual to your list of manuals |
Dymo LetraTag® Plus LT-100T manual content summary:
- Dymo LetraTag® Plus LT-100T | User Guide 1 - Page 1
® LT-100T User Guide LT Mom US_cover.indd 1 29-09-2006 09:14:32 - Dymo LetraTag® Plus LT-100T | User Guide 1 - Page 2
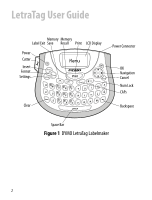
LetraTag User Guide Memory Memory Label Exit Save Recall Print LCD Display Power Cutter Insert Format Settings Cancel Clear Clear Power Connector OK Navigation Cancel Num Lock CAPs Backspace Space Bar Figure 1 DYMO LetraTag Labelmaker 2 - Dymo LetraTag® Plus LT-100T | User Guide 1 - Page 3
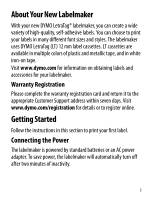
can create a wide variety of high-quality, self-adhesive labels. You can choose to print your labels in many different font sizes and styles. The labelmaker uses DYMO LetraTag (LT) 12 mm label cassettes. LT cassettes are available in multiple colors of plastic and metallic tape, and in white iron-on - Dymo LetraTag® Plus LT-100T | User Guide 1 - Page 4
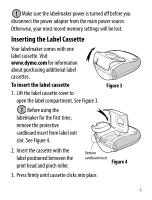
Figure 2 Connecting the Optional Power Adapter An optional 9 Volt, 1.5 A power adapter can also be used to power the labelmaker. Connecting the AC adapter to the labelmaker disconnects the batteries as a power source. To connect the power adapter 1. Plug the power adapter into the power connector - Dymo LetraTag® Plus LT-100T | User Guide 1 - Page 5
will be lost. Inserting the Label Cassette Your labelmaker comes with one label cassette. Visit www.dymo.com for information about purchasing additional label cassettes. To insert the label cassette 1. Lift the label cassette cover to open the label compartment. See Figure 3. ! Before using - Dymo LetraTag® Plus LT-100T | User Guide 1 - Page 6
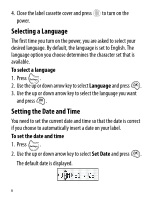
4. Close the label cassette cover and press to turn on the power. Selecting a Language The first set the current date and time so that the date is correct if you choose to automatically insert a date on your label. To set the date and time 1. Press . 2. Use the up or down arrow key to select Set Date - Dymo LetraTag® Plus LT-100T | User Guide 1 - Page 7
When finished, press . Printing Your First Label You are now ready to print your first label. To print a label 1. Enter text to create a simple label. 2. Press . 3. Press the cutter button to cut the label. Congratulations! You printed your first label. Continue reading to learn more about - Dymo LetraTag® Plus LT-100T | User Guide 1 - Page 8
the location of the feature and function keys on your labelmaker. Refer to Figure 1 on the inside front cover. The enter up to 100 characters and spaces on a label; however, the display will only show a small portion of the characters. And, with DYMO's exclusive graphical Font size # lines CAPs Num - Dymo LetraTag® Plus LT-100T | User Guide 1 - Page 9
default. Backspace The key removes the character to the left of the cursor. Clear The Clear key clears all label text and formatting. Navigation Keys You can review and edit your label using the left and right arrow keys on the Navigation key. You can navigate through menu selections using the - Dymo LetraTag® Plus LT-100T | User Guide 1 - Page 10
The key displays the Size, Style, and Borders submenus. These formatting features are described later in this User Guide. Insert The key allows you to insert symbols, a second line, or the date on your label. Settings The key displays the Preview, Language, Set Date, and Set Contrast submenus. These - Dymo LetraTag® Plus LT-100T | User Guide 1 - Page 11
Small, Small, Medium, Large, and Extra Large. When you select a size, that size applies to all characters on a label. To set the font size 1. Press the key. 2. Use the up or down arrow keys to select Size and press . 3. Use the up or down - Dymo LetraTag® Plus LT-100T | User Guide 1 - Page 12
line, but will not print on the label. 3. Type the text for the second line. Adding the Date You can insert the date on your label. The date format is MMM DD, YY (US) or DD MMM YY (Europe) depending upon the version of your labelmaker. To insert the date 1. Press . 2. Select Date - Dymo LetraTag® Plus LT-100T | User Guide 1 - Page 13
Underline Styles You can highlight your text by choosing a box or underline style. Underline Square Pointed Rounded Crocodile Edged Train Sweet Hearts Flowers A label can be underlined or enclosed in a box, but not both together. To add an underline or box style 1. Press . 2. Select Borders, and - Dymo LetraTag® Plus LT-100T | User Guide 1 - Page 14
Using Symbols and Special Characters Symbols and other special characters can be added to your labels. Adding Symbols The labelmaker supports the extended symbol set shown below. 14 - Dymo LetraTag® Plus LT-100T | User Guide 1 - Page 15
you locate the symbol, press to add the symbol to your label. The labelmaker remembers the last symbol used. The next time you choose to you used is automatically selected. Adding International Characters The labelmaker supports the extended Latin character set using RACE technology. Similar - Dymo LetraTag® Plus LT-100T | User Guide 1 - Page 16
character between the two lines. To preview your label 1. Press . 2. Select Preview and press . The text of the label scrolls across the display. Adjusting the Print Contrast You can adjust the print contrast to fine tune the print quality of your label. To set the contrast 1. Press . 2. Select Set - Dymo LetraTag® Plus LT-100T | User Guide 1 - Page 17
Using Labelmaker Memory The labelmaker has a powerful memory feature that allows you to store the text of up to nine labels you use frequently. Storing Label Text You can store up to nine specific labels you use frequently. To store the current label text 1. Press . The first of the memory fields is - Dymo LetraTag® Plus LT-100T | User Guide 1 - Page 18
is designed to give you long and trouble-free service, while requiring very little maintenance. Clean your labelmaker from time to time to keep it working properly. Clean the cutter blade each time you replace the label cassette. To clean the cutter blade Press in and hold 1. Dampen a cotton - Dymo LetraTag® Plus LT-100T | User Guide 1 - Page 19
To clean the print head 1. Remove the label cassette. 2. Remove the cleaning tool from inside the label compartment cover. 3. Gently wipe the padded side of the tool across the print head. See Figure 6. 19 - Dymo LetraTag® Plus LT-100T | User Guide 1 - Page 20
or connect AC power adapter. Tape Jam • Remove jammed label; replace label cassette. Motor is stalled due to label jam. • Clean cutter blade. If you still need assistance, contact DYMO Customer Support. See Contacting Customer Support at the back of this User Guide to locate the contact number - Dymo LetraTag® Plus LT-100T | User Guide 1 - Page 21
the highest quality documentation for our products. We welcome your feedback. Send us your comments or suggestions about our user guides. Please include the following information with your feedback: • Product name, model number, and User Guide page number • Brief description of instructions that are - Dymo LetraTag® Plus LT-100T | User Guide 1 - Page 22
22 - Dymo LetraTag® Plus LT-100T | User Guide 1 - Page 23
The following table provides a list of telephone numbers for DYMO Support departments. You can also reach DYMO at www.dymo.com. Country Australia Canada Mexico New Zealand United States Telephone 1800/ 633 868 (800) 263-6105 +01 5368 2066 0800 803 966 (203) 588-2500 - Dymo LetraTag® Plus LT-100T | User Guide 1 - Page 24
LTRazor_back.indd 1 ©2006 DYMO A Newell Rubbermaid Company DYMO Corporation 44 Commerce Road Stamford, CT 06902 www.dymo.com 23-01-2006 16:51:08
-
 1
1 -
 2
2 -
 3
3 -
 4
4 -
 5
5 -
 6
6 -
 7
7 -
8
-
9
-
10
-
11
-
12
-
13
-
14
-
15
-
16
-
17
-
18
-
19
-
20
-
21
-
22
-
23
-
24
 |
 |
LT-100T
User Guide
®
LT Mom US_cover.indd
1
29-09-2006
09:14:32