Dynex DX-400WPS User Manual (English) - Page 3
Safety information, Power supply components and, features, Installing the power supply, - manual
 |
View all Dynex DX-400WPS manuals
Add to My Manuals
Save this manual to your list of manuals |
Page 3 highlights
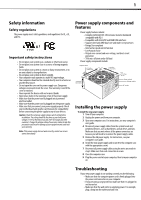
1 Safety information Safety regulations The power supply meets safety guidelines and regulations for UL, cUL, and FCC. Important safety instructions • Do not place your system near a radiator or other heat source. • Do not place your system close to a source of strong magnetic fields. • Do not place your system in a moist or dusty environment, or in an area subject to strong vibration. • Do not place your system in direct sunlight. • Your computer must operate at a stable AC input voltage. • Your computer should not be situated directly next to a heater or another heat source. • Do not open the cover on the power supply case. Dangerous voltages are present inside the cover. Your warranty is void if the cover is removed. • Never operate the device with wet or moist hands. • Never place items in the openings or fan of the power supply. • Make sure that the power cord is plugged into a powered electrical outlet. • Make sure that the power cord is plugged into the power supply. • Make sure that you connect your power supply properly. Check your motherboard and graphic card manuals for compatibility before connecting the power supply to any of your devices. Caution: Check the red power supply voltage switch setting before installation. The setting should be the same as your local power voltage (115 V for North America and 230 V for Europe and other countries). Change the voltage setting if necessary. Failure to take this precaution could result in damage to your equipment and could void your warranty. Note: If the power supply does not work correctly, contact our service center immediately. Power supply components and features Power supply features include: • Complies with Intel ATX 12V version 2.2 and is downward compatible with V2.0 • Compatible with Intel VIIV and AMD LIVE interfaces • Supports Intel and AMD dual-core and multi-core processors • Energy Star compliant • Internal fan speed control function • Low Acoustic noise • Output over-current and over-voltage, and short circuit protection • 70% min. efficient under full load Power supply components include: Output cables 5.9 inches (150.0 mm) 5.5inches (140.0 mm) Fan 4.7 inches 12 cm 3.4 inches (86.0 mm) Power switch Voltage switch AC socket Installing the power supply To install the new power supply: 1 Turn off your computer. 2 Unplug the power cord from your computer. 3 Open your computer case. For instructions, see your computer's user guide. 4 Disconnect power supply cables from the system board and peripheral devices, such as hard drives, optical drives, and fans. Make sure that you note where all the power connectors are because you will need to reconnect the power supply cables. 5 Remove the old power supply. For instructions, see your computer's user guide. 6 Install the new power supply and secure it to the computer case with the appropriate screws. 7 Reconnect all power supply cables using the notes you made in step 4. Make sure that each connection is secure. 8 Close the computer case. 9 Plug the power cord into your computer, then turn your computer on. Troubleshooting If your new power supply is not working correctly, try the following: • Make sure that the computer power cord is firmly plugged into the power cord connector on your computer. • If you are using a surge protector, make sure that it is plugged in and turned on. • Make sure that the wall outlet is supplying power. For example, plug a lamp into the outlet and turn it on.
-
 1
1 -
 2
2 -
 3
3 -
 4
4 -
 5
5 -
 6
6
 |
 |
