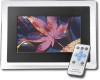
Dynex DX-DPF7 User Manual (English) - Page 3
Setting up your digital picture, frame, Using your digital picture frame - 10
 |
UPC - 600603114526
View all Dynex DX-DPF7 manuals
Add to My Manuals
Save this manual to your list of manuals |
Page 3 highlights
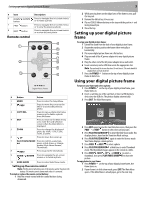
Setting up your digital picture frame 3 # Item 6 DOWN /ROTATE button 7 PREV button 8 NEXT button Remote control Description Press to navigate the on-screen menus or to rotate a photo. Press to navigate the on-screen menus or to view the previous photo. Press to navigate the on-screen menus or to view the next photo. 4 1 5 6 7 2 8 9 6 /, '( 3 10 Digital Picture Frame # Button Action 1 MENU Press to enter the Setup Menu. 2 PREV 3 COPY/DEL. 4 EXIT 5 ZOOM Press to move the cursor to the left or to access the previous photo. Press to copy a photo into frame memory or to delete a photo from the frame. Press to return to the Main menu or to enter the card selection screen when the Main Menu is displayed. Press to enlarge the displayed photo by 100%, 117%, 133%, 150%, or 200%. 6 UP Press to move the cursor up. 7 PLAY/PAUSE/MODE Press to confirm a selection, pause a slide show, or change modes (Slide Show, Browse, Thumbnail). 8 NEXT Press to go to the next photo. 9 DOWN /ROTATE Press to navigate the on-screen menus or to rotate a photo. 10 SLIDE SHOW Press to enter Slide Show mode. Setting up the remote control Note: Pull the plastic tab sticking out of the remote control. It protects the battery. The remote control cannot work unless it is removed. To install or replace the remote control battery: 1 Hold the remote control with the control buttons facing downward. 2 While pressing down on the ridged area of the battery cover, pull the tray out. 3 Remove the old battery, if necessary. 4 Place a CR2025 lithium battery on the tray with the positive + end facing toward you. 5 Close the tray. Setting up your digital picture frame To set up your digital picture frame: 1 Extend the stand from the back of your digital picture frame. 2 Rotate the stand to position the frame either vertically or horizontally. 3 Place your digital picture frame on a flat surface. 4 Plug one end of the AC power adapter into your digital picture frame. 5 Plug the other end of the AC power adapter into a wall outlet. 6 Insert a memory card or USB device into the appropriate slot. Note: The card only fits in one direction. Do not force it. The card should fit snugly when correctly inserted. 7 Press the POWER button on the top of your digital picture frame to turn it on. Using your digital picture frame To turn on your frame and select a photo: 1 Press POWER on the top of your digital picture frame, your frame turns on. 2 Insert a card into one of the card slots or insert a USB memory device into the USB slot. The photos display automatically. 3 Press EXIT. The Main Menu opens. 4 Press EXIT again to enter the Card Selection screen, then press the PREV or NEXT button to select the card you want. 5 Press PLAY/PAUSE/MODE to enter the Slide Show mode. This displays photos, based on the Transition Mode settings. 6 Press PLAY/PAUSE/MODE again to enter the Browse mode. Your frame displays a single picture. 7 Press PREV or NEXT to select a photo. 8 Press PLAY/PAUSE/MODE a third time to enter Thumbnail mode. The thumbnail images appear on the screen in a table. 9 Press PREV , NEXT , UP , or DOWN to select a thumbnail, then press PLAY/PAUSE/MODE to show the picture. To copy photos to your frame: 1 Press POWER on the top of your digital picture frame, the frame turns on. 2 If your frame is in slide show mode, press EXIT. The Main Menu opens. If the Main Menu is already open, go to the next step.
-
 1
1 -
 2
2 -
 3
3 -
 4
4 -
 5
5 -
 6
6 -
 7
7 -
 8
8 -
 9
9 -
10
-
11
-
12
-
13
-
14
-
15
-
16
-
17
-
18
-
19
-
20
-
21
-
22
 |
 |
